
Transitional Care Management
Table of Contents:
- Eligibility Rules
- CPT Rates
- Consent
- Add TCM Episode
- Manage TCM Episodes
- View TCM Episode
- Clinical Time Logging
- Approve Time
Eligibility Rules:
- Must be hospitalised as an inpatient
- Must have an active insurance plan
- Must be 40 years of age or older
CPT Rates:
- There are only two CPT codes available for TCM.
- Below are the details for these CPT codes, including their complexities and rates.
| CPT Code | Complexity | Rate |
| 99495 | Moderate | $218.44 |
| 94496 | High | $296.41 |
Instructions:
To add TCM, please navigate to the Patient Dashboard and select the TCM tab.
Consent:
- Please click the “New TCM Episode” button. The consent screen will appear.

- If the patient consents to receive TCM services, please select "Accepted by patient" and submit.

- You can view the Consent in Dual Languages: English and Spanish. By default, English is selected. In the section below, the selected language is Spanish.

- You may select the consent date and time manually for previous dates; however, there are restrictions for future dates and times. By default, the current date and time are displayed.

- If the patient disagrees, please click “Rejected by patient” and submit the form. This decision can be edited later if the patient would like to proceed with the service.

Add TCM Episode:
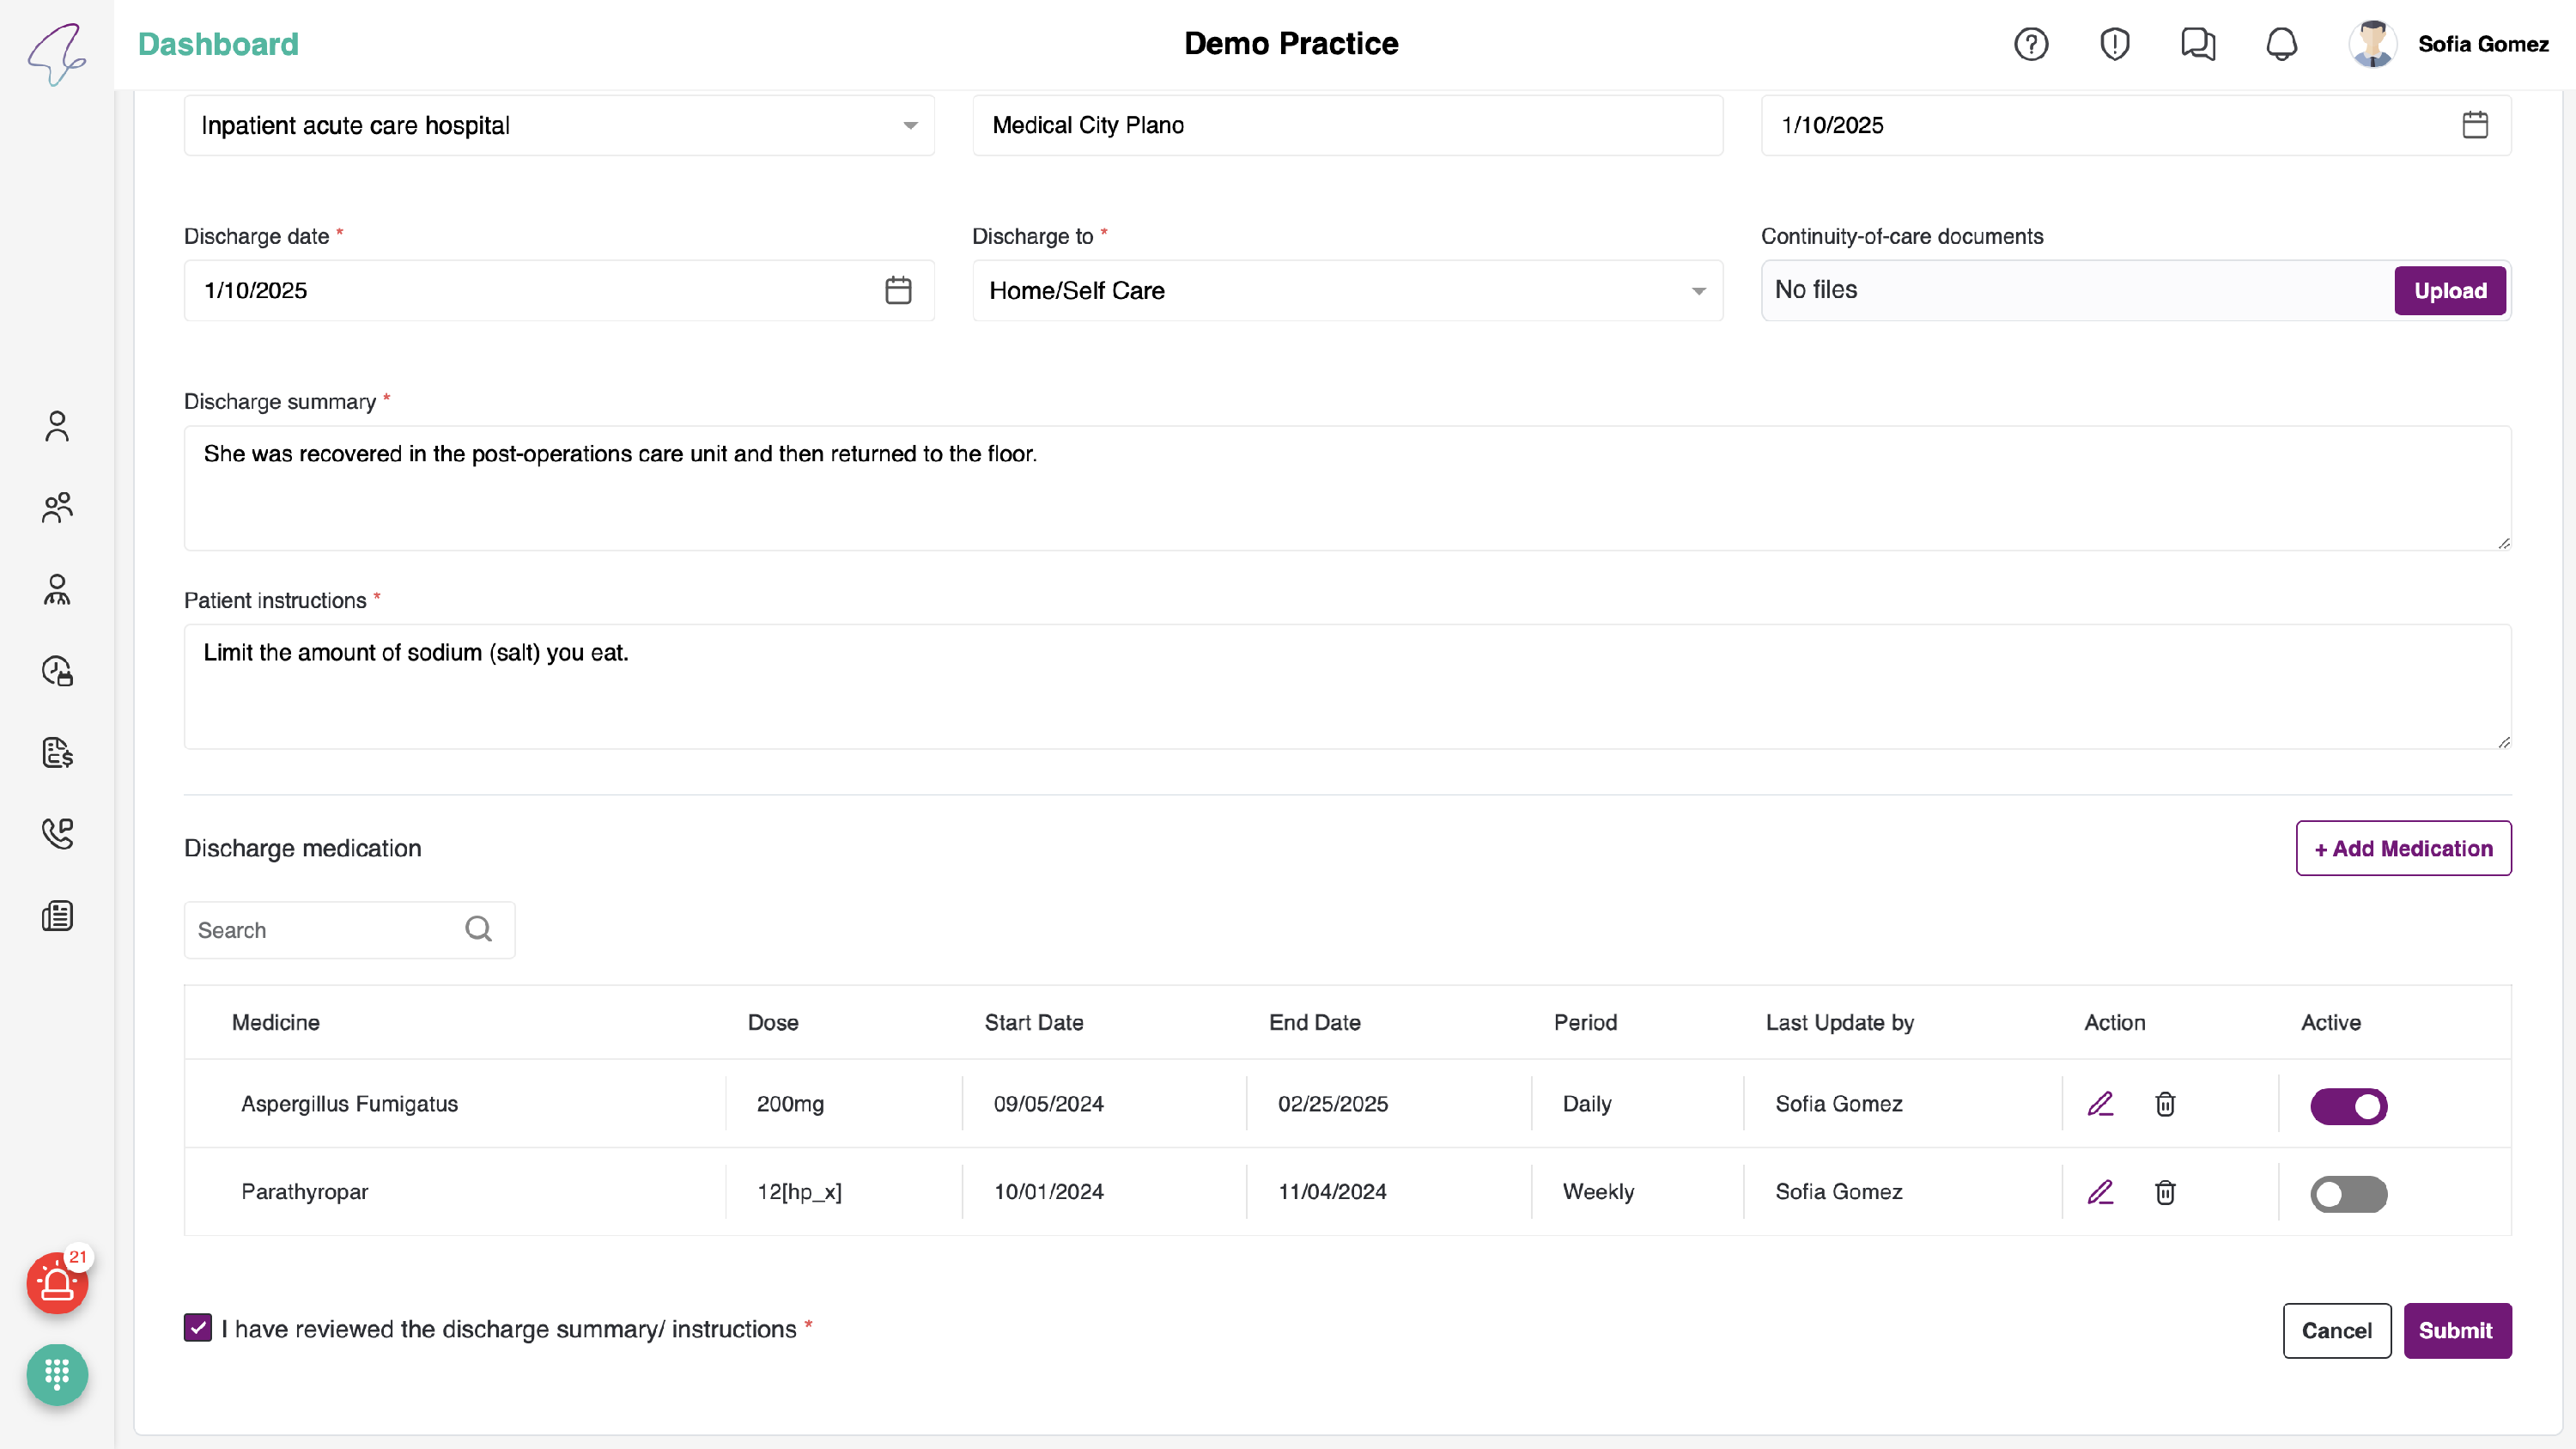
- After submitting consent, you will see the Discharge information screen (only when the consent is accepted by the patient).

- The Inpatient facility type, Inpatient facility name, and Discharge date are automatically populated.
- To add any attachments, click the Upload button in the “Continuity-of-care documents” field. You may add only one file, and it must be in .pdf or .doc format.
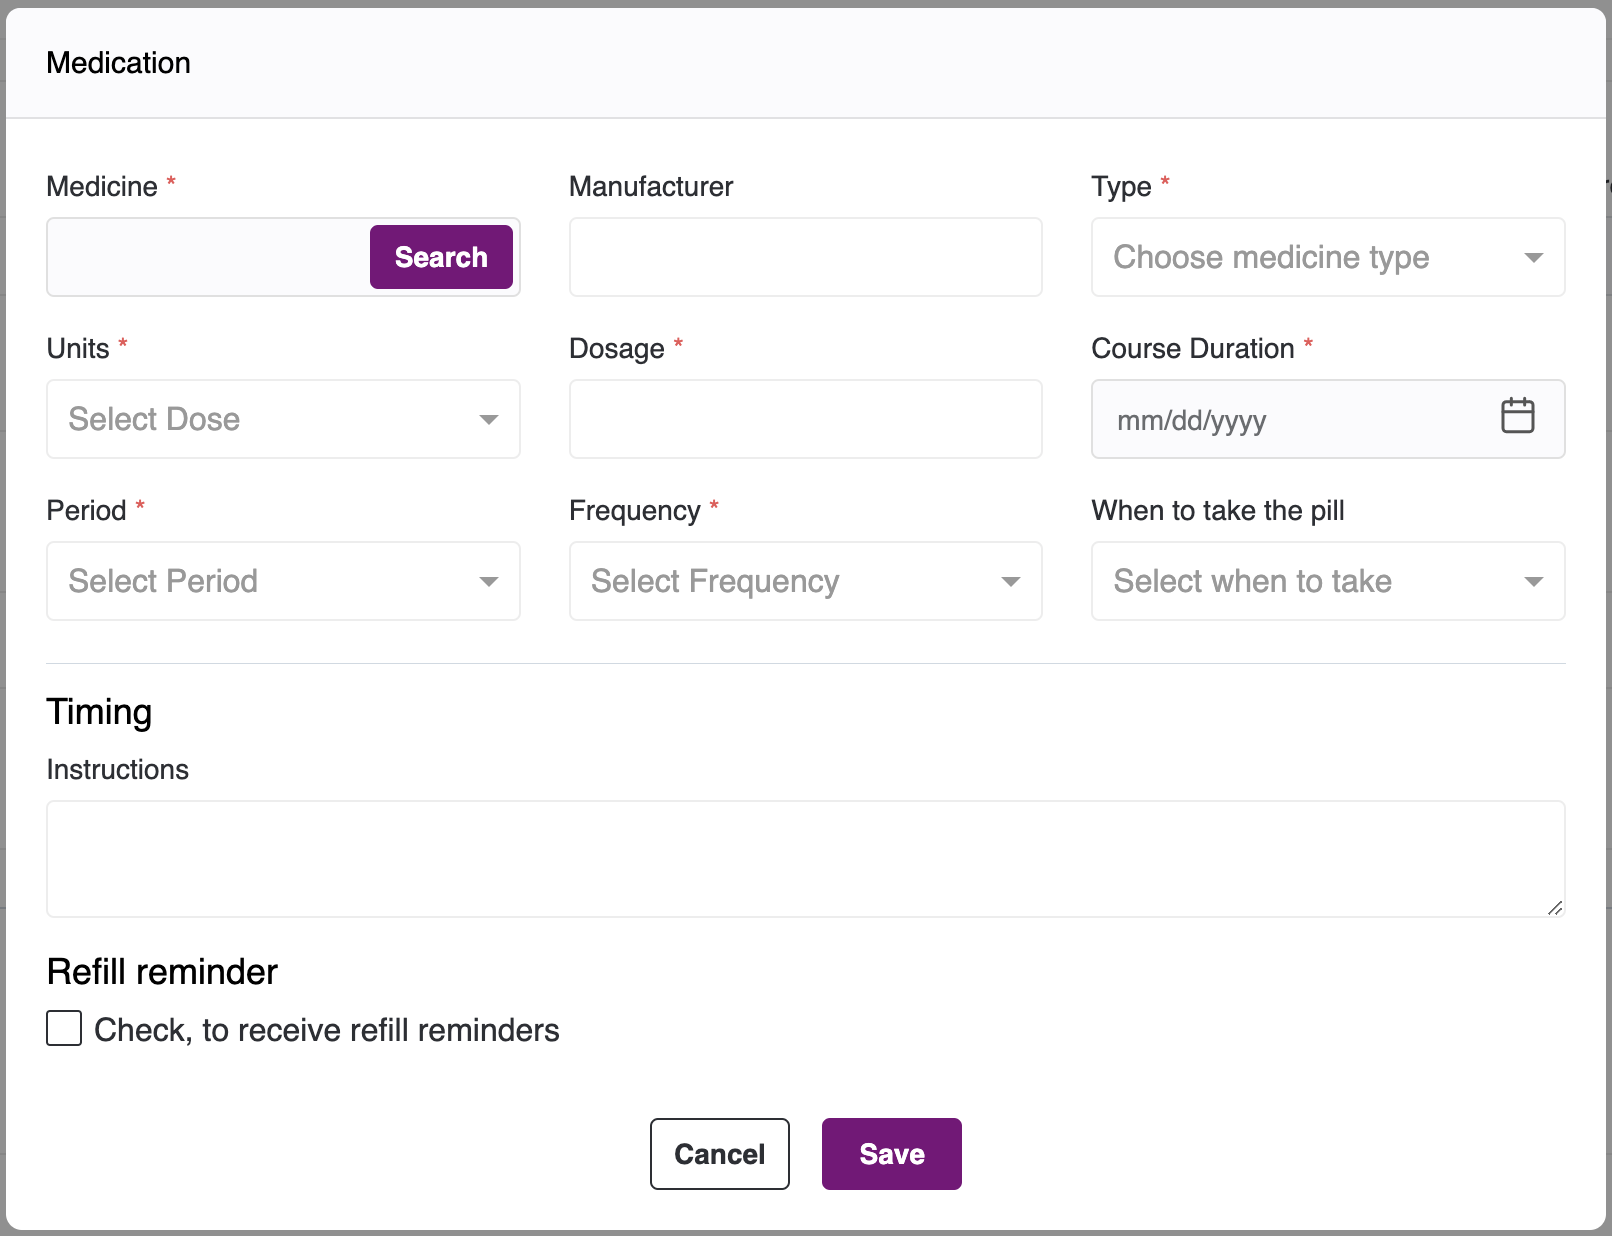
- If you need to add medications, click the “Add Medication” button. The Add Medication pop-up will appear. Search for the medication you want to add, complete the remaining medication details, and then add the medication.
- After you have completed all required fields, please select the checkbox in the bottom-left corner to confirm that you have reviewed the Discharge Summary Instructions, and then click the Submit button. The Initial Communication screen will appear.


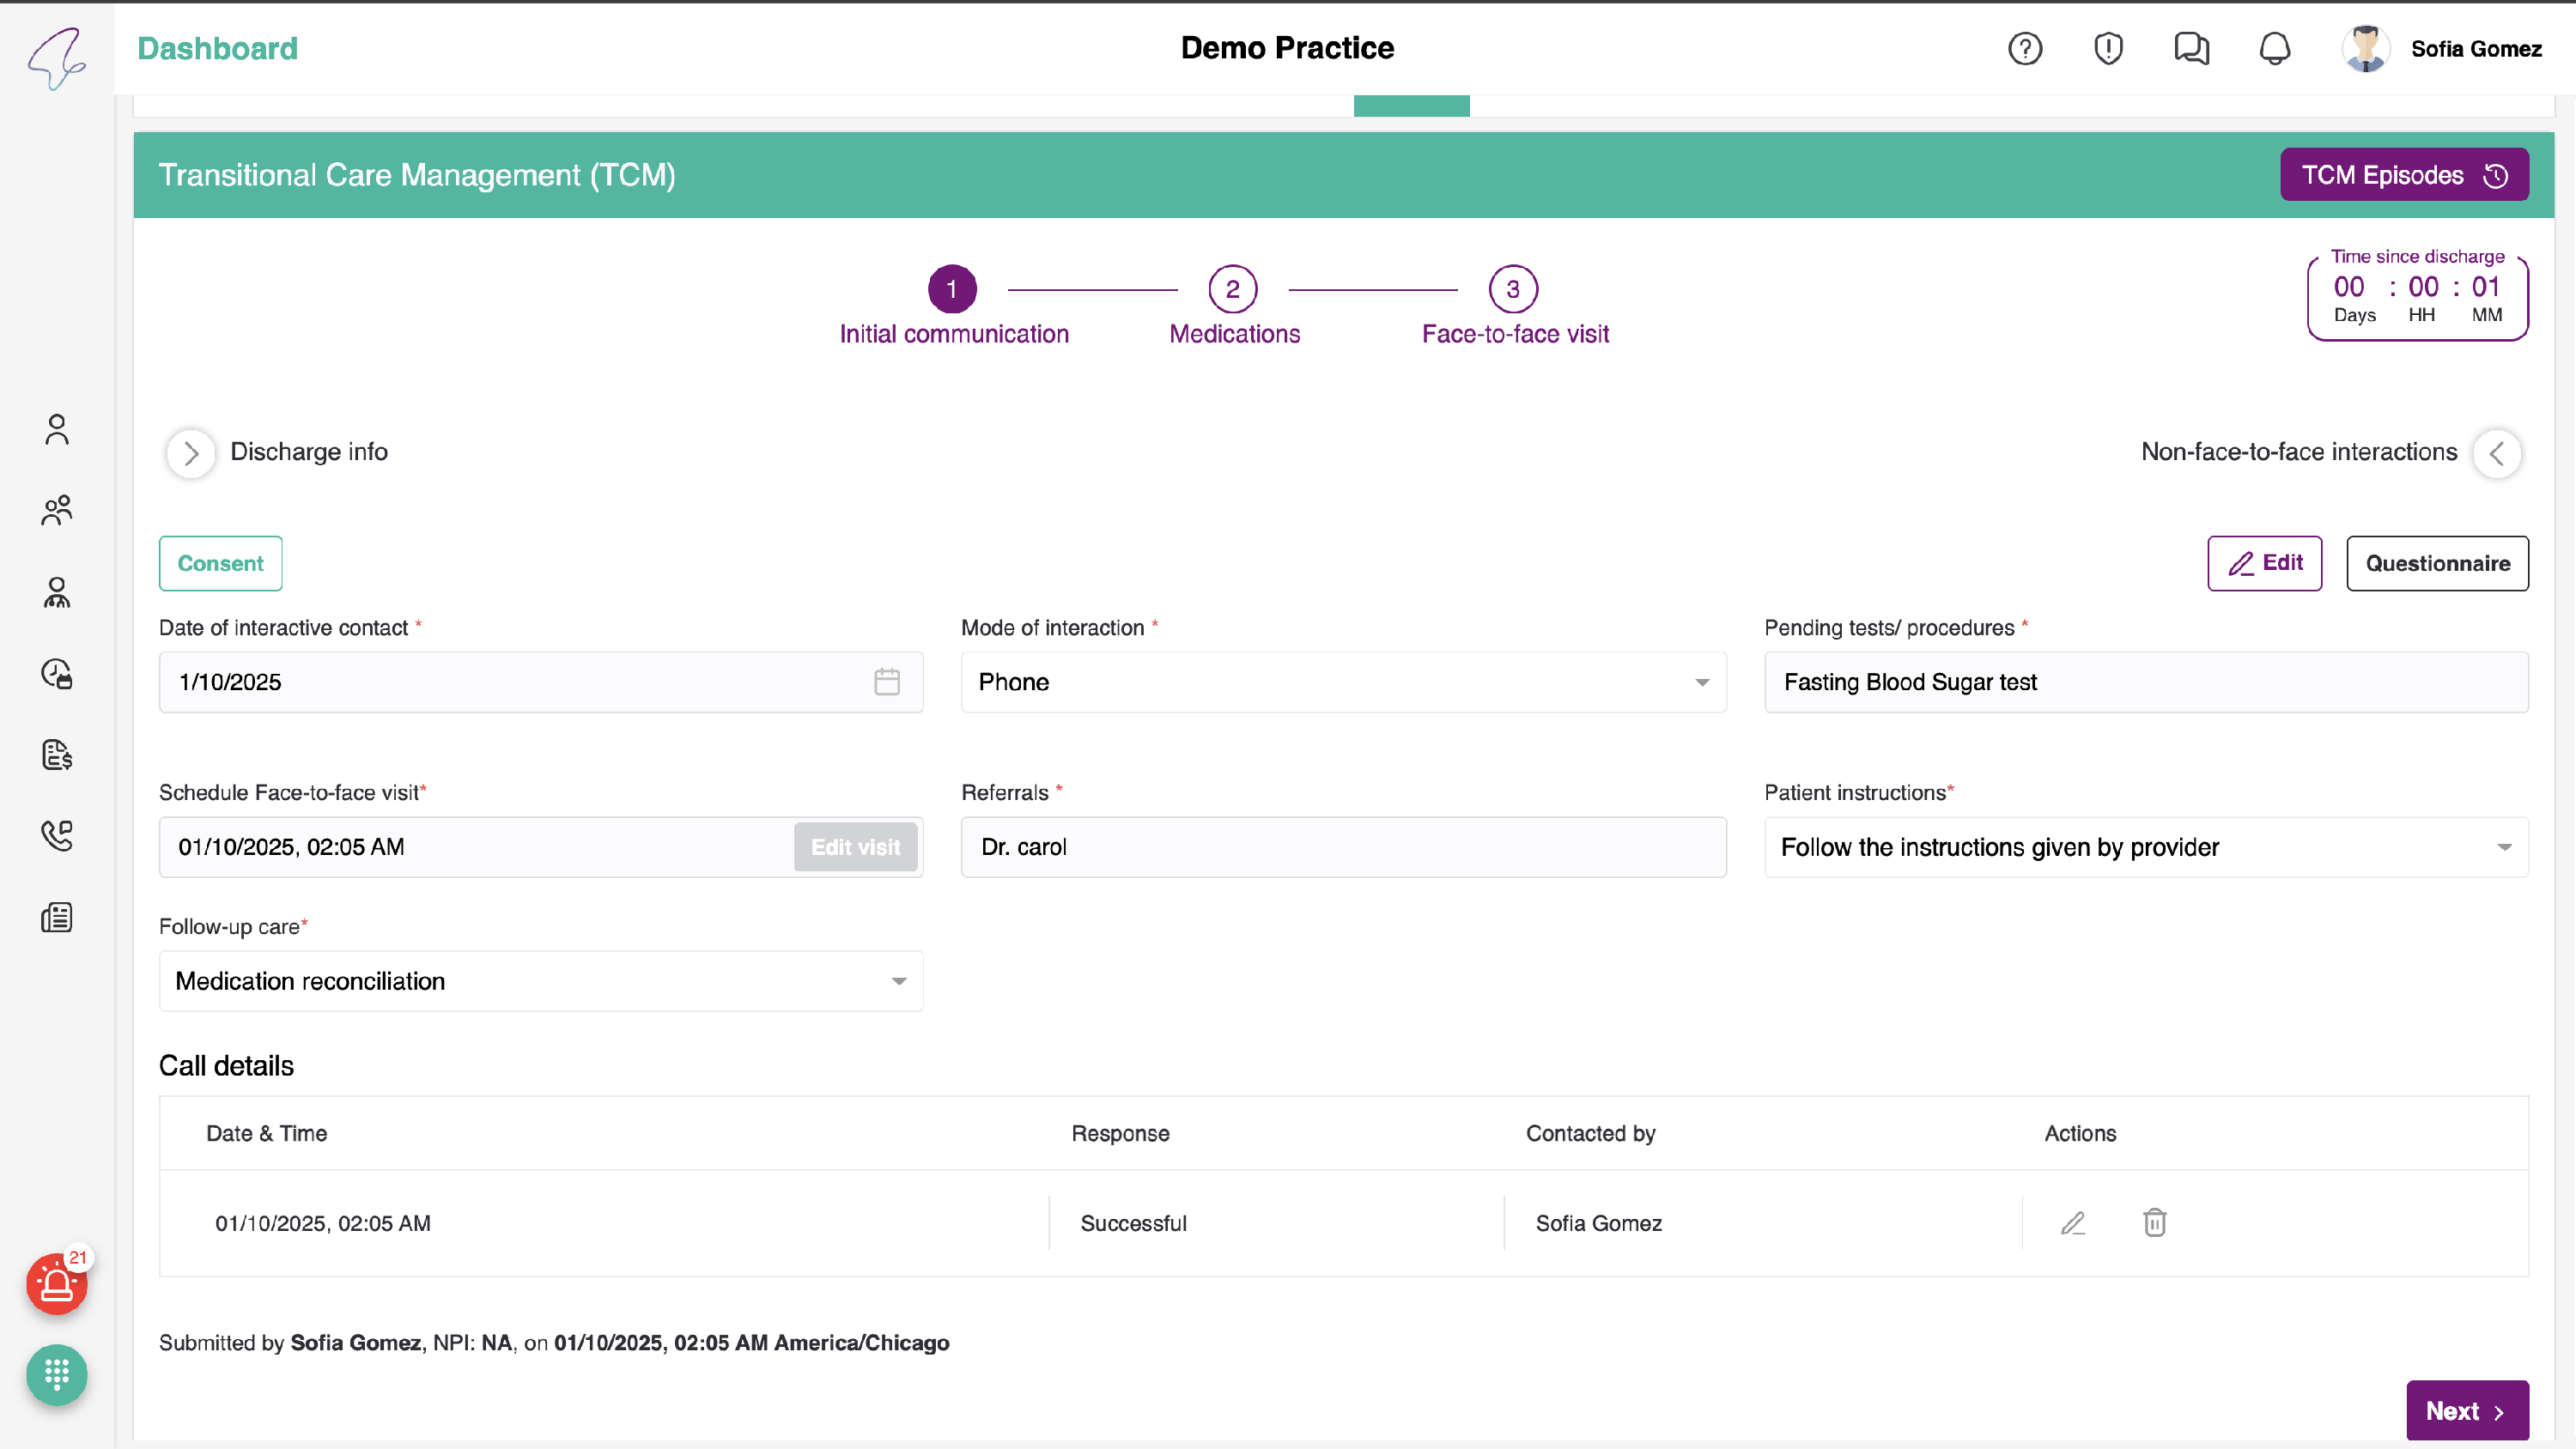
You can see the following:
- TCM Episode List (top-left): Use this to view and manage the TCM episodes.
- Discharge Info: To view the overlay, you can edit it by clicking the Edit button.
- Clock ticker (top-right): Starts counting from the date the patient is discharged.

- If there are any other calls associated with this TCM episode, please click the Add Call button and enter the information for each call.
- You may schedule a call for the F2F Visit by clicking the Schedule button. This will display a pop-up window. Please complete the required fields and then click the Save button.
- Please complete all remaining details, and select the relevant checkboxes to confirm that you have reviewed the patient information, identified the problems, and scheduled a Face-to-Face call. When finished, click Submit.

- Medication reconciliation will be displayed. You will see a table listing all active medicines. You can search for a specific medicine using the search bar located to the left, above the table, or you can add medicines by selecting the “Add Medicine” button above the table in the top-right corner.

- You can edit, delete and inactivate the medicines using the actions and toggle at the right in the table. Here, we can view the active medicines at the top and inactive medicines at the bottom.
- After making your changes, click on the Next Button to proceed to Face-to-Face Visit screen.
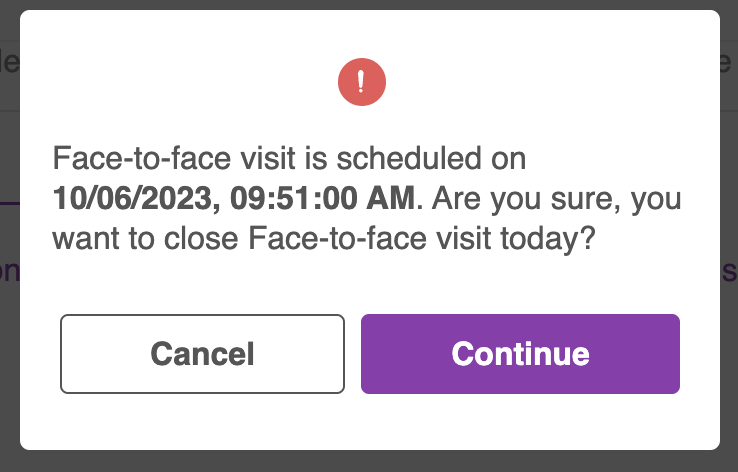
- If you try to add F2F before the Scheduled Call date, we get to see a pop-up which asks you to confirm if you still want to add F2F. You can view the date on which the Call is scheduled.
- Clicking on 'Cancel' will direct you back to Medication Reconciliation screen. And, continue button will take you to the F2F screen.

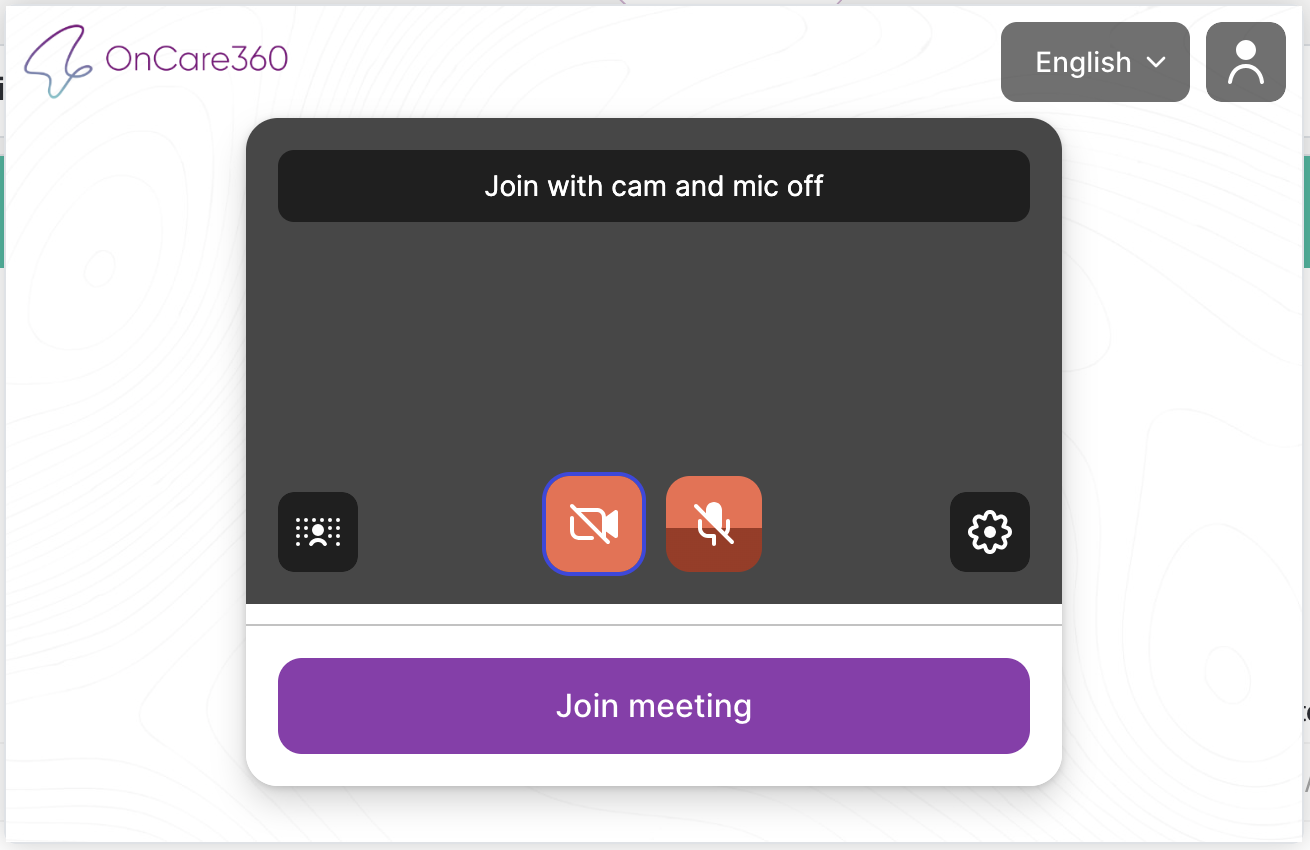
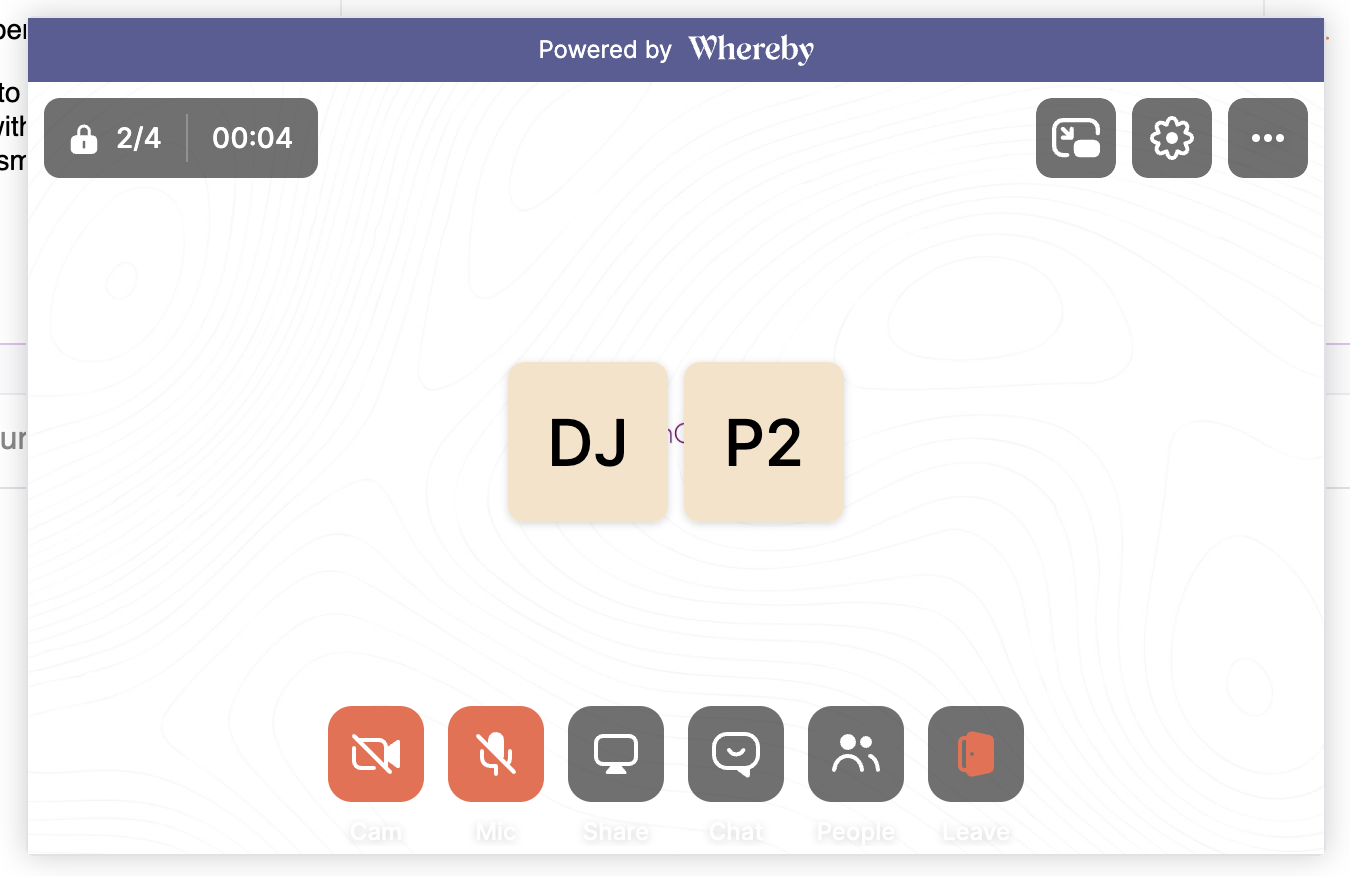
- In the top-right corner, you will find the “Call Scheduled List” button. When you click it, a pop-up window will appear, showing the list of scheduled calls along with a “Join Now” button.

- Please review this pop-up to join the meeting. Once the provider joins the call, the patient will receive an email and an SMS with instructions to join the call.
- When the patient requests to join the call, you will be prompted to admit the patient as follows:
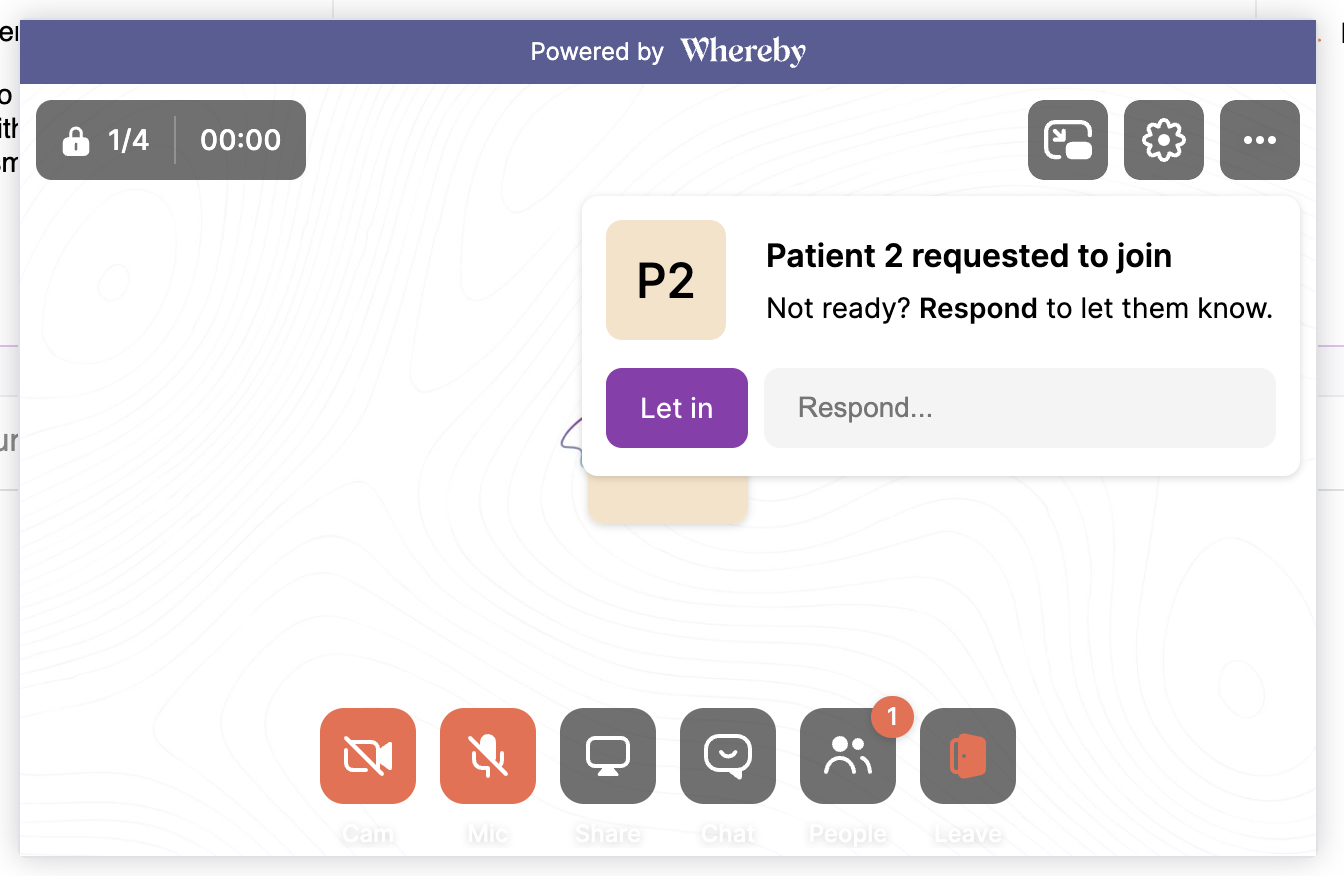
- Once both the Provider and the Patient have joined the call, the timer on the left will start. At that point, you may turn the PIP on.
- Fill all the details, below in the Notes section, Assessment field will get the patient's diagnoses populated.
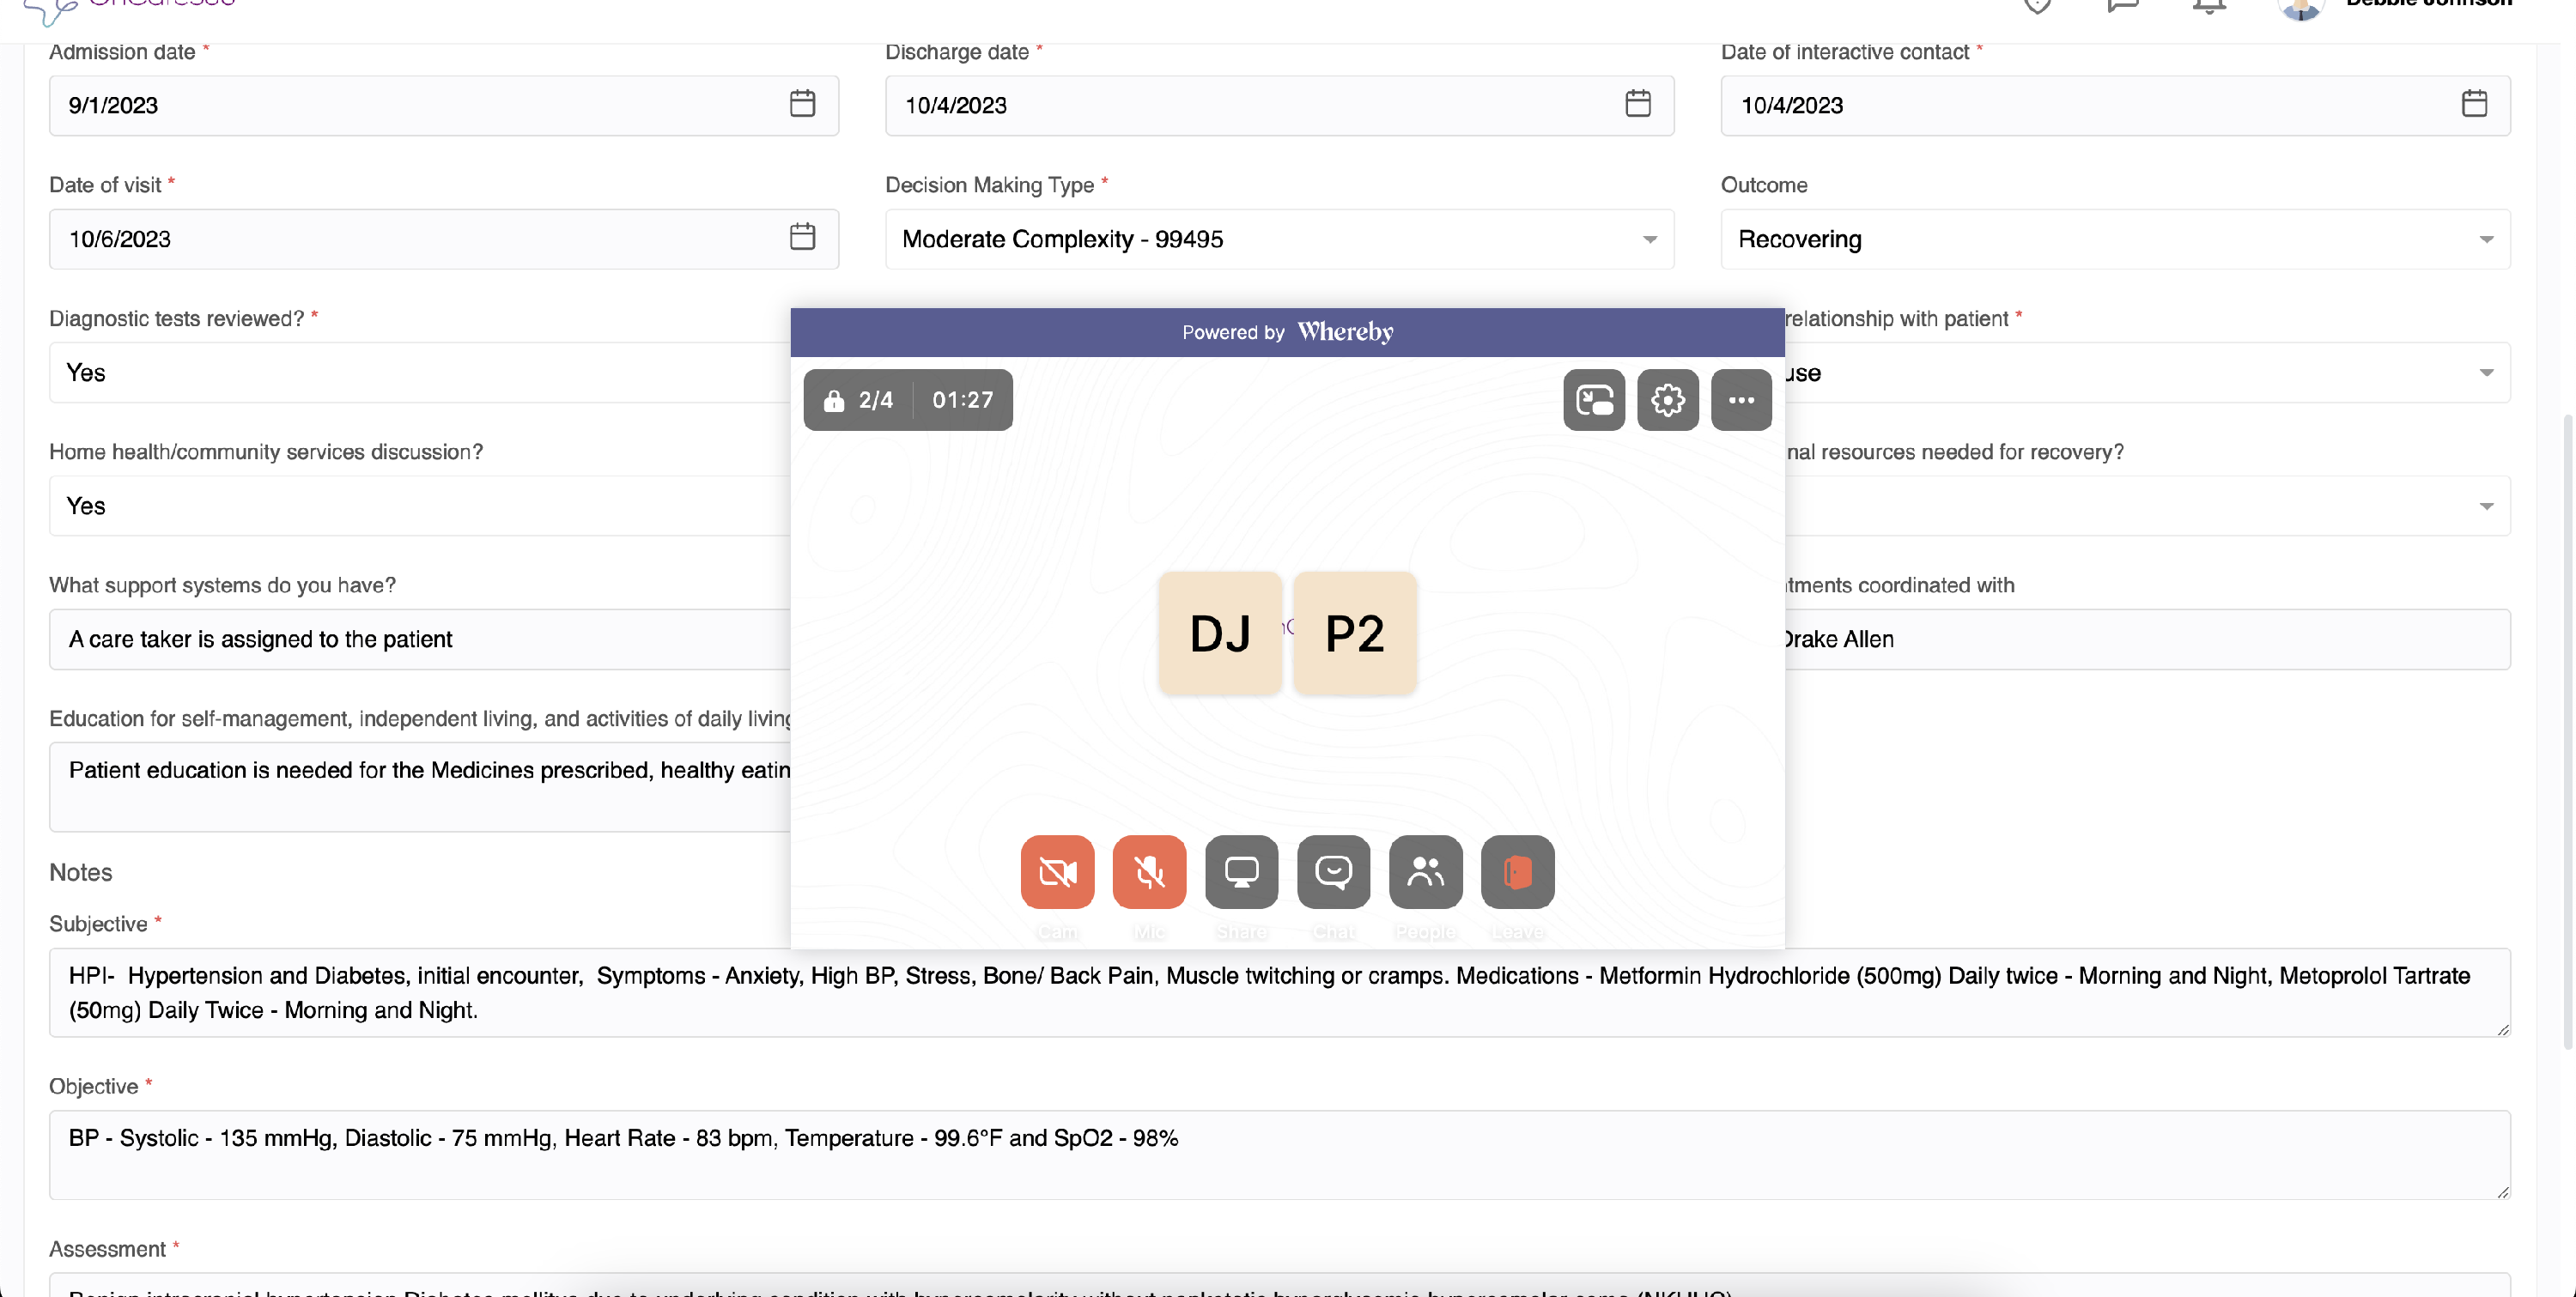
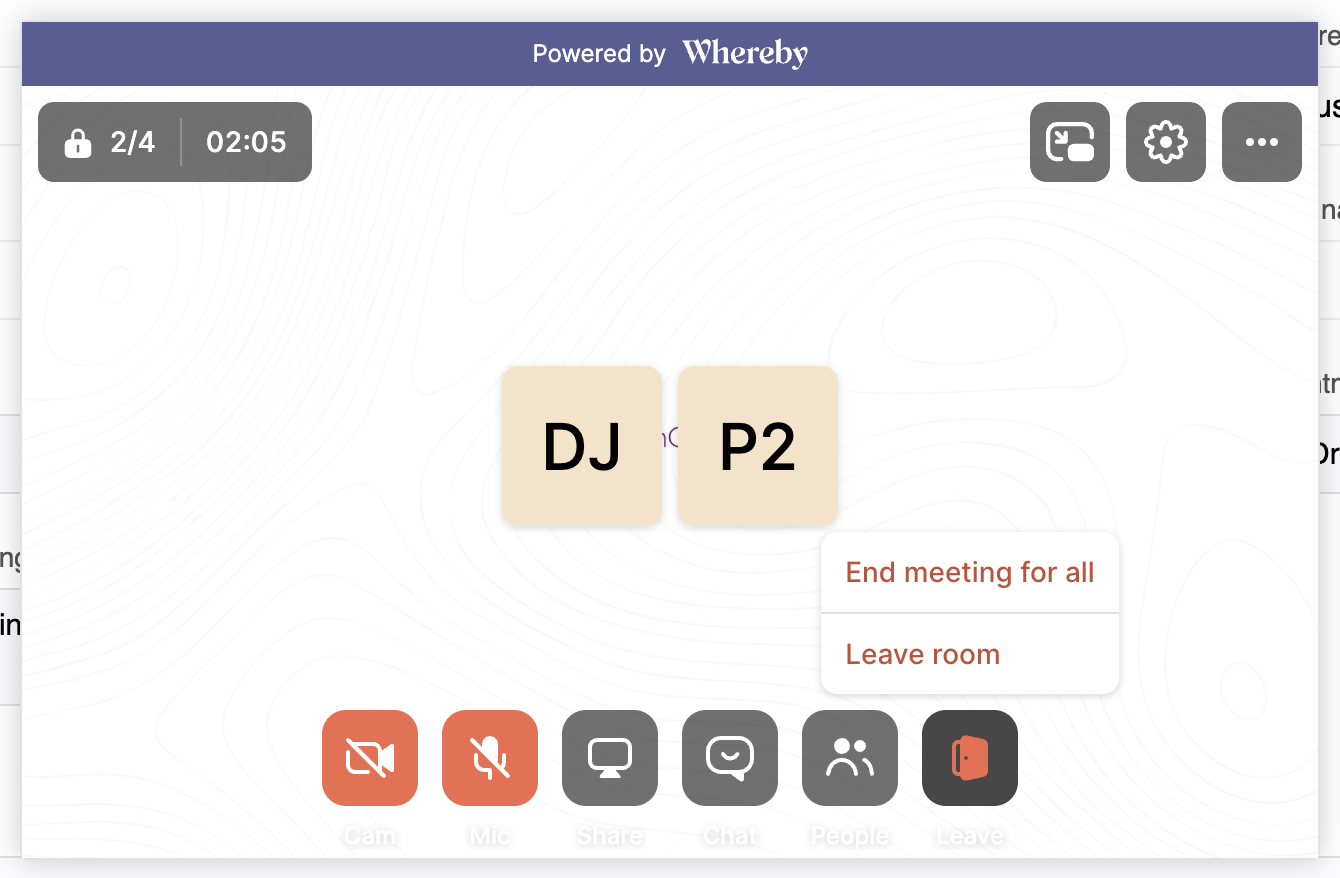
- After you enter the required details, please select the checkbox confirming that the information is accurate. Then end the call and submit. The entire TCM episode will be submitted.
- You can find the “Non Face-to-Face Interaction” button in the top-right area, directly below the Clock Ticker.

- Please click the “Add Interaction” button in the overlay. This will redirect you to the Non-Face-to-Face Interactions page.

- Please enter the required details, check the box to confirm that the information provided is accurate, and then submit.

- Any submitted non face-to-face interaction will be treated as “Interaction 1.” You can add additional interactions by clicking the “Add Interaction” button.

Note: Every time the Provider or Program Coordinator makes a change, the information will be updated and can be viewed at the bottom of the page, above the Previous button. All pages will also include Previous and Next buttons to enable navigation.
Manage TCM Episodes:
- With the TCM episode now added, you can navigate between the three sections: Initial Communication, Medication Reconciliation, and Face-to-Face Visit.

- You can view the list of TCM Episodes in the top-right as follows:

- We can confirm that there is only one active TCM episode for this patient. In addition, two buttons are available: Close episode and Discontinue episode.
- To discontinue the TCM episode, click the Discontinue button. You will see a pop-up window as shown below:
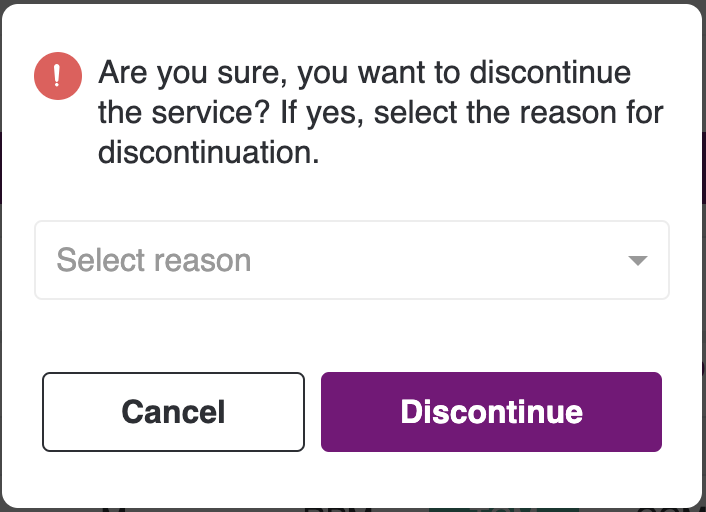
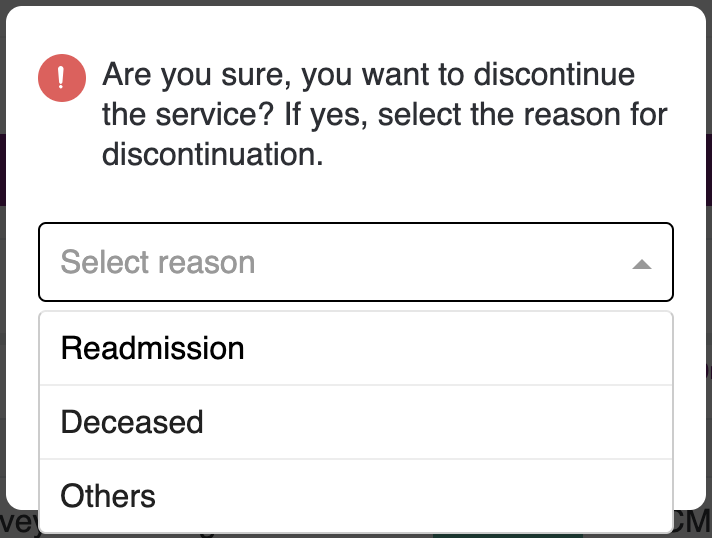
- You can select the reason for discontinuing the TCM Episode from the dropdown list Readmission, Deceased, or Others and then click the Discontinue button

- The TCM episode has been discontinued and can only be viewed, not edited.
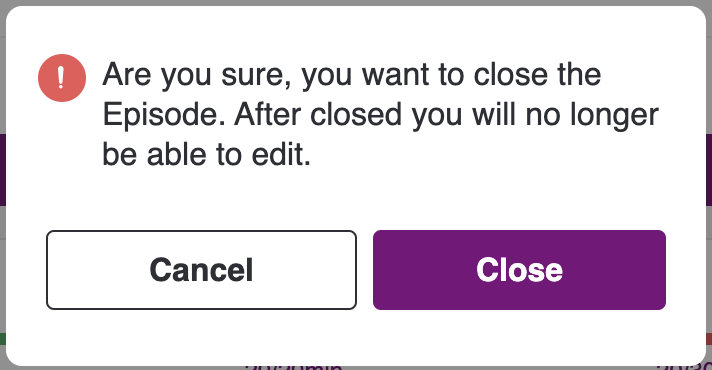
- You can also close the episode. To do this, click the Episode list option on the left, where you will see the “Discontinue this Episode” option.

- You will see the following confirmation pop-up. Clicking the Close button will close the episode, and the episode can be viewed only (not edited). If you click Cancel, you will be redirected back to the episode.
- To add a new TCM Episode, click the “TCM Episode” button on the left. You will then be able to view the “Add Episode” button.

Note:
- On clicking the "Add Episode", we have the same application flow. From taking Consent till F2F Visit.
- You can only have one active TCM Episode at a time.
View TCM Episode:
- To edit the details, click the Edit button in the top-right corner. You will then see the screen where you can make your updates. Once you are finished, click the Update button to submit your changes, or click Cancel to discard them.
- On the Medication Reconciliation screen, you can edit or delete medicines using the action buttons in the table. To end the course duration or if the medicine is no longer required for the patient, please use the toggle to inactivate the medicine.
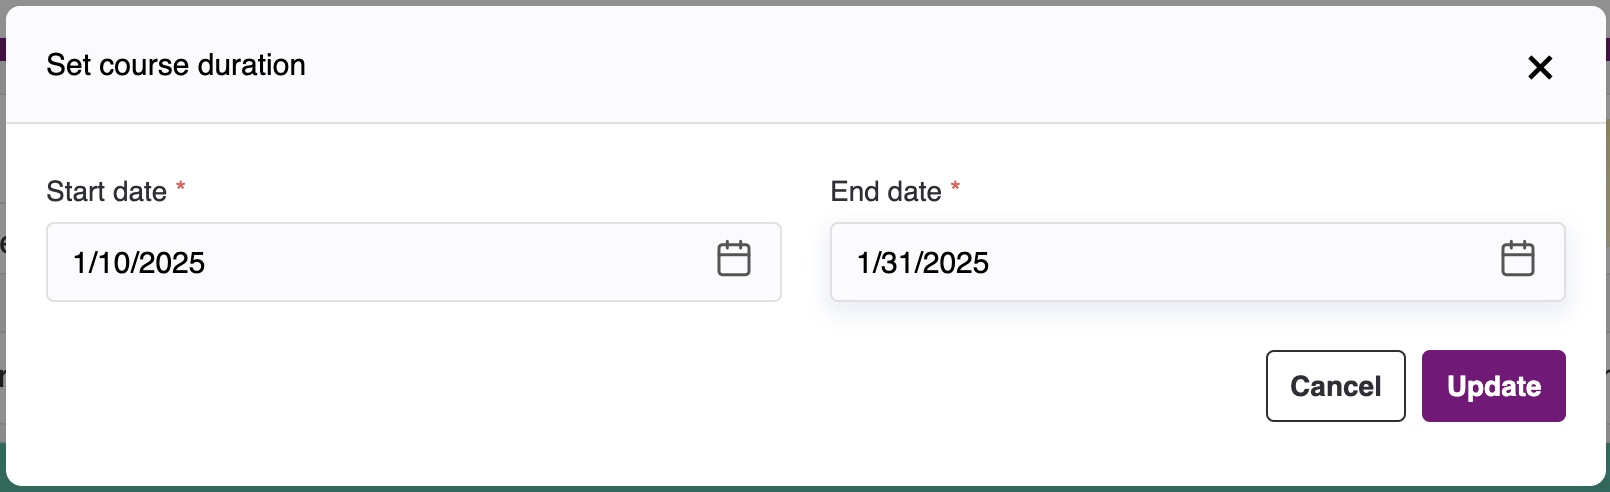
- If you would like to make the medicine active again, you will need to set the Course Duration again as follows. After you set the End Date, click the Update button.
- Going forward, in Face-to-Face visit, click the Edit button on the right to enable editing.
- By clicking the Edit button, you can edit the TCM Face-to-Face Visit section. After you make your changes, click Submit Changes to save and update the information.
- You can view Consent, Discharge Info, and Non Face to Face Interaction across all sections, and view the Questionnaire in the Initial Communication section.
- You can edit Discharge Info by selecting the Edit button.
- It will redirect to Discharge Info Screen, you can view the following screen. Once you make your changes, click on the Submit Changes button to save the changes you made.
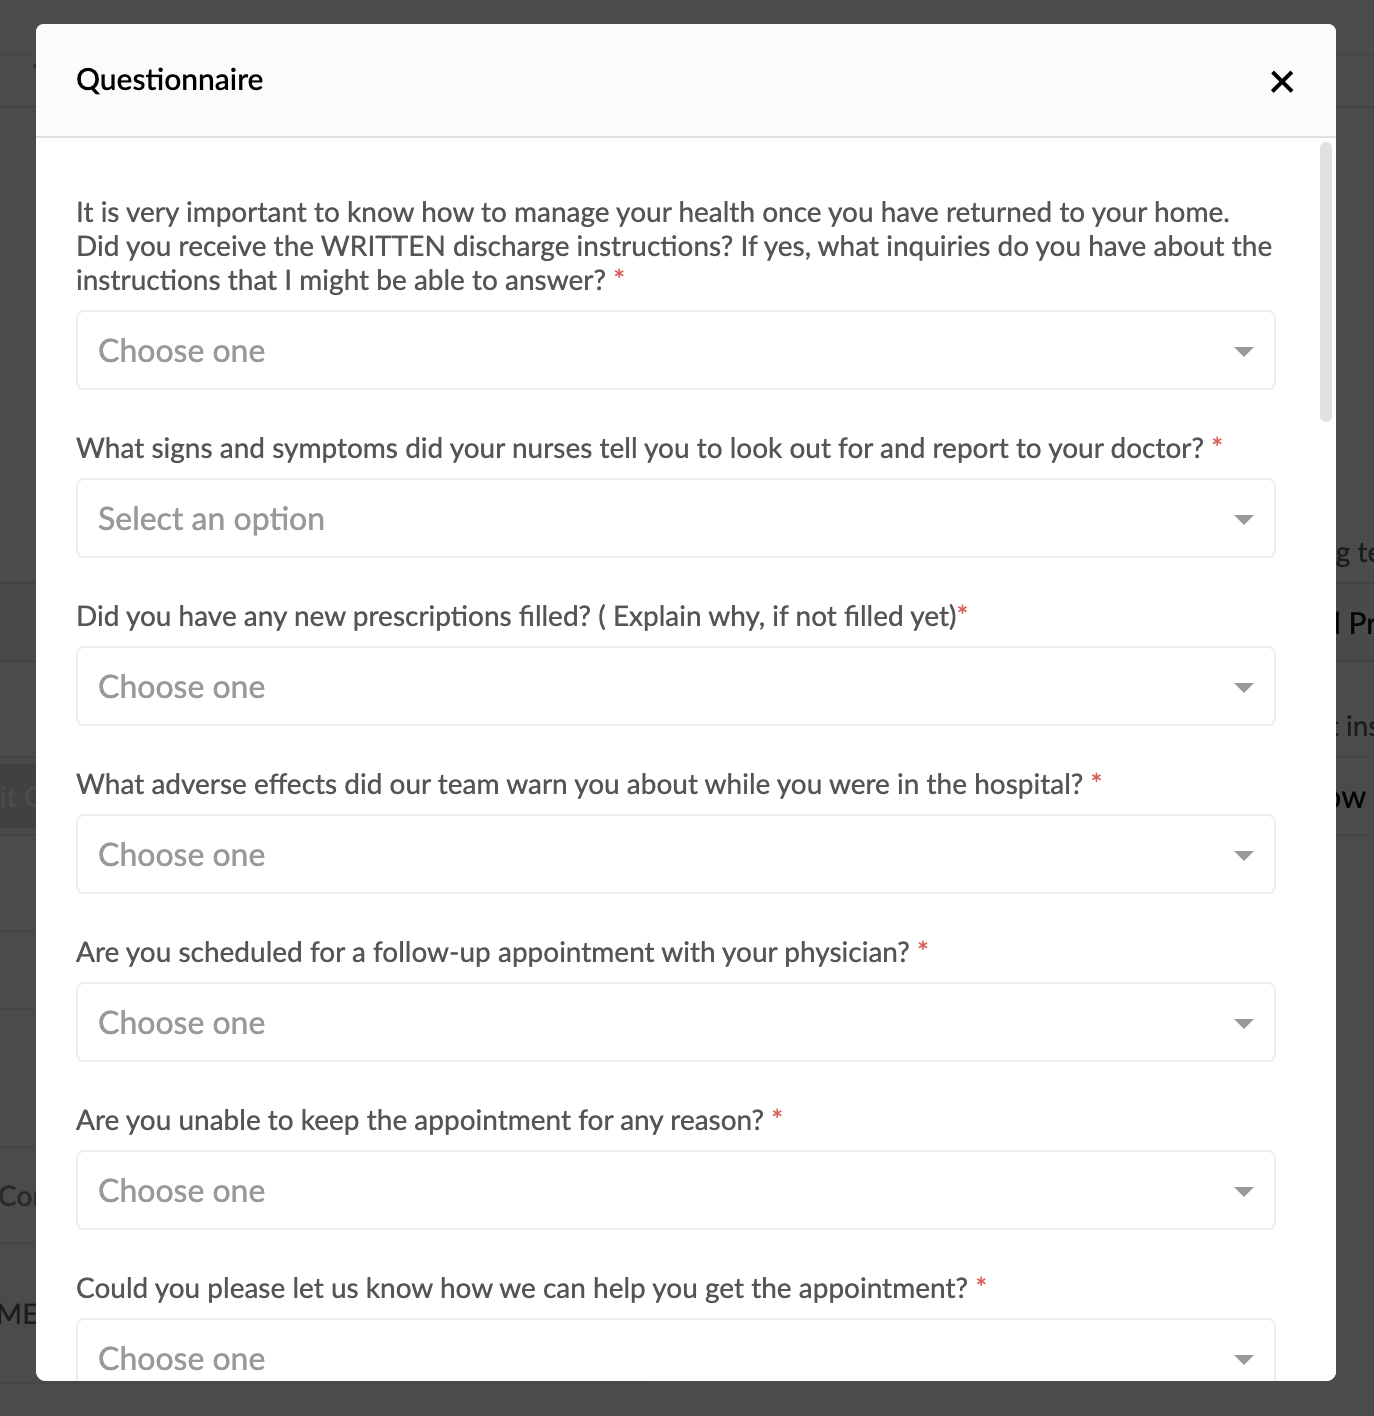
- To submit Questionnaire, click on the Questionnaire button at the top-right in Initial Communication, you can see the following pop-up. Once you enter all the details click Submit Button.
- Submitted Questionnaire can be viewed but not edited.
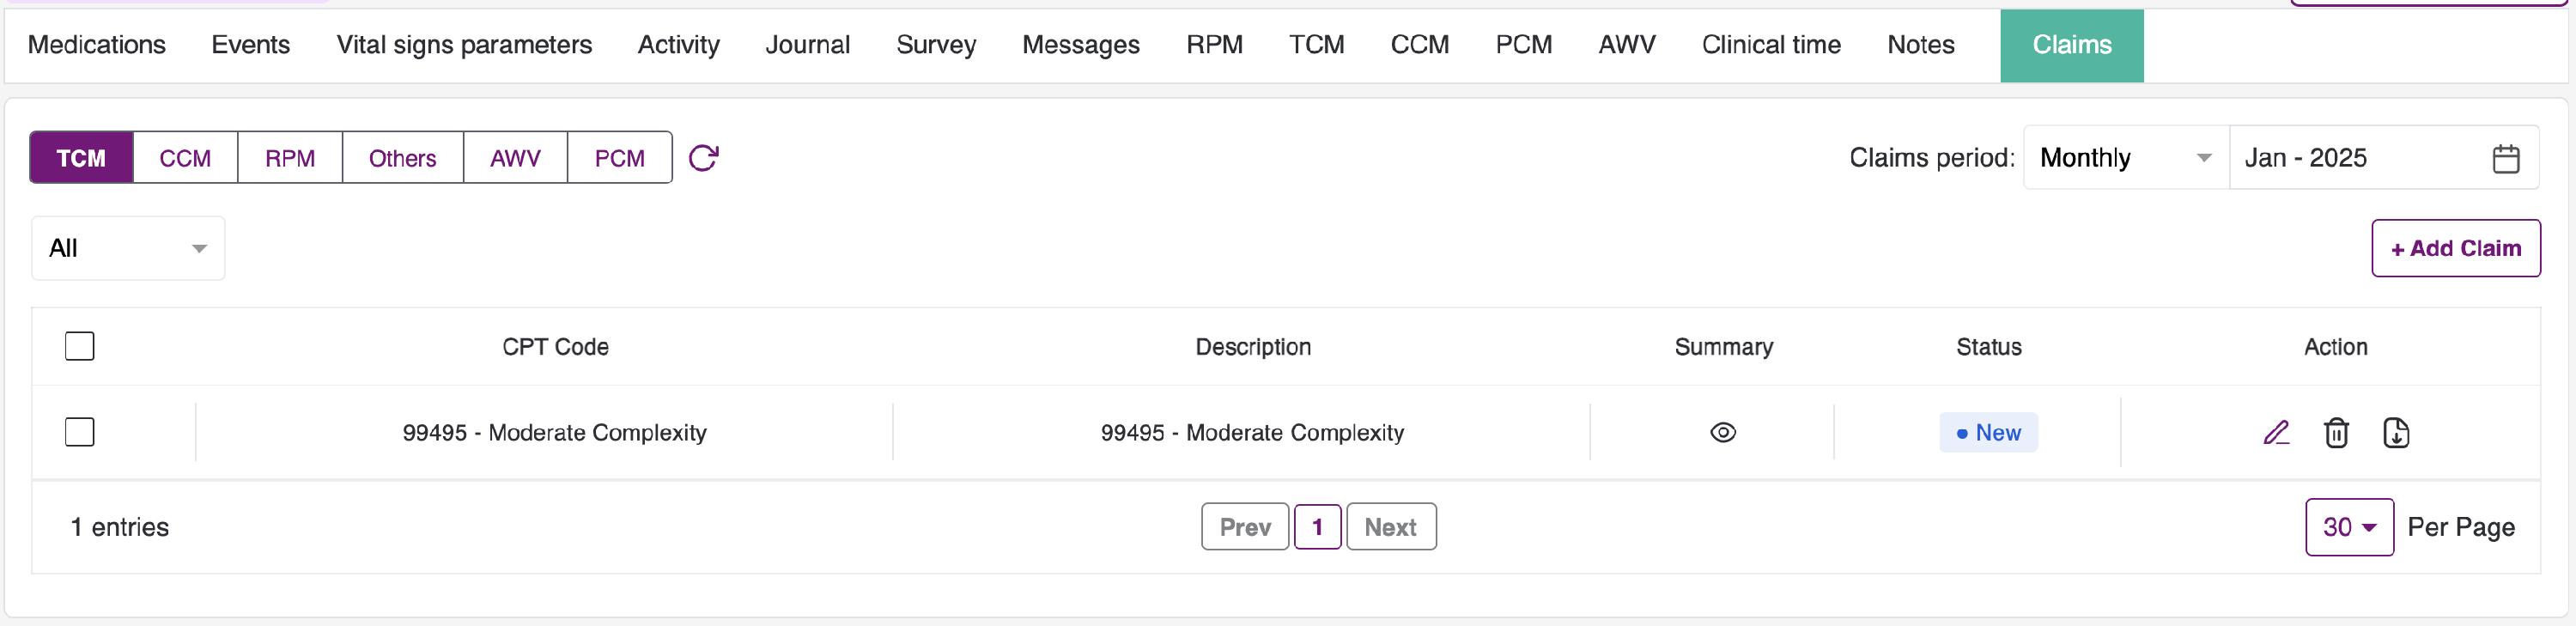
Clinical Time Logging:
- To view the Clinical Time Logging (Billing) for TCM, go to the Patient Dashboard and click on the Clinical Time Tab. Following screen can be viewed.

- There are 4 sub tabs - RPM, CCM, Others and TCM, billing logs for each program. Click on TCM tab.
- Clicking on RPM, CCM, TCM and Others tab, will display calls list with checkboxes for each row with details as follows:
- CPT code
- Time
- Interactive contact date
- Face-toface visit date
- Topic
- Summary
- Status
- Action
- CPT codes are different for all types i.e., RPM, CCM, and TCM. CPT codes for all reimbursement types are different.
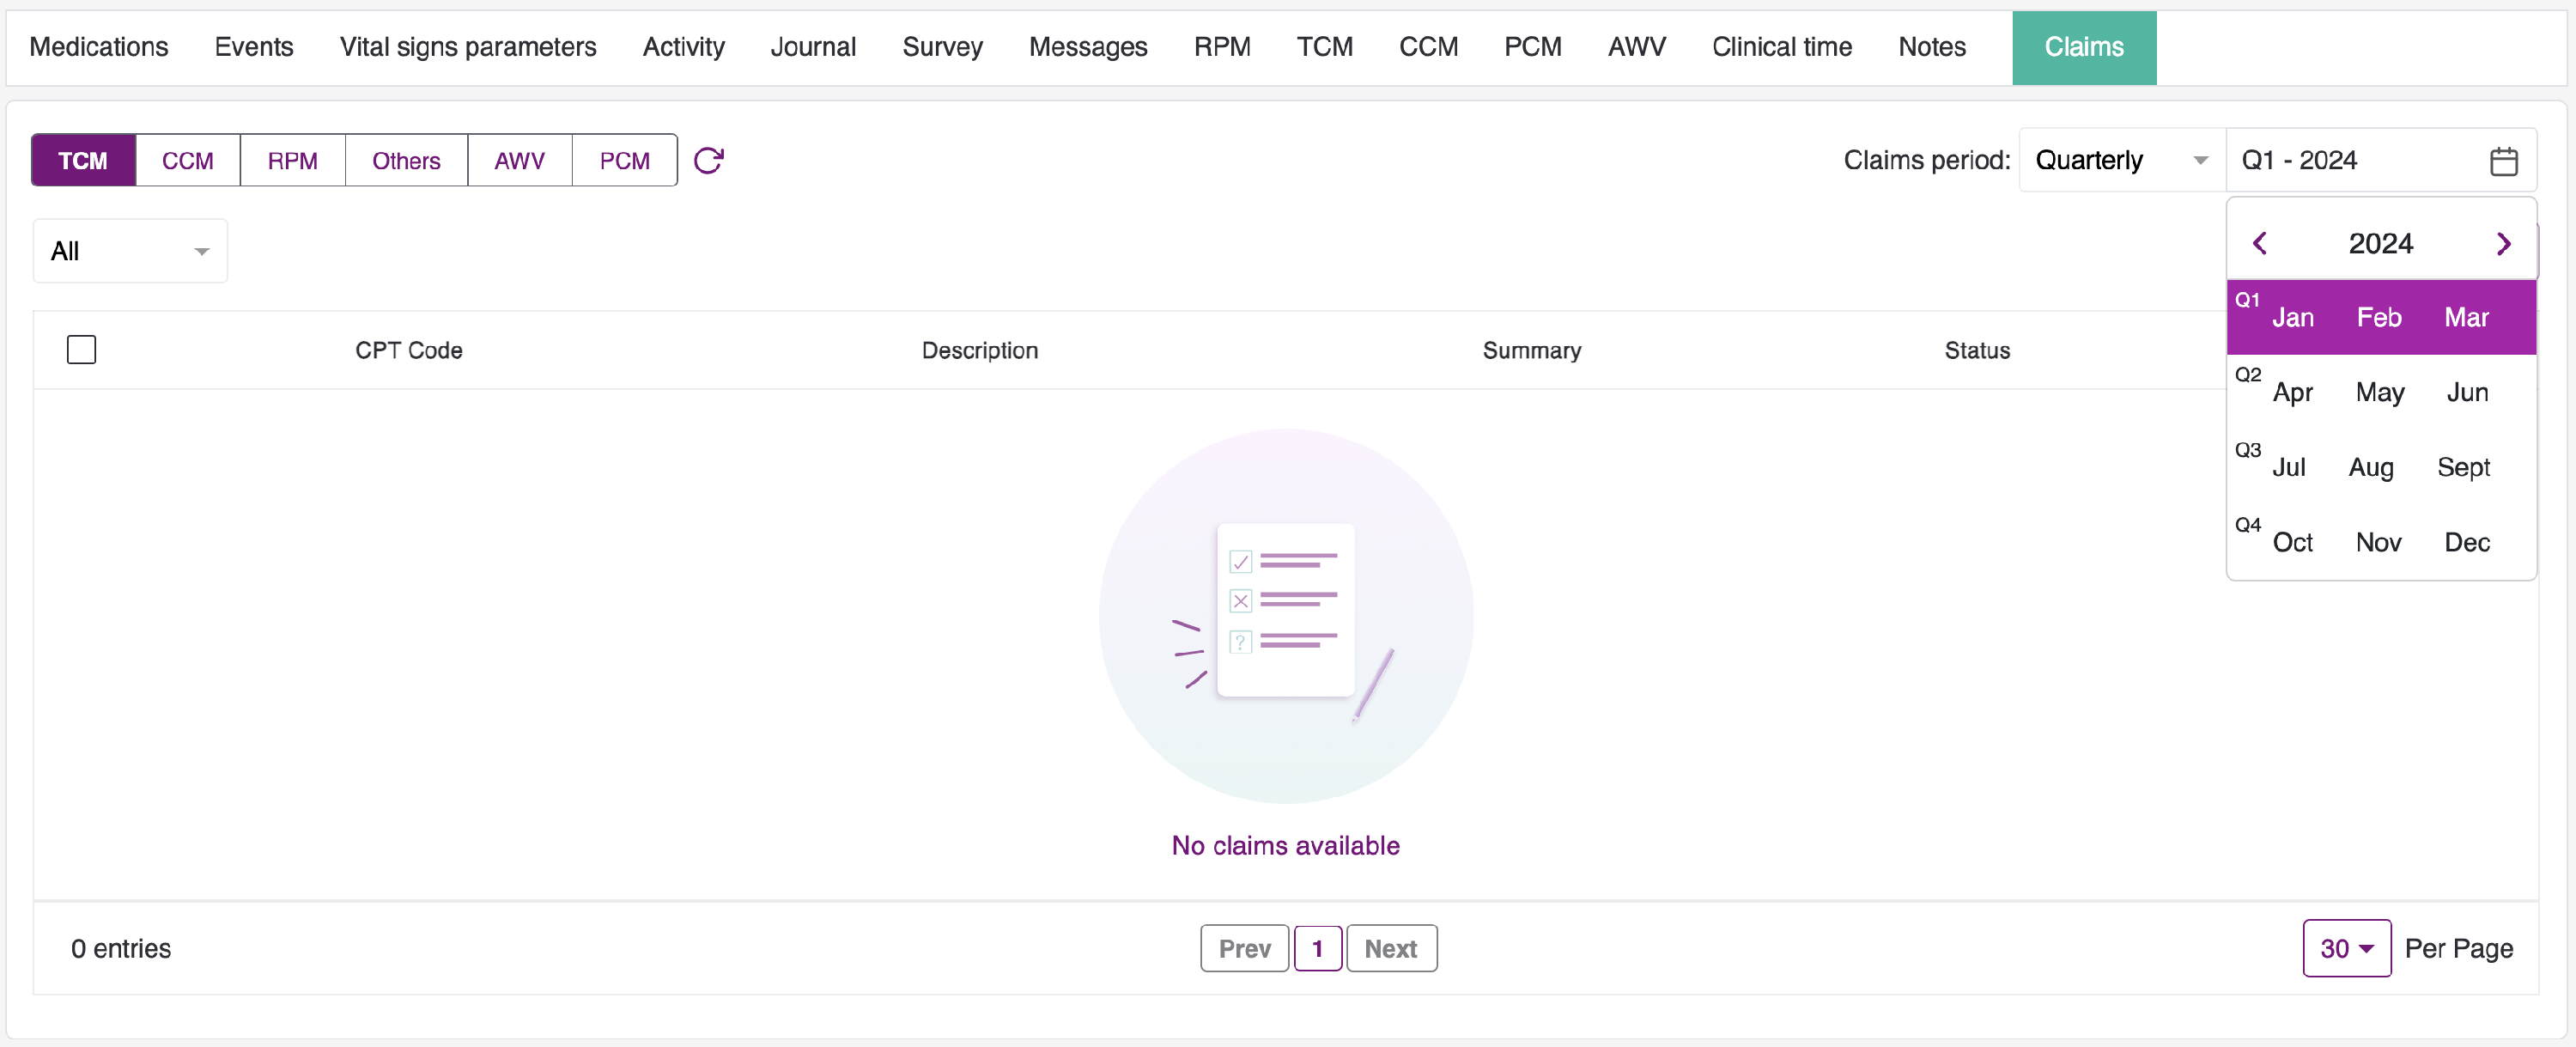
- Billing Period - By default, we have the Monthly filter selected, and the month will be the previous month. We also have a Quarterly filter.
- If Monthly is selected, then we can select the Month from the picker.

- If the Quarterly is selected, we can select the Quarter. On selection, we can view the Bills accordingly.
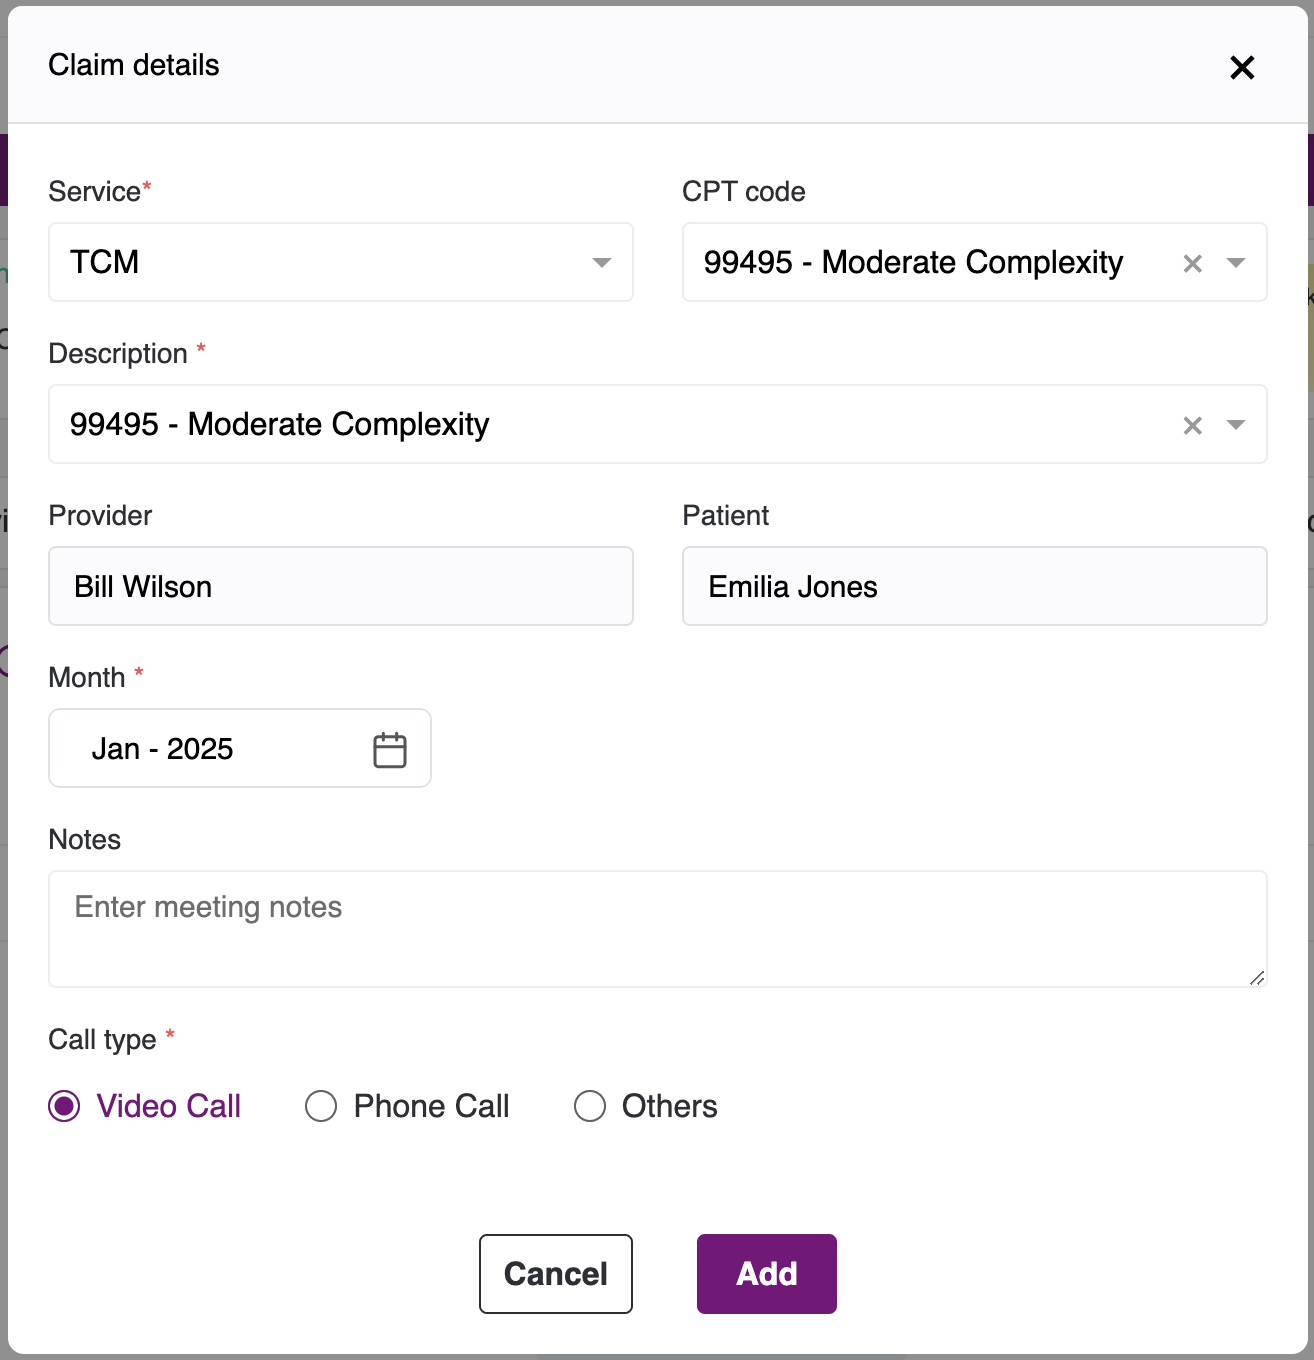
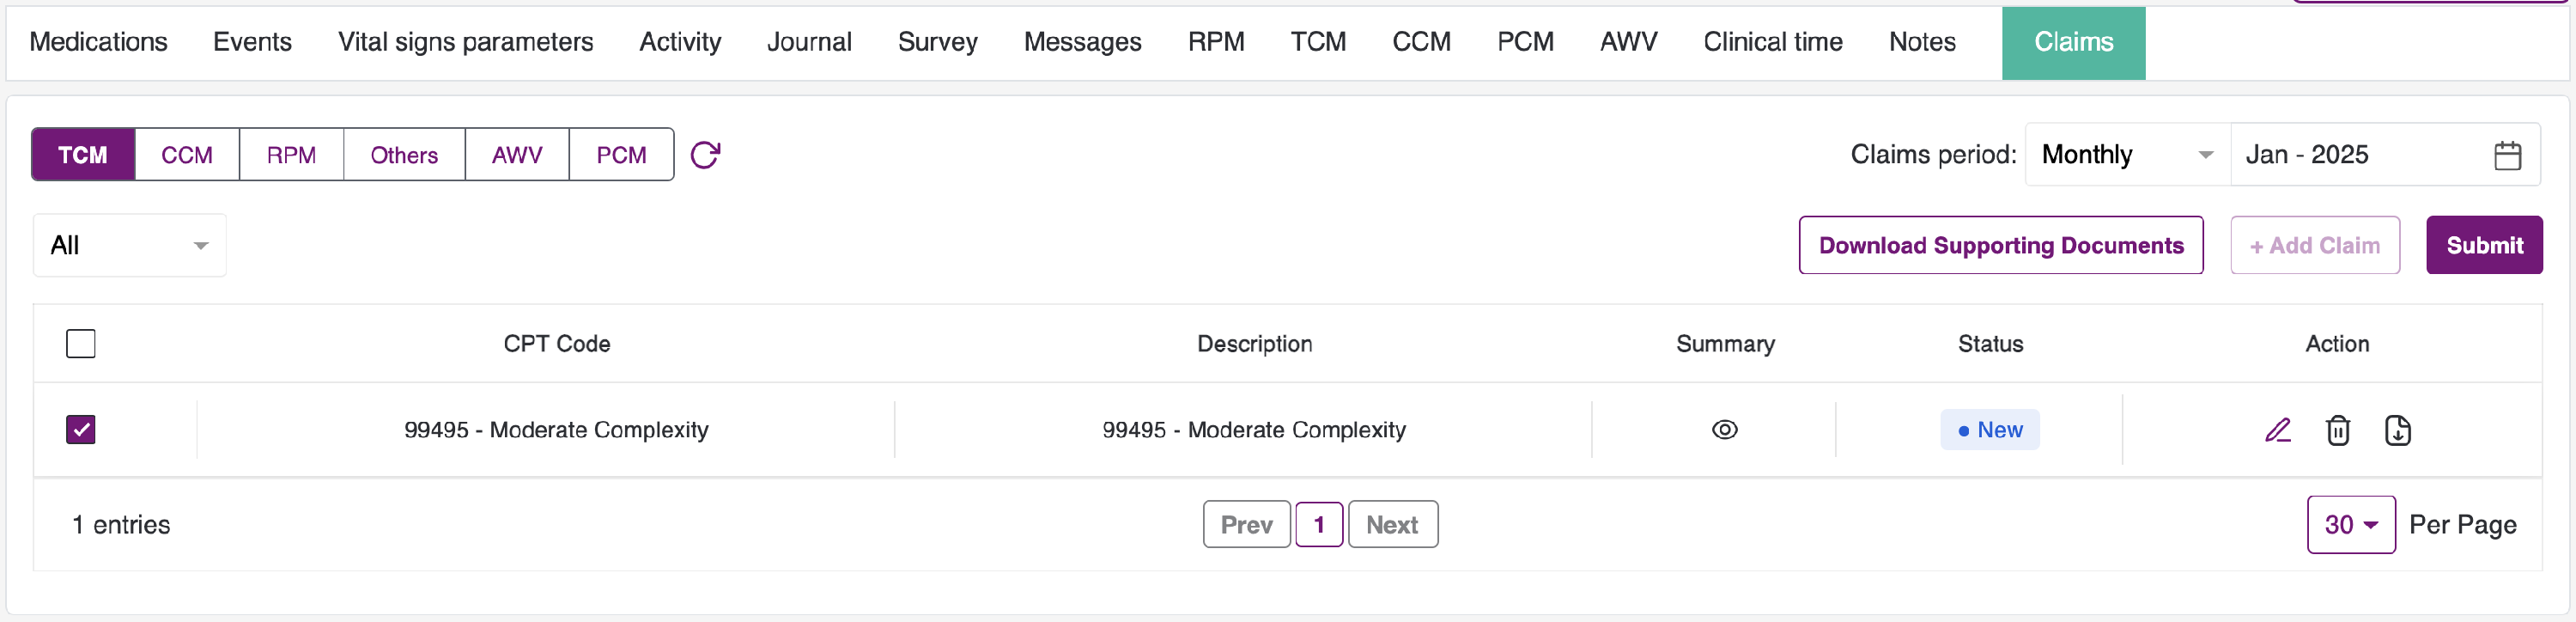
- User can use the Add Row option to add a row in the given list with entering the details like Billing Type, CPT code, topic, Provider, Patient, Date, Start Time, End time, Meeting Notes and call type.
- To edit the call details click on the Edit icon in Action, allows user to edit the details like Billing type, CPT code, topic, Date, Provider, Meeting Notes, call type for selected row in the list.
- User can select the calls from the list and click on Submit.
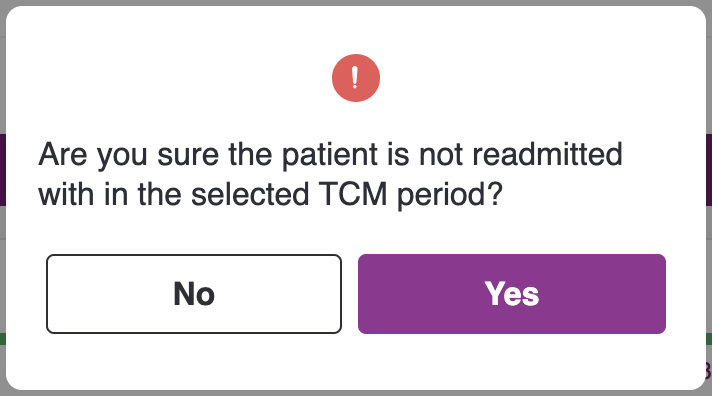
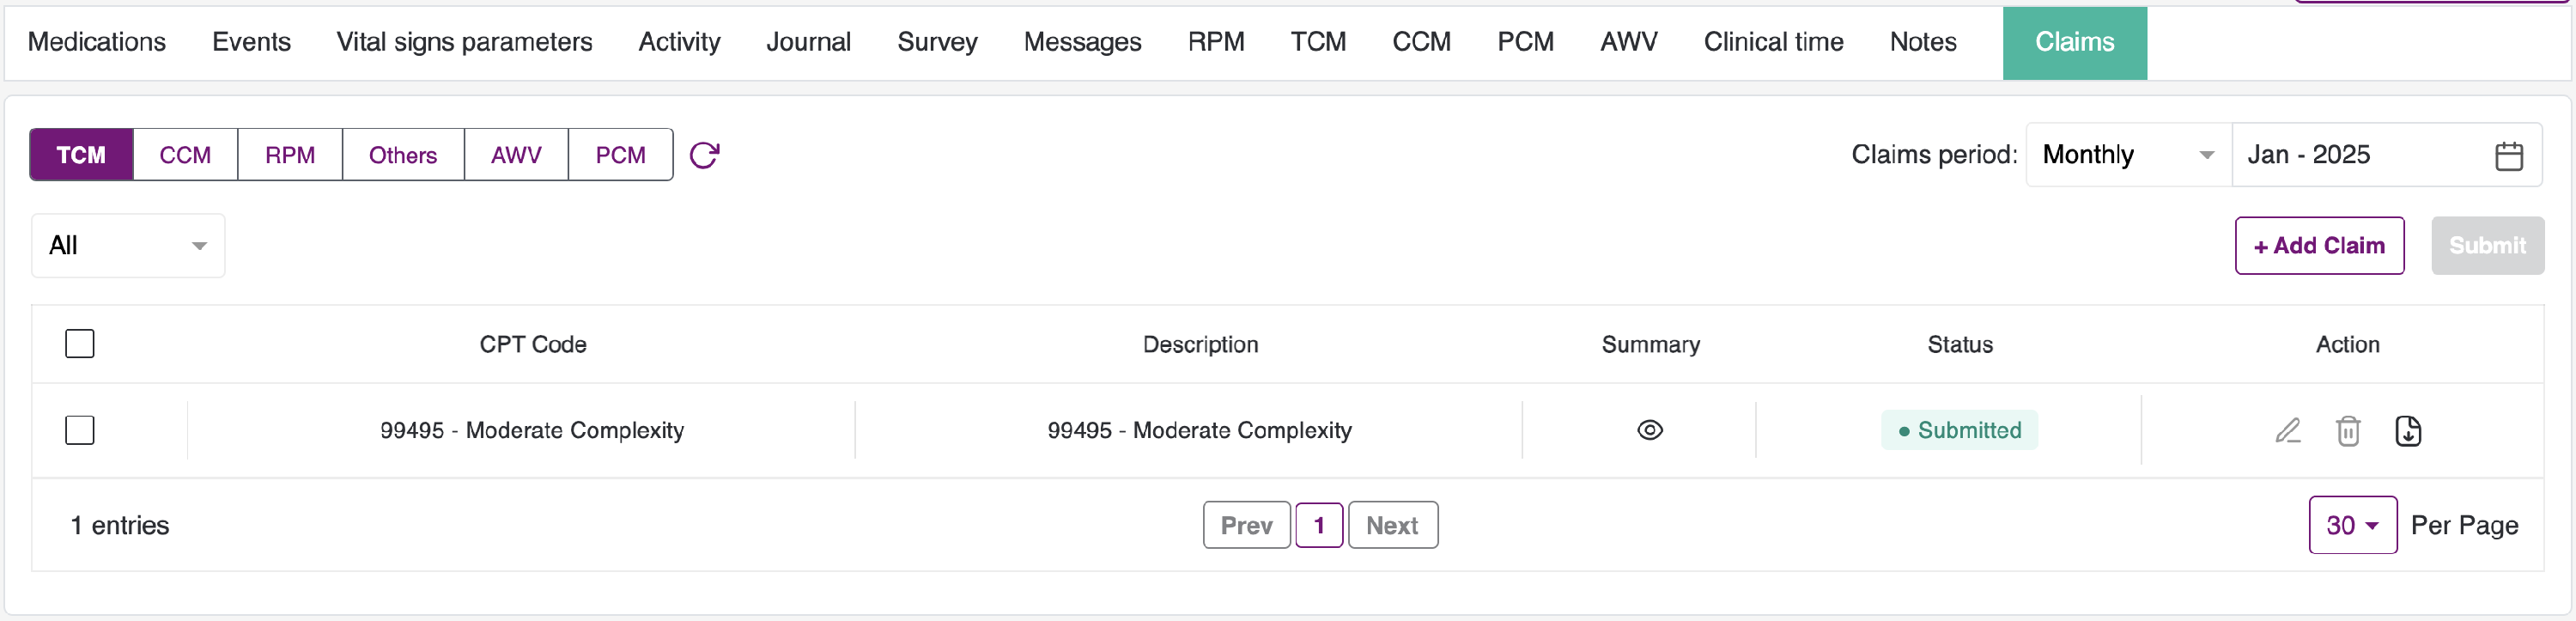
- You will be asked confirmation before submitting the bill that the patient was not readmitted. On clicking Yes, the bill will get submitted and on clicking no, you will be redirected back to Bills tab. The submitted bills cannot be edited.
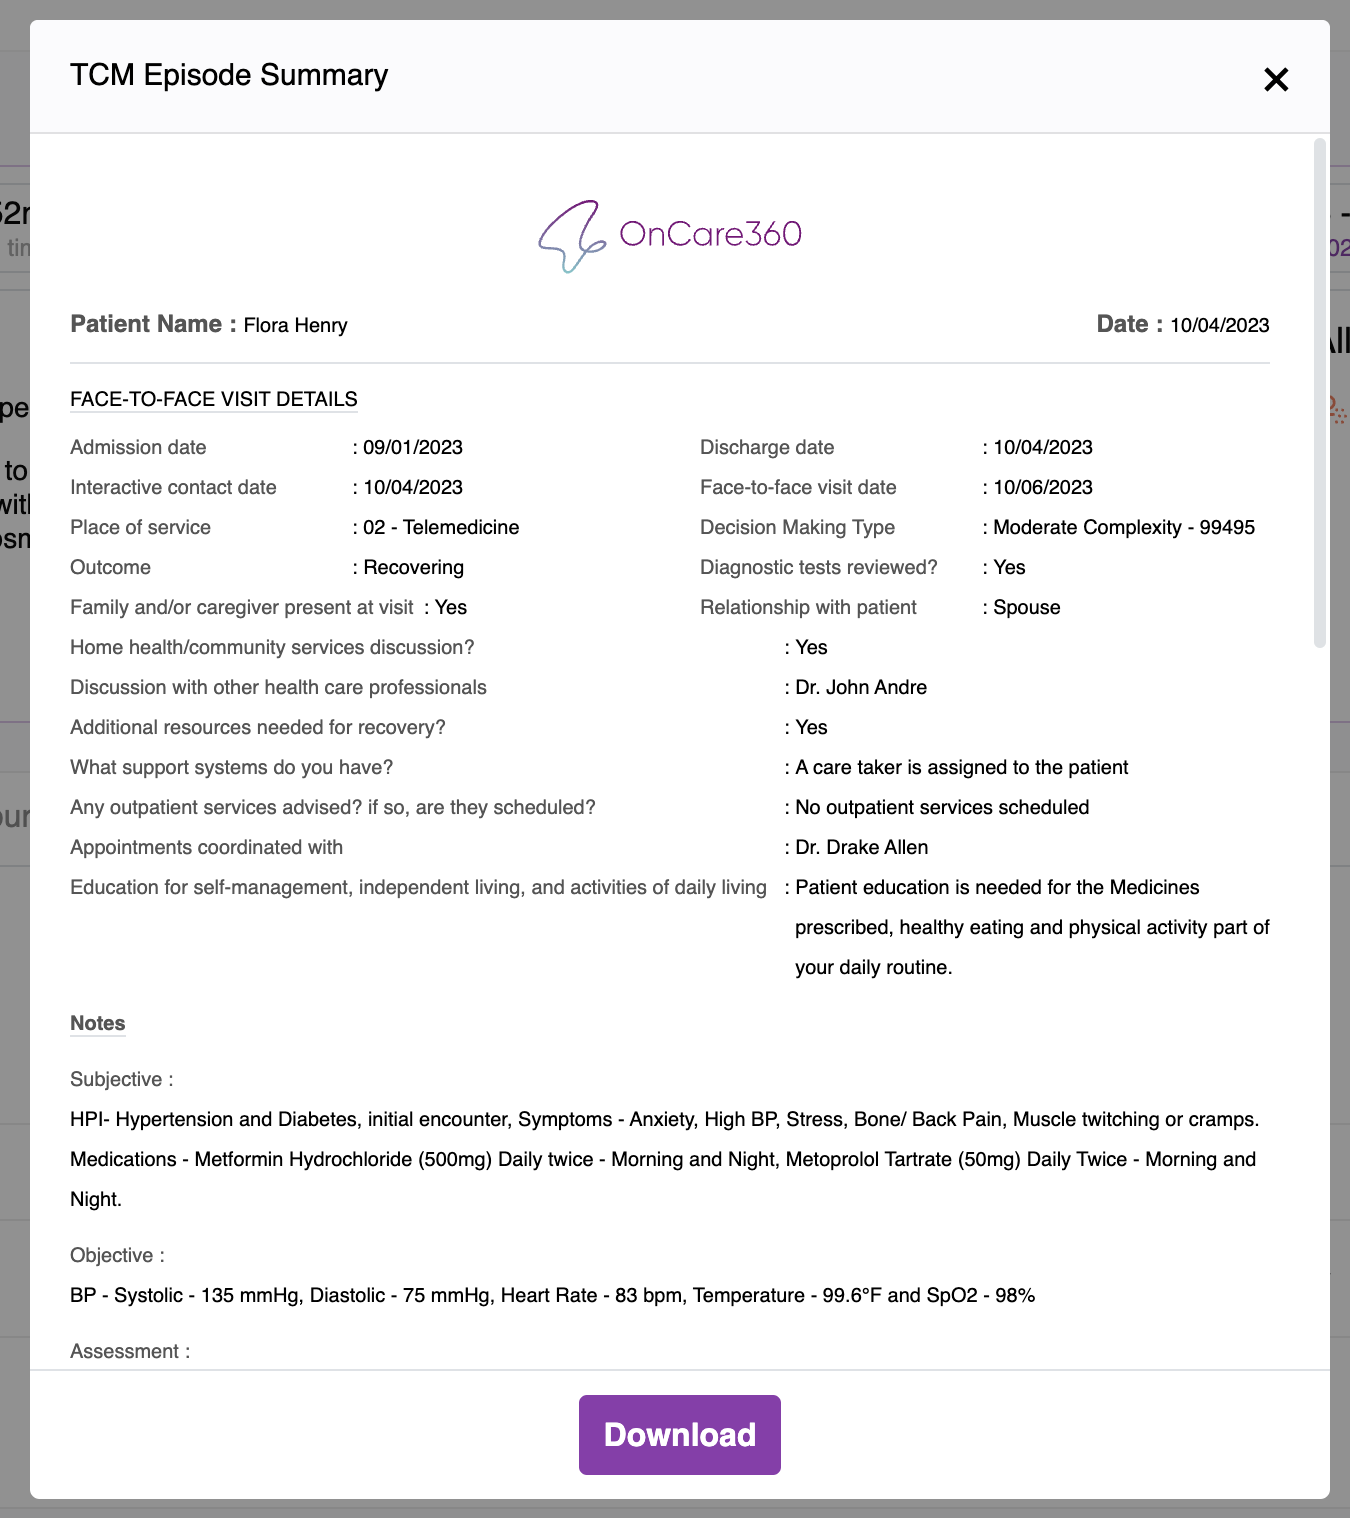
- You can view and download the Episode Summary by clicking the eye icon. You can view the pop-up as follows:
- Click on the Download button to download the bill. You can later view the downloaded bill in your downloads.
- You can also download the records document by clicking on the download icon, which is located beside the delete option for each record.
- We can also download all the selected records at once by clicking on the "Download Supporting Documents" button, which is located at the top of the table.
- Each reimbursement type tab have filters as shown:
- All - Shows all the TCM call logs
- New - This displays all the newly submitted calls/bills and is represented by the colour blue.
- Submitted - It displays all the submitted calls/bills and is represented by the light green colour.
- Rejected - It displays all the rejected calls and they are represented by the colour red
- On-Hold - Displays the calls that are kept on hold and are represented by amber colour
- Approved - Displays all the approved calls and is represented by the colour green
- On clicking the Rejected calls/bills, User can view the Rejected reasons, which shows the date with rejected reason.
Note:
- The above filters doesn’t exist for “Others” tab
- Calls/bills when in Submitted, Approved or On-Hold state will be disabled.
- All, New Rejected bills can be submitted again.
- To refresh the table, click on the Refresh icon beside the tabs.
Approve Time:
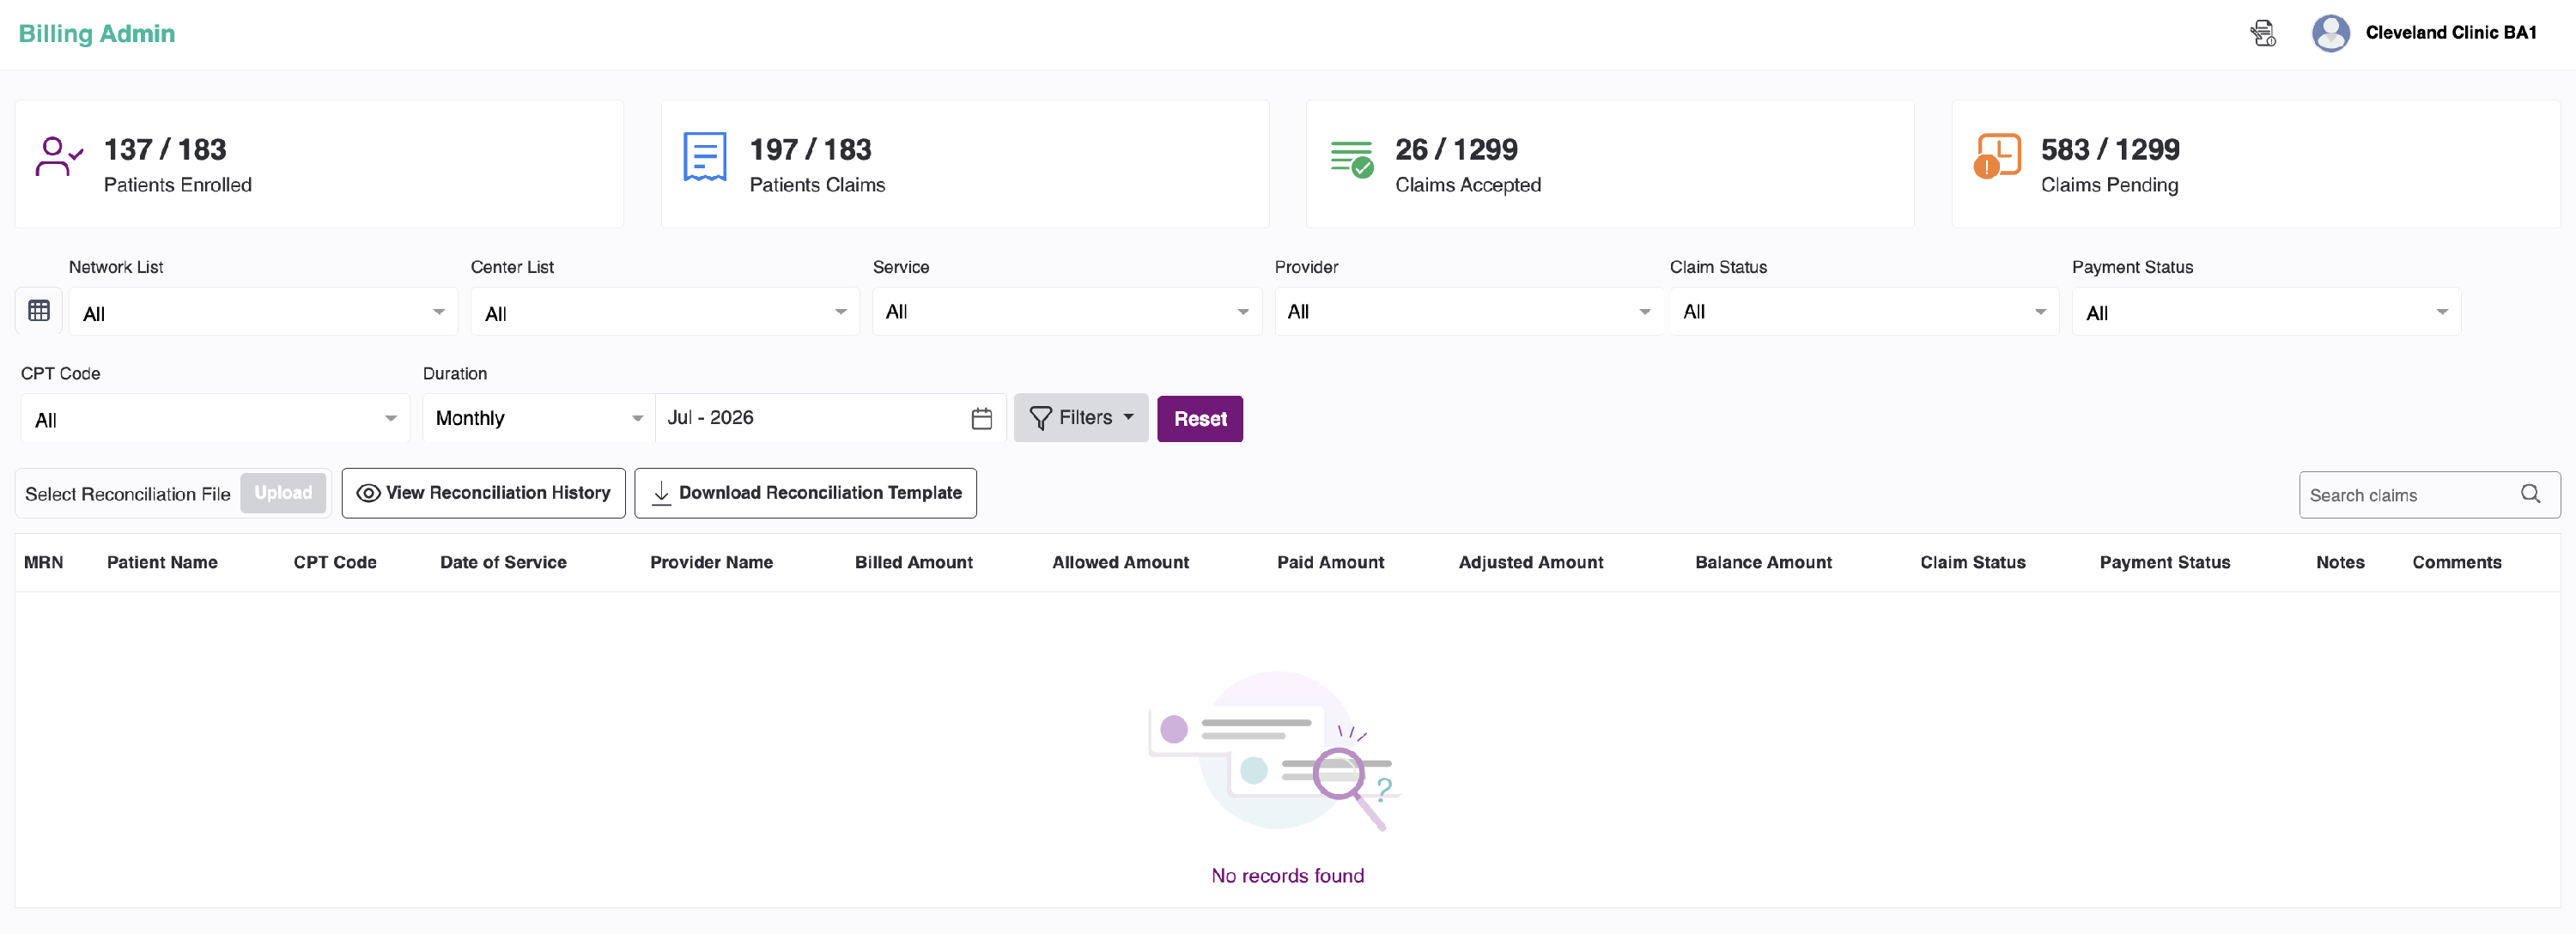
- The call logs that are submitted are saved in the Billing Portal. Once the Admin logs in, they can view the screen shown below.
- By default, All Programs and All Providers are selected. You may adjust these options based on your preferences.

- On the dashboard, count for Patients enrolled, Patients billed, Bills accepted, Bills pending will be displayed.
-
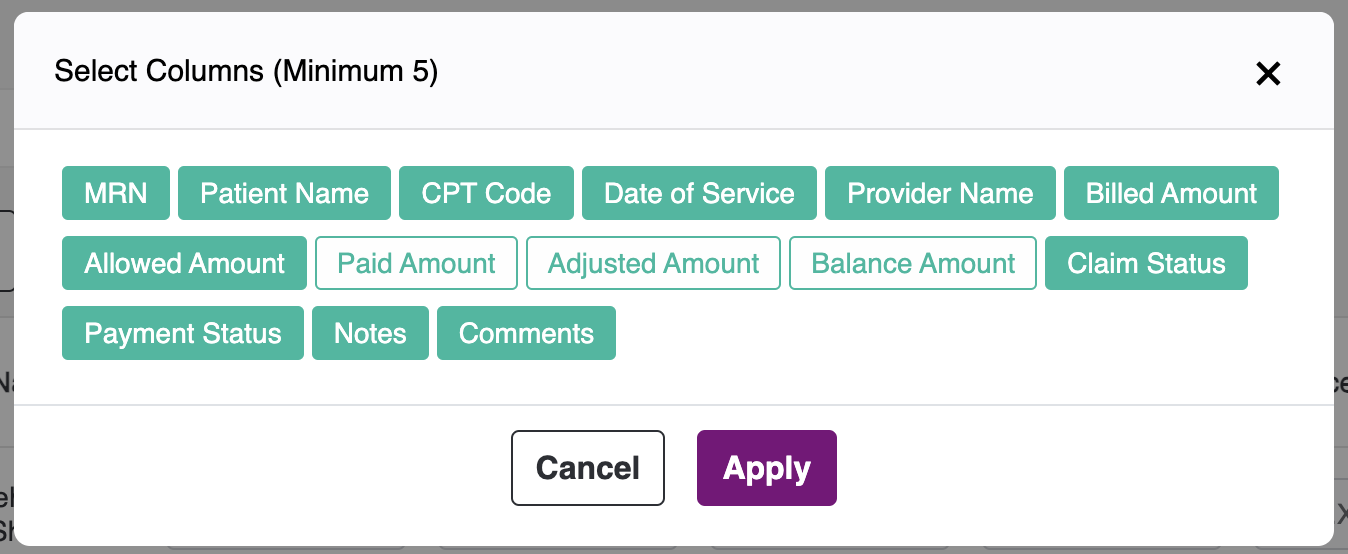
On the left-hand side, there is a table icon. Upon clicking on it, a pop-up will appear where you can select the required table columns, as shown below.
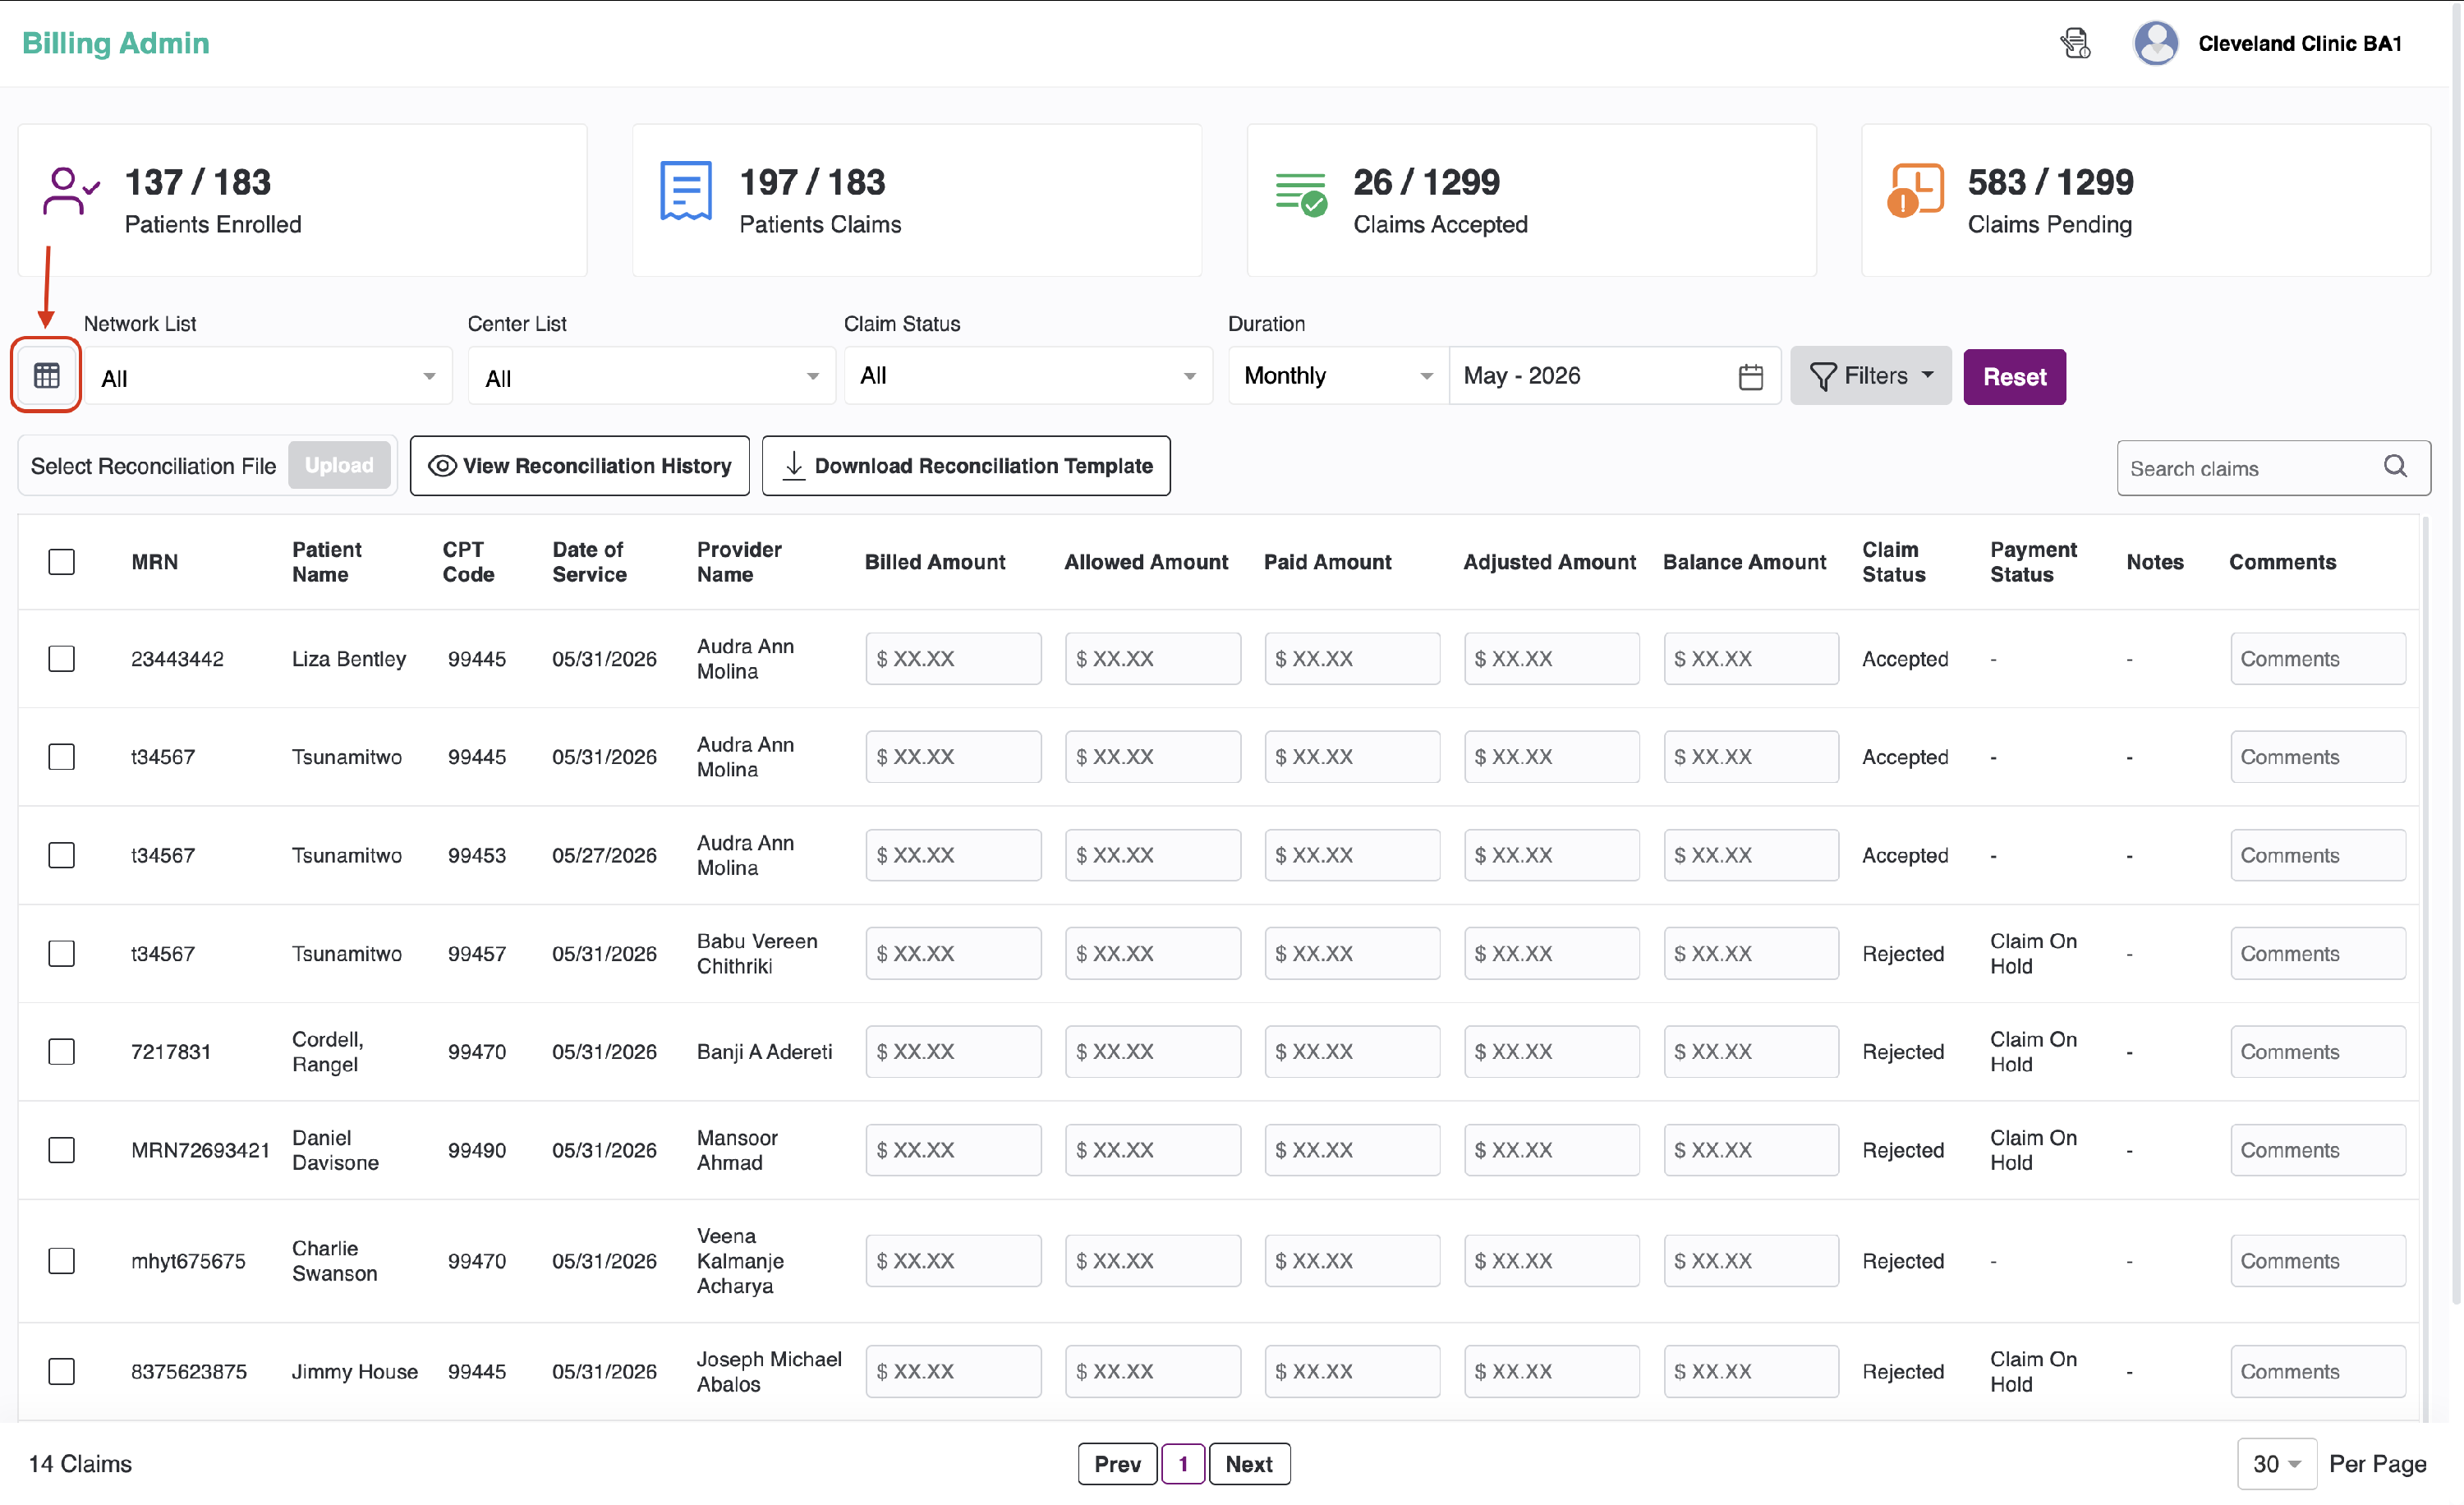
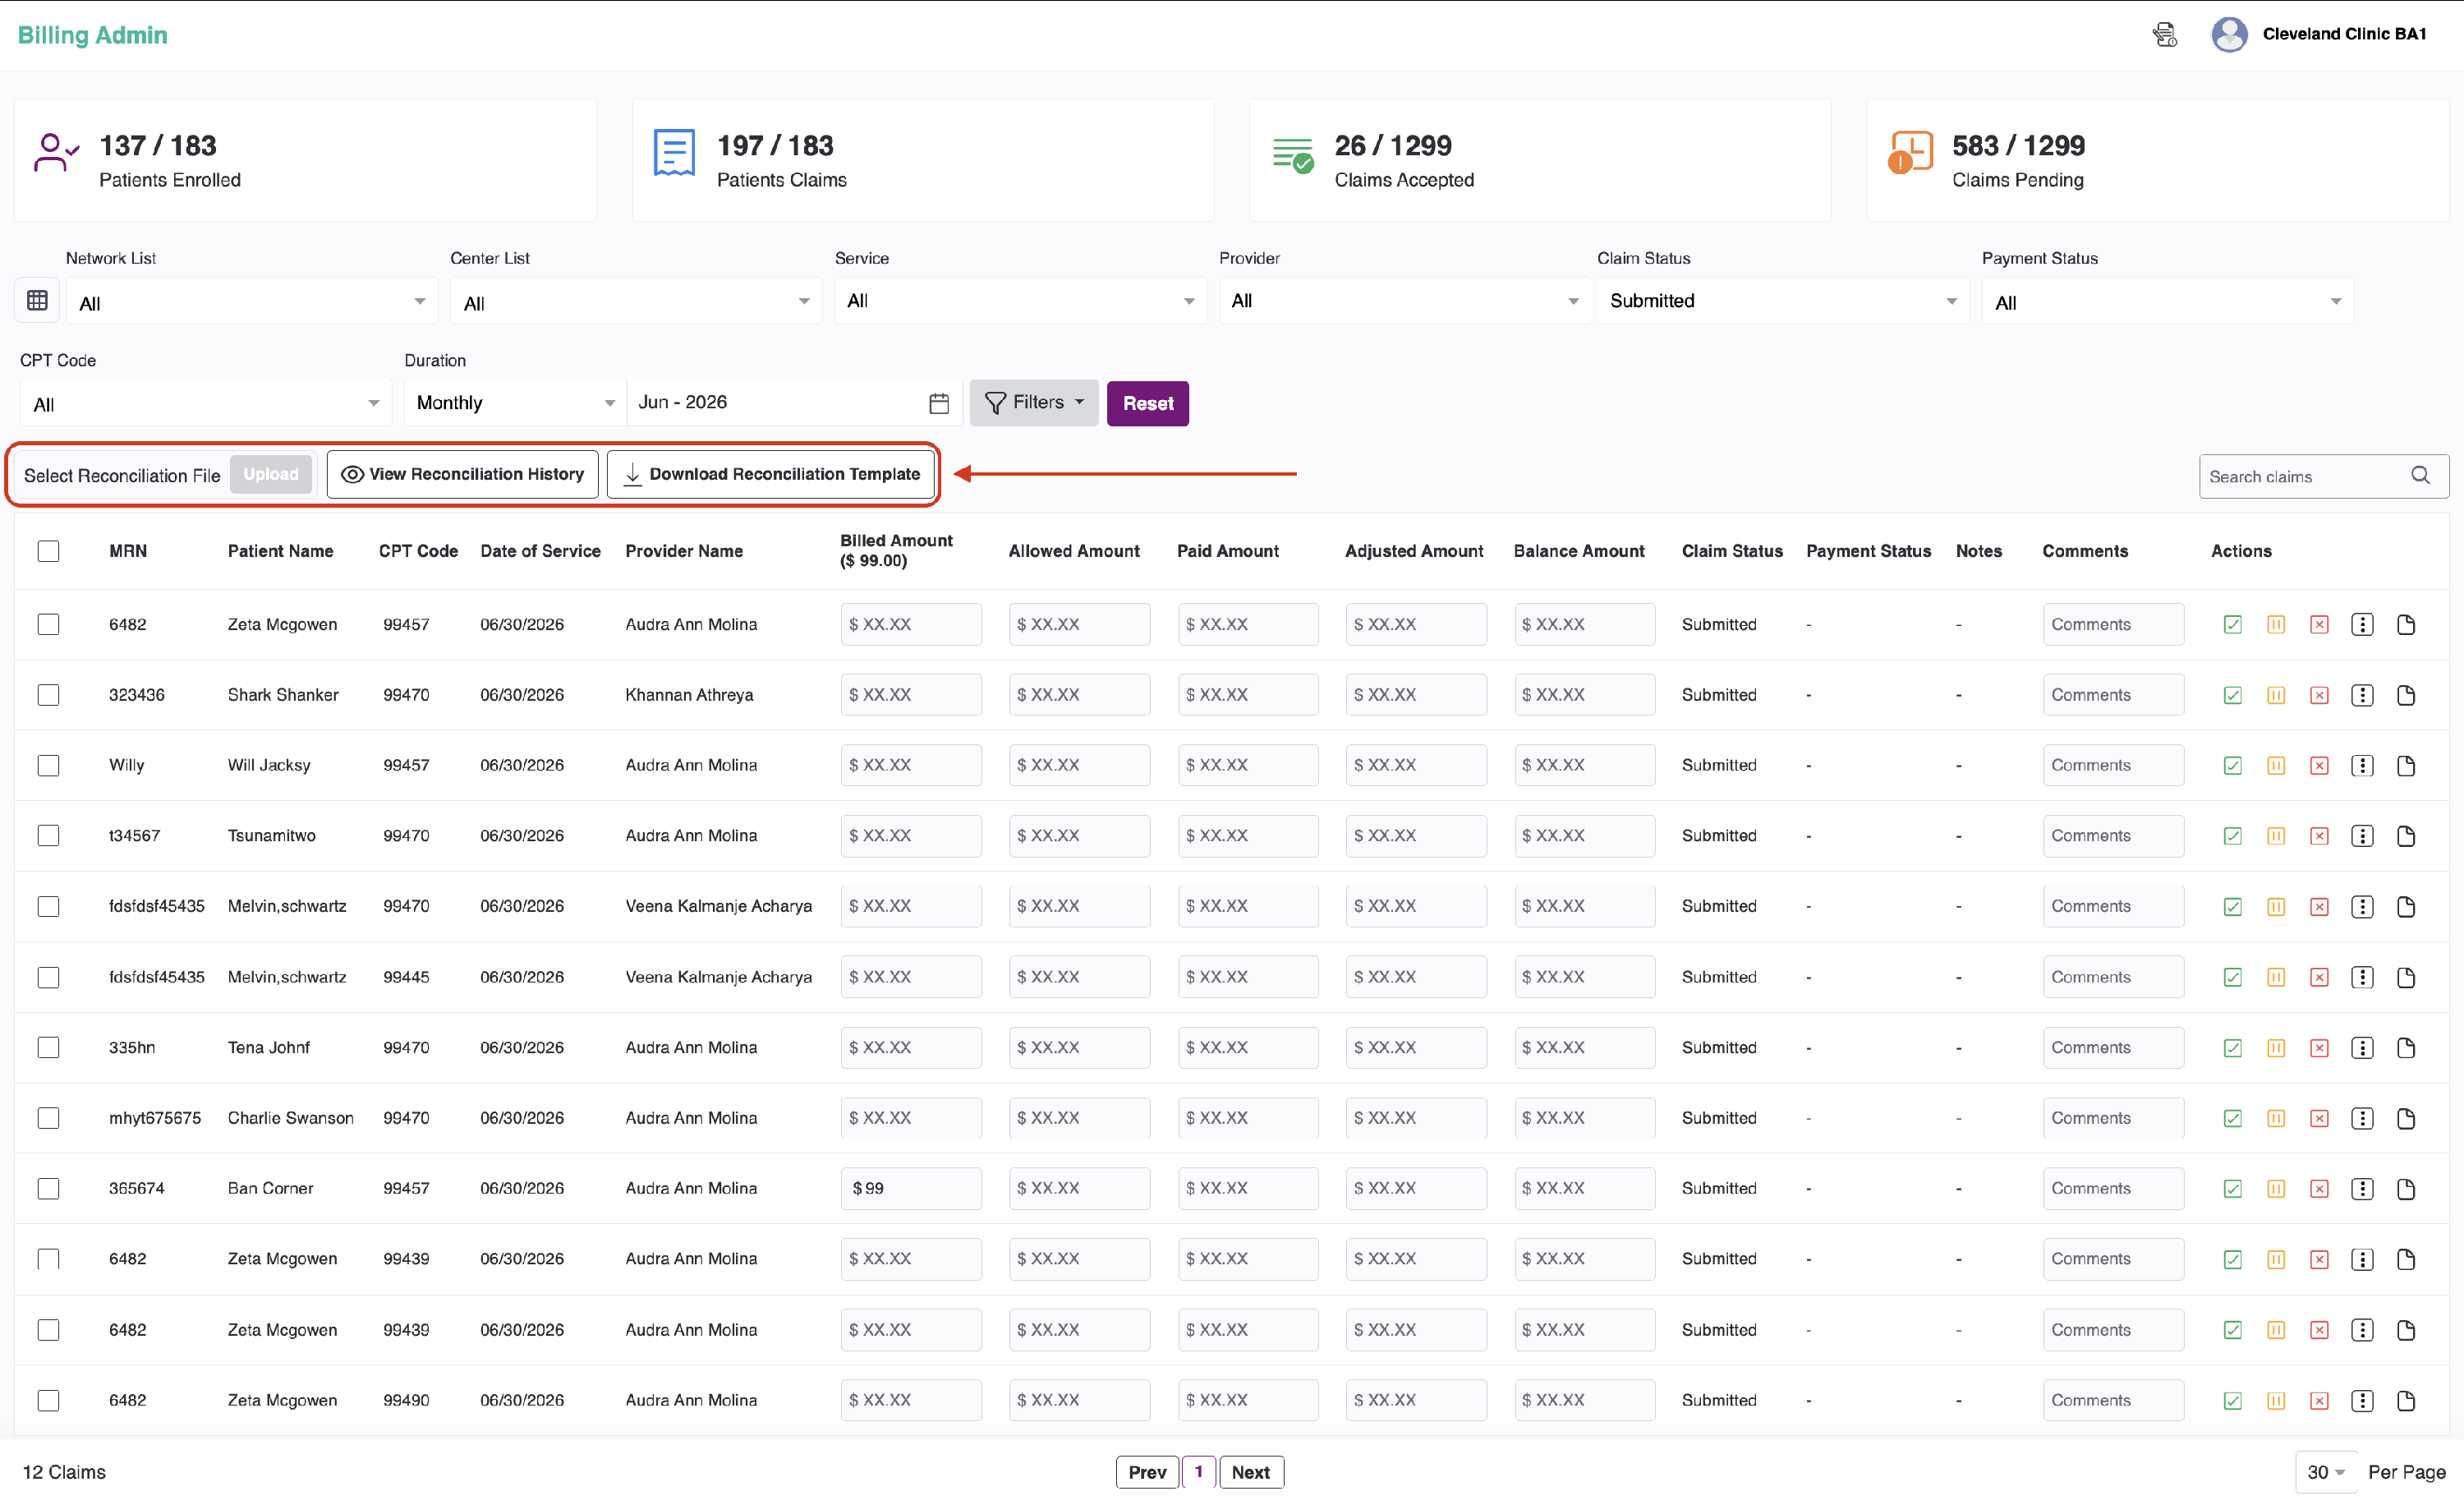
- There are 9 filters: Network, Center, Service, Provider, Claims Status, Payment Status, CTP Code, Duration, and Search Bills, which allow you to search bills for review.
- Users can filter the submitted billing list based on the bill status across four categories.
- Submitted Bills
- Bills on Hold
- Accepted Bills
- Rejected Bills
- Patients that qualify under the rules engine for the set of rules associated with the respective CPT code will be ready to be billed, while patients that do not qualify under those rules will be rejected by the rules engine.
- Users can also filter the submitted billing list based on the type of billing or product (All/RPM/CCM/RTM/TCM/PMPM).
- Click the Status filter, select the Submitted Bill option, then click the Program filter and select CCM. The following screen will be displayed.


-
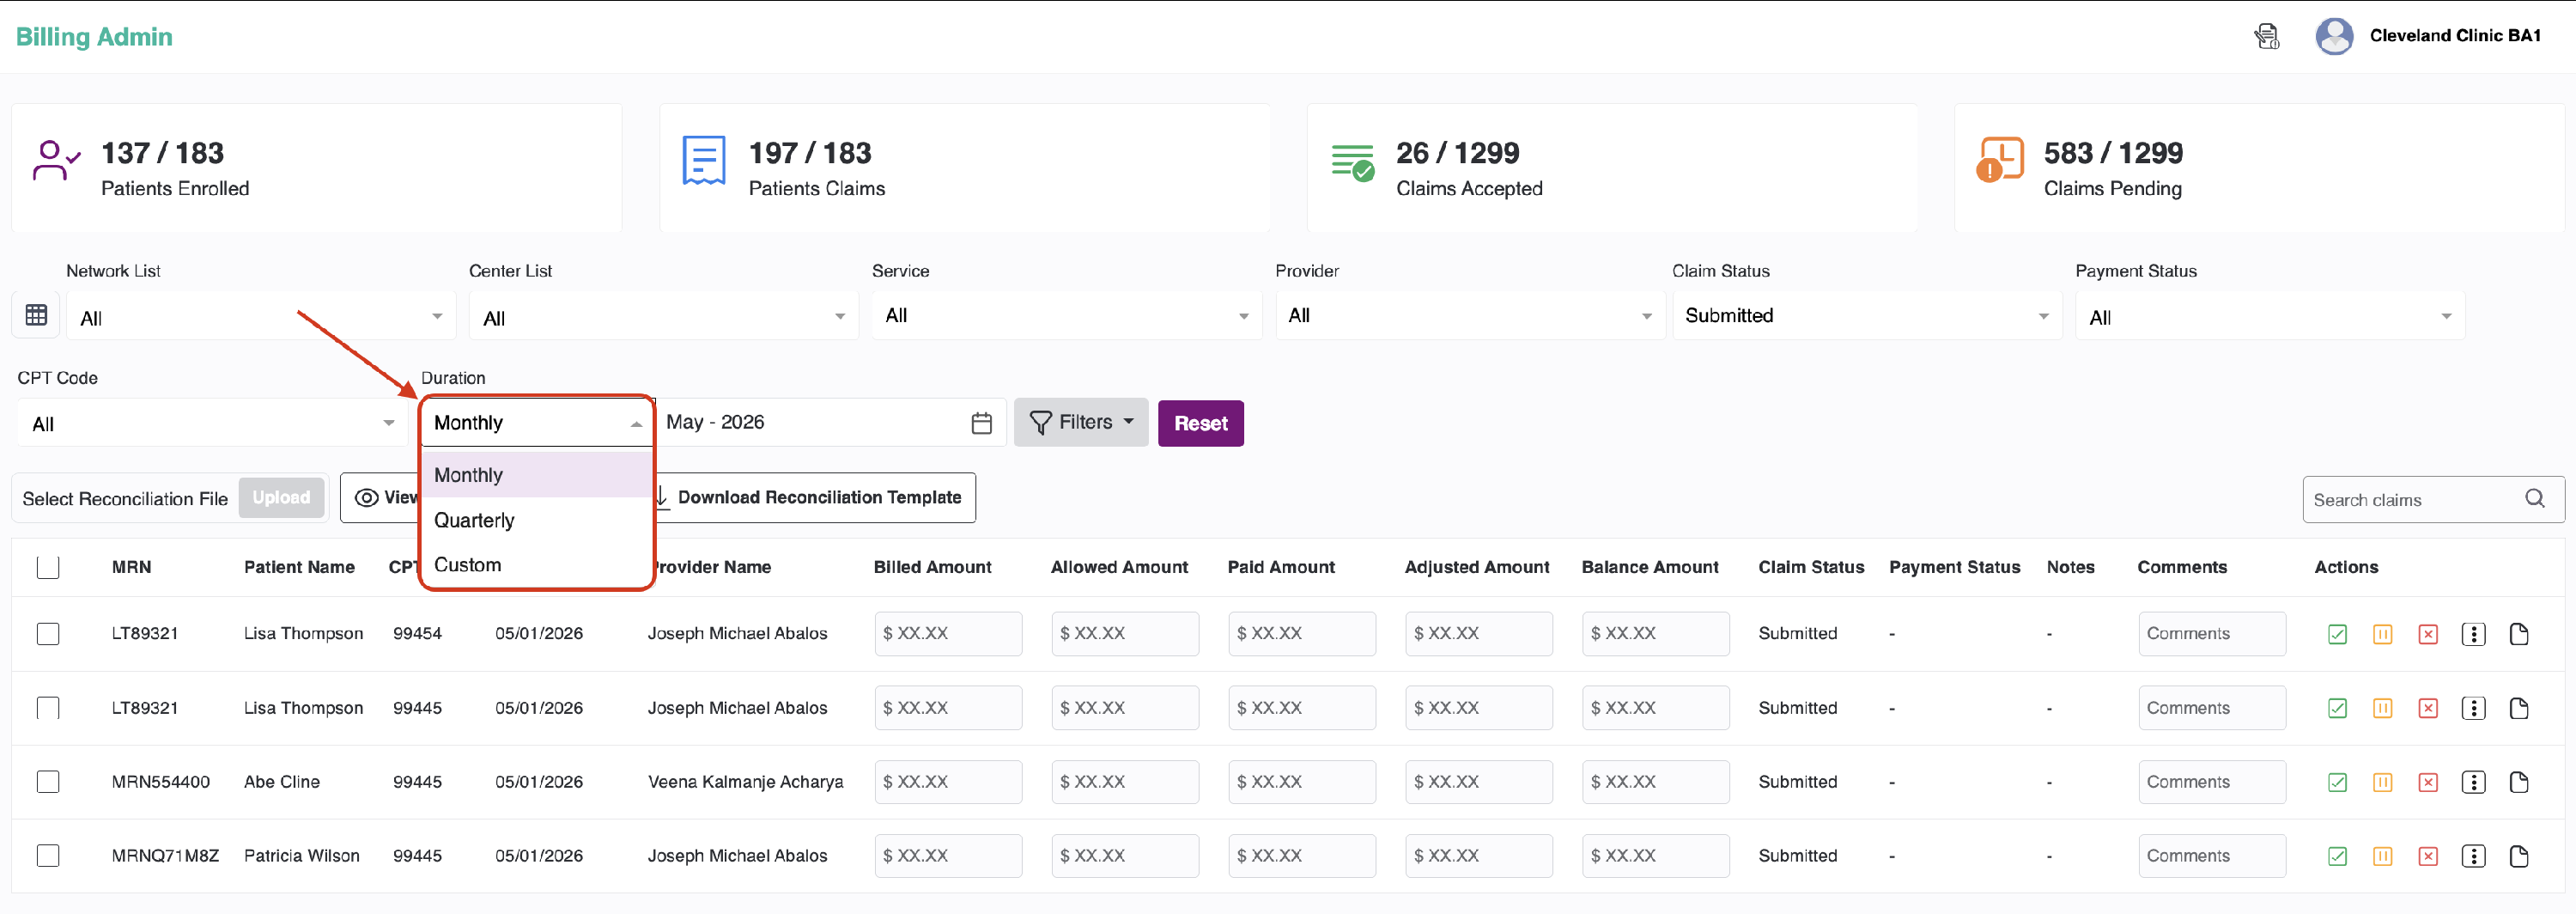
User can filter the submitted billing list based on the selected duration of Date from and Date to. We can view the bills based on the Duration type - Monthly, Quarterly & Custom. By default, we have Monthly selected.
- Users can filter the submitted billing list by provider name for the selected center.
- The search field is available on the dashboard to find the required data.
- Below the filters, the table is displayed with the following headers:
- Checkbox — to select all records
- Patient EMR ID
- Patient Name
- Date of Service — the date on which the service was provided
- CPT Type — RPM/CCM/TCM/Other CPT code and topic
- Note — meeting notes captured while scheduling
- Provider Name
- Bill details — Bill ID and the month, date, and year the billing was submitted
- Actions — Approve / On Hold / Reject
- All submitted bills appear in the list in checkbox form. Users can select bulk actions to mark the selected bills as Approved or Rejected. Users can also download the bills by clicking the Download option.
- To submit the bills, select the checkbox and click Accept selected bills on the right. A pop-up will appear to confirm whether you want to accept the bill. Click Yes to accept the bill.


-
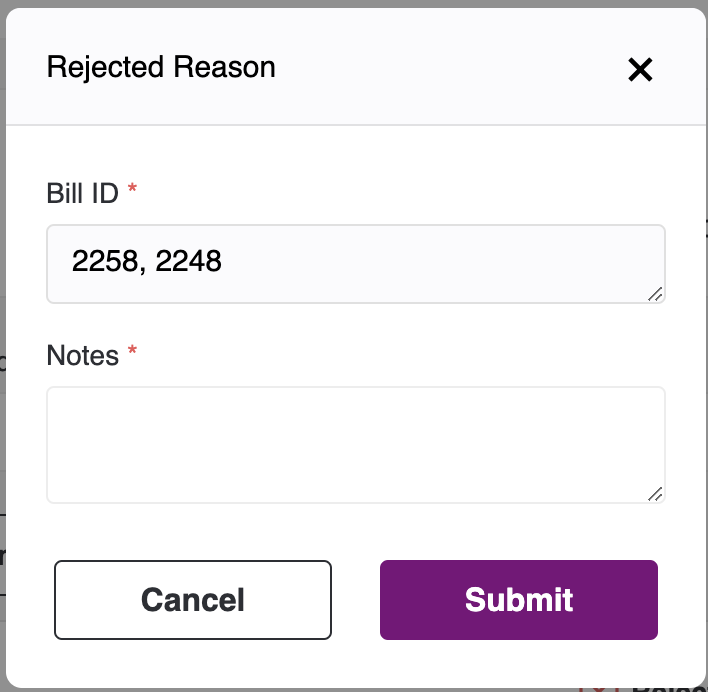
You can also reject bulk bills by selecting the relevant records and clicking the "Reject selected claims" button. This button will be displayed in the header area once you select the bills. After you click the button, a pop-up window will appear prompting you to enter the reason for the rejection. Once you enter the reason, click Submit. The rejected bills will then be listed under Rejected Bills.
-
You may perform actions—Approve, On Hold, or Reject—for individual calls. After the call log is approved, set to On Hold, or rejected, it will be categorized as Accepted, On Hold, or Rejected, respectively.

-
If there are no calls logs, you will see an empty state showing No records found.
- Once the bills are accepted, you can view them by selecting Status as Accepted.
- To download the Bill report, select the checkbox for an individual record, or select the checkbox in the header to download the report for all records.
- You can download the report for any status, including All, Ready to bill, Submitted, On-Hold, Rejected, and Approved.


- You can view download option at the right, click on the download to download the report. You can view it in your downloads.
-
We can also add the Billed Amount, Allowed Amount, Adjusted Amount, Balance Amount for each bill in the input field where you can enter the amount and click outside the field. It will be saved, but it is only for reference and will not be referenced anywhere else.

- We also provide the options Claim Denied, Claim Failed, Closed, Patient Pending, Secondary Pending, and Claims On Hold to update the payment status of each claim. To access these options, please select the submitted claim status and click the more icon, as shown in the image below.


-
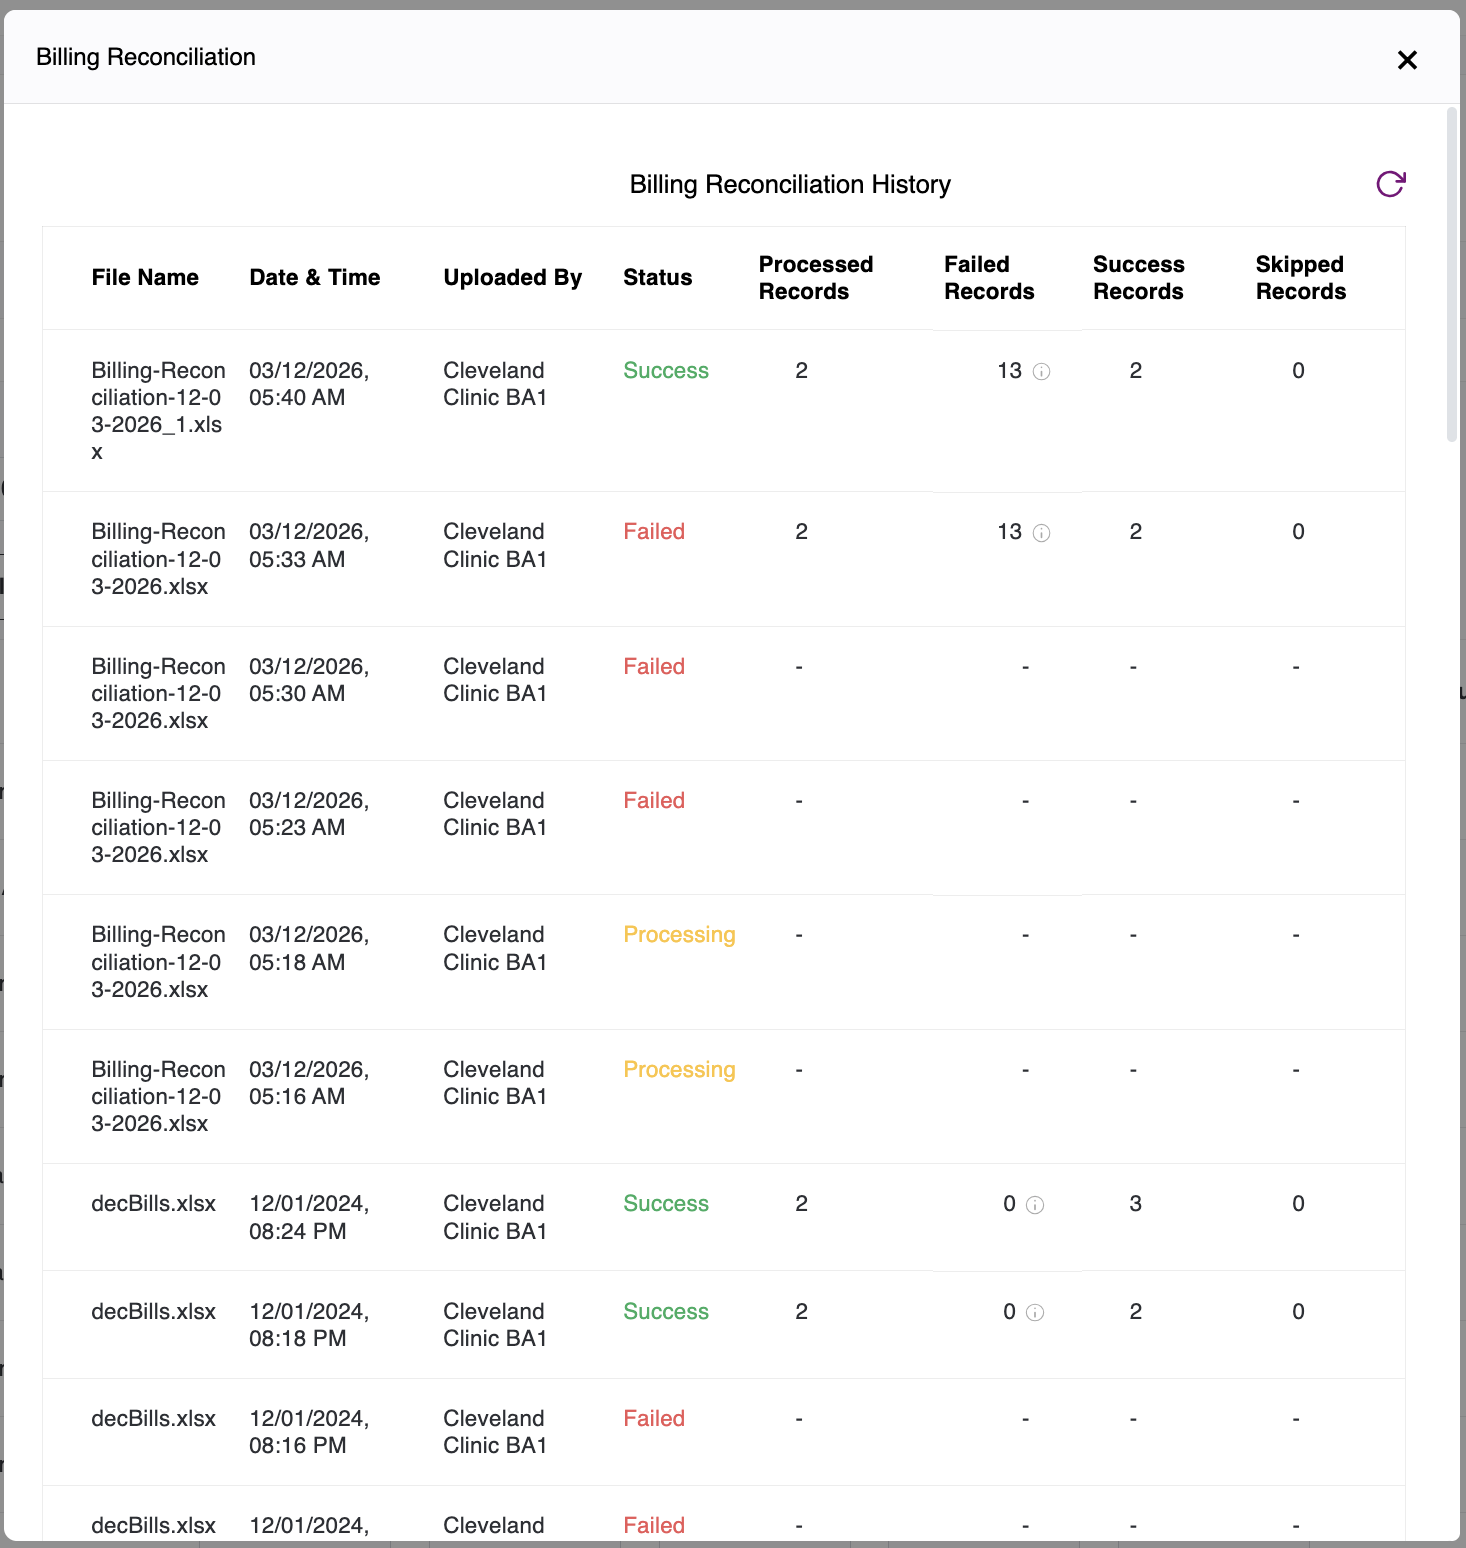
We also have the option to upload the billing reconciliation file. You can upload an Excel file with the claims data of each patient and check the history of the uploaded file. Additionally, you can download a sample file or sample reconciliation template by clicking on the "Download Reconciliation Template" button.


- Patients enrolled – the count of patients who have given the consent for subscriptions available for a center/ total number of patients of a specific center.
- Patients billed – the count of patients for whom the bills are submitted / the total number of patients enrolled.
- Bills accepted – count of bills approved / count of total bills(accepted+ rejected+ on hold+ submitted)
- Bills pending - count of bills in ready to bill state/ count of total bills(accepted+ rejected+ on hold+ submitted)