
Patient Listing
Table of contents:
Program Indicators:
Upon successful authentication, you will be directed to the Patients tab as the landing page.

- On the left-hand side, there is a side navigation bar that provides access to the care coordinator list, provider listing, schedules, claims, calls & SMS, and operational reports. At the bottom, there are two floating icons: Critical Alerts and the Dial Pad.
- The Oncare360 logo is located in the top-left corner, while on the top-right side, there are icons accompanied by a login name.
Raise Ticket:
- The question mark icon, which represents “Raise Ticket”, indicates that whenever you encounter any issue or bug in the application, you can report it by filling out the simple form.

-
When you click the icon, a pop-up will appear, presenting a simple form as illustrated below.
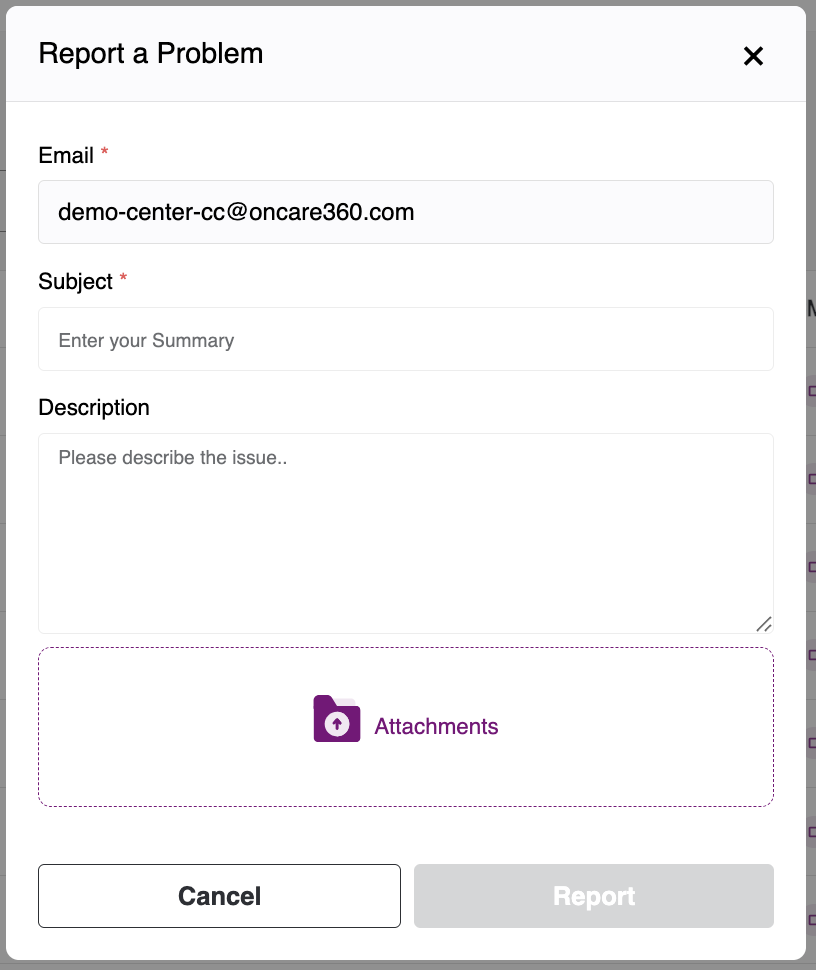

The form consists of:
- Email - The email will be pre-populated, and it is not editable.
- Title - Please provide a name for the ticket, and use the field below to describe your issue. You may also upload an image or video.
- Upon submitting your request, we will make every effort to resolve the issue in a timely manner.
Critical Alerts:
-
When the shield icon is clicked, indicating critical alerts, a pop-up will appear showing all critical alerts received by the patient on their mobile device.

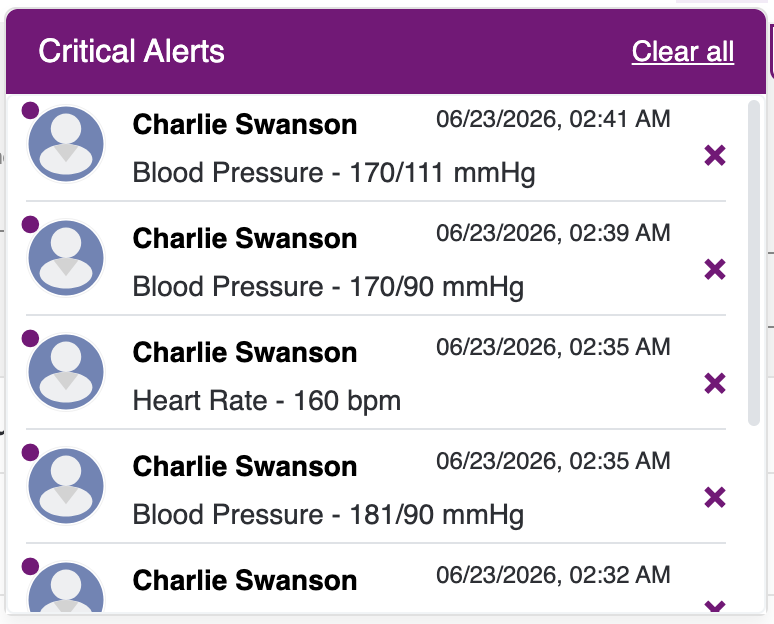


- Upon clicking the record, you will be directed to the Event tab within the Patient Dashboard. There, you can view all critical alerts provided by the patient.

- Upon clicking the Last 14 Readings, you will see a popup modal where you can view the last 14 days' readings for that particular patient.

Notifications:
- The Bell icon serves as the notification center, alerting you to various updates, such as incoming calls, added bills, rejections, and more.
- When you click the notification icon, a pop-up will appear displaying all the latest notification entries.
- Each time a new notification is received, a red dot indicator will notify you on the icon.


- Upon selecting the record, you will be directed to the corresponding tab..
Profile Icon:
- You can view an image corresponding to the title of the Program Coordinator/Provider.
- When you click the image representing the title, a modal drop-down will appear, offering options such as Privacy Policy, Terms of Use, and the Log Out feature.

- Upon clicking on “Privacy Policy,” a pop-up will appear displaying the content of the Privacy Policy, which you have previously accepted.

- When you click on "Terms of Use," you will be presented with a pop-up displaying the content of the Terms of Use.
- Which you have previously agreed to.

-
Upon selecting "Log out," the user will be securely logged out of the portal and redirected to the log-in page.
Filters:
We have the ability to hide and show the patient listing columns. Based on which columns are active, the corresponding filters will be available.

Note:
- By default, we cannot remove or hide the Patient, Phone Number, and Quick Actions columns.
- We can also change the logic of the label filter. When selecting multiple labels, we can configure whether the multiselect uses an AND or OR operation.

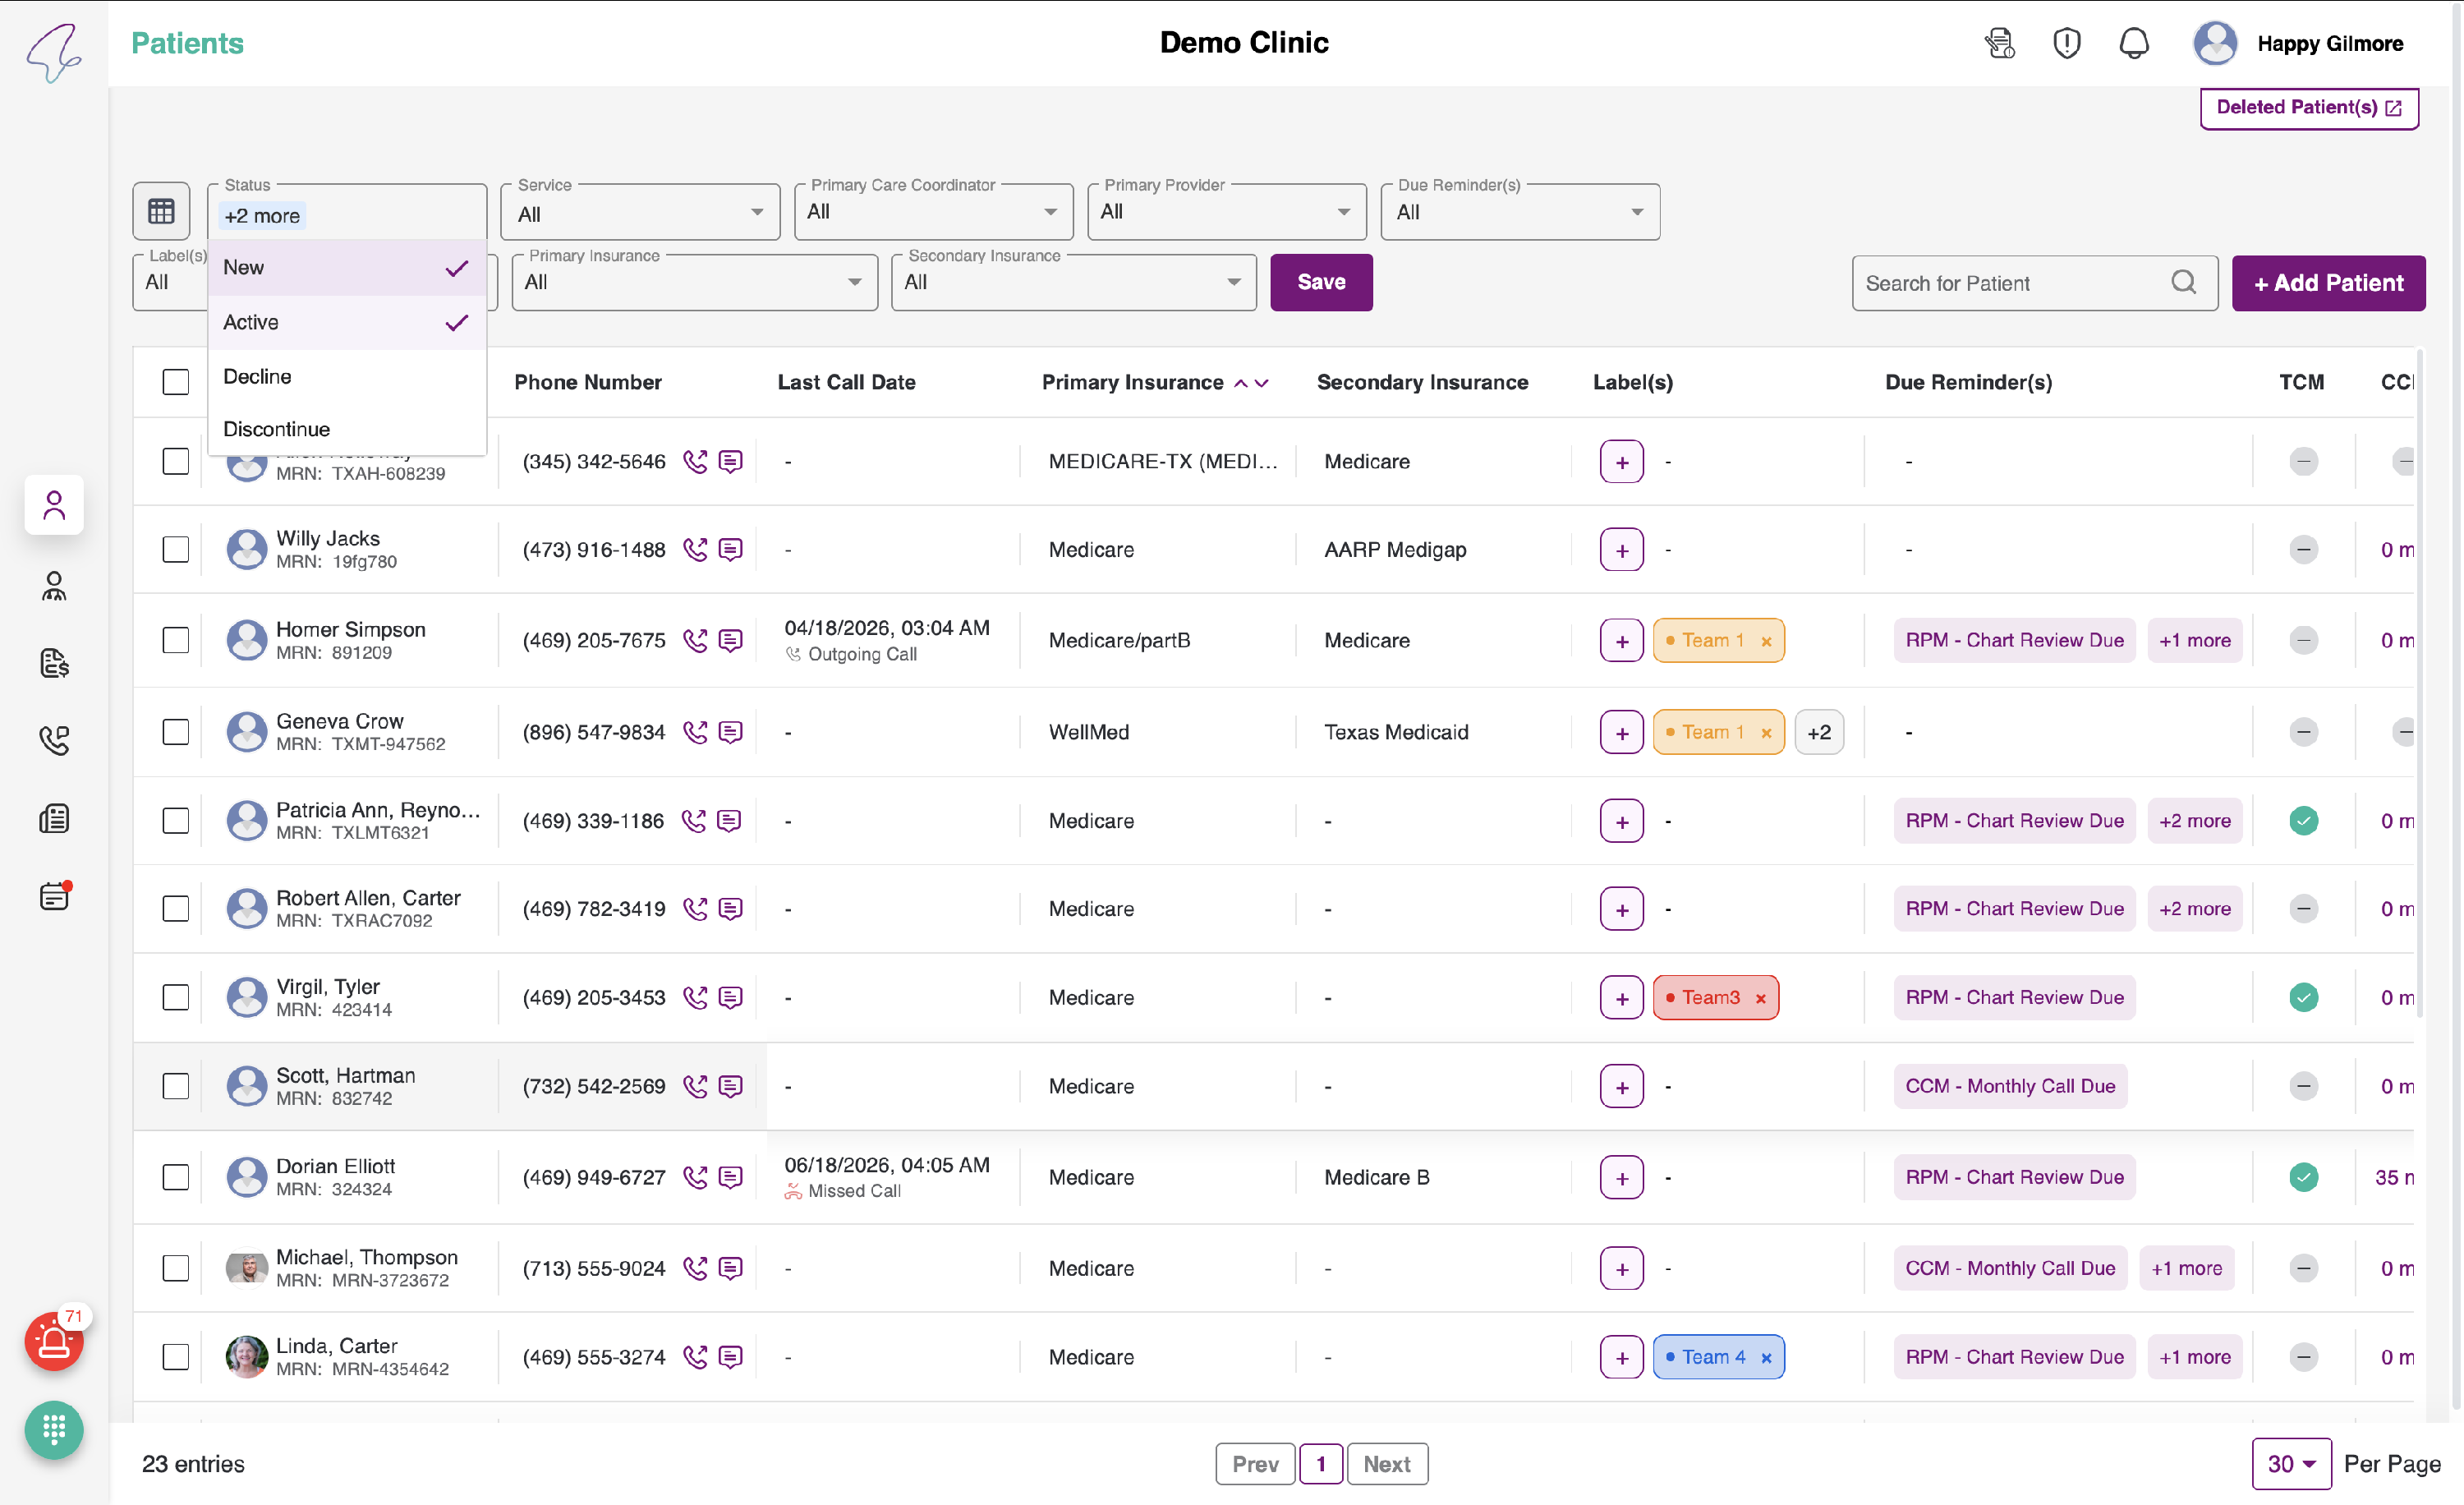
Status Filter:
- By default, the service filter will display New and Active records.
-
By using the Status filter, you can refine the patient list according to the Status type, with the option to select multiple Status values. This will enable you to view the corresponding records.
New - The patient with no service.
Active - The patient with at least one active service.
Decline - The patient whose service content was rejected.
Discontinued - The patient who has had the service discontinued.

Service Filter:
- By default, the service filter will display All records.
- By using the service filter, you can refine the patient list by service type, with the option to select multiple services. This will allow you to view the corresponding records.

- The filtered results will always depend on the Status filters.
Primary Care Coordinator Filter:
-
By default, the care coordinator filter will display All records.
- We can view all care coordinator names in the dropdown and select multiple care coordinators. If any patient has the same care coordinators, those matches will be displayed in the list.

- The filtered results always depend on the Status and Service filters.
Primary Provider Filter:
- By default, the provider filter will display All records.

- We can see all the provider names in the dropdown, and we can select multiple providers. If any patient has the same providers, it will be shown in the list.

- The filtered results will always depend on the Status, Service, and Care coordinator filters.
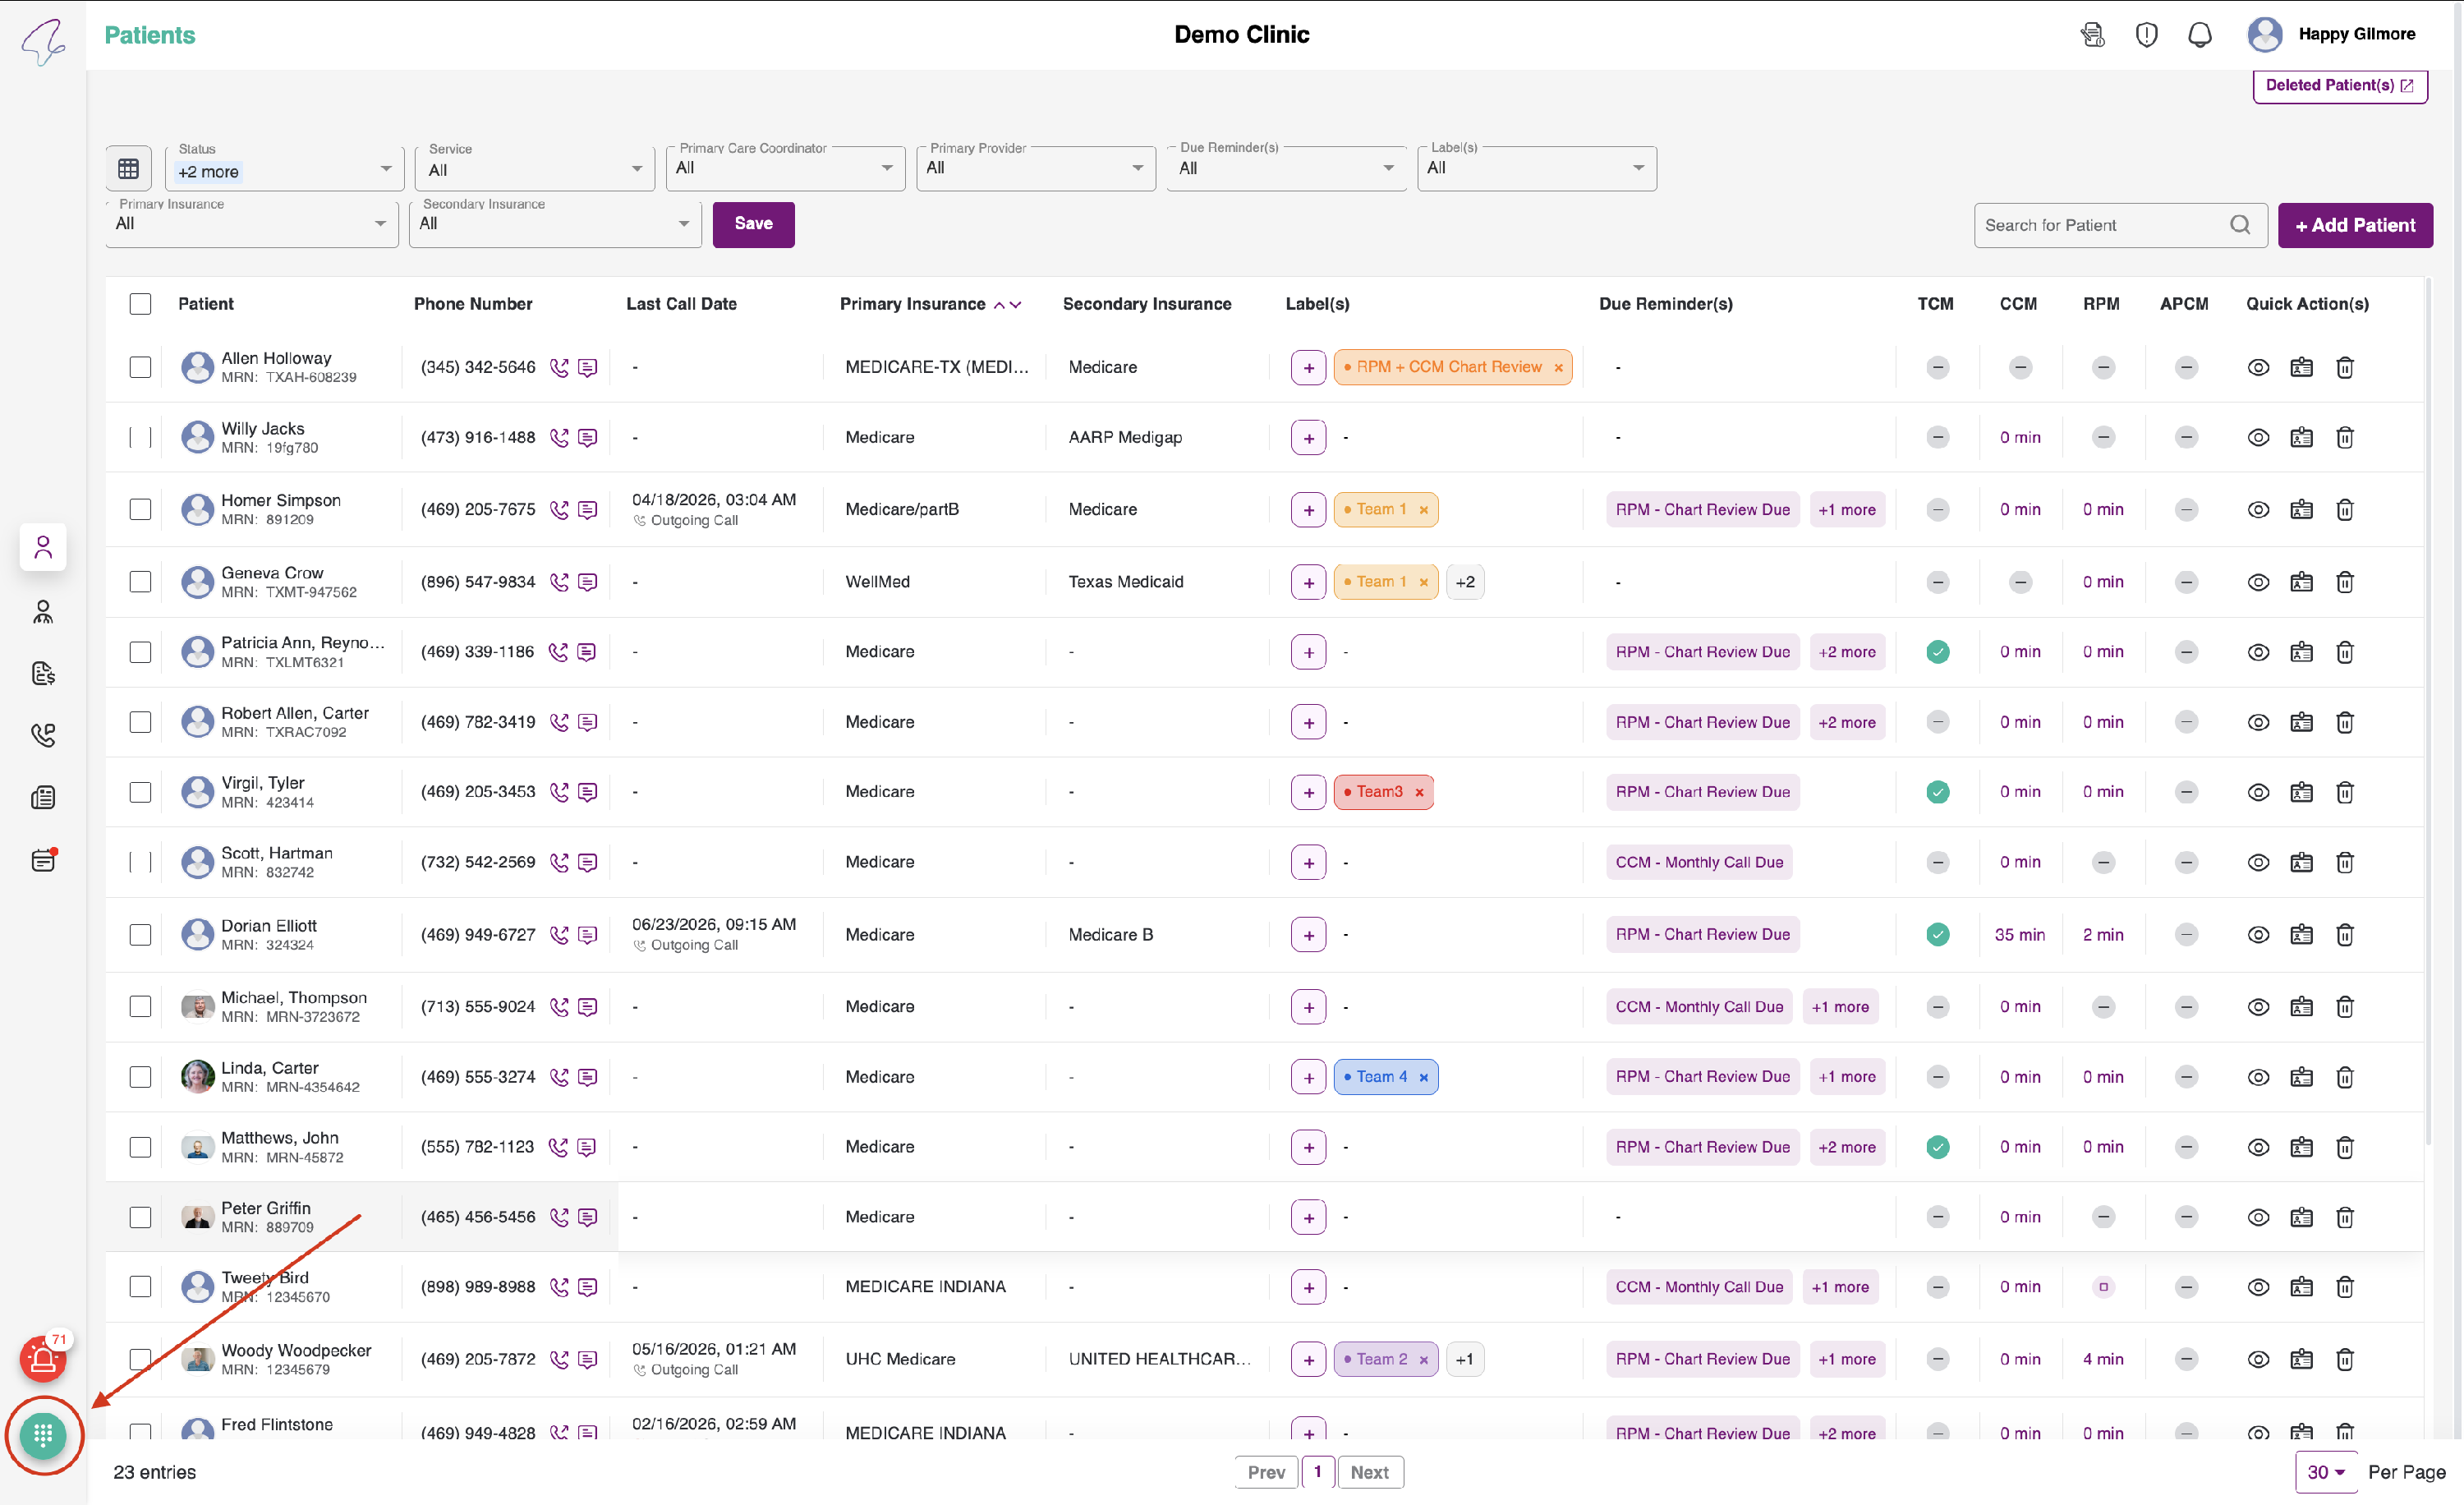
Due Reminders:
- This is the Service Due Reminders filter, in which we generate the due list based on the available services.
-
In this filter, the due items include:
1. CCM Monthly Call Due - This is based on clinical time. If the last CCM clinical bill was added a month ago and the care plan is active, we will display the CCM monthly call due.
2. CCM Medication Reconciliation Due - This is based on the medication. We display this due item for every quarter, starting from the time the care plan is added, provided the care plan is active, to show the CCM medication reconciliation due.
3. CCM Care Plan Update Due - This is based on care plan activities. If there has been no action on the care plan within the past one year, or if the care plan has a last updated date that exceeds the allowed timeframe—and the care plan is active—we will show the CCM care plan update due to ensure it remains current.
4. FRA Due - This is based on the latest FRA date after the care plan is taken. If the latest FRA was provided more than one year ago and the CCM care plan is active, we will display the FRA due.
5. RPM Chart Review Due - This is a weekly review for the RPM service. We will generate this due item every week after the RPM care plan is taken, and we will continue to receive it every week as long as the RPM service remains active.
6. PCM Monthly Call Due - This is based on clinical time. If the last PCM clinical bill was added a month ago and the care plan is active, we will display the PCM monthly call due.
- You can select only one service at a time from the filter.

Labels Filter:
- By default, the label filter will display all records.
- We can see all available options in the dropdown, and we can filter the patients based on their assigned labels.
- Note: We can also change the logic of the label filter. When selecting multiple labels, we can configure whether the multiselect uses an AND or OR operation.

Primary Insurance:
- By default, the Insurance filter will display all records.
- You can view all available insurance options in the dropdown, and patient data will be filtered based on the patient’s assigned primary insurance.
- Note: There will be no multiselect option available for this filter.

Secondary Insurance:
- By default, the Insurance filter will display all records.
- You can view all available insurance options in the dropdown, and patient data will be filtered based on the patient’s assigned secondary insurance.
- Note: There will be no multiselect option available for this filter.

- The filters follow the hierarchical structure: Status, Service, Primary Care Coordinator and Primary Provider, Due Reminders, Labels, Primary Insurance and Secondary Insurance.
- You can also save your filter preferences by clicking the Save button. The Filter Reference will be saved when you navigate to the patient Dashboard.
Patient Search Filter:
- By utilising this search filter you can search the patient based on the Patient ID,Patient Name, Patient MRN and Mobile Number

Add Patient:
When you need to add a patient, click the + Add Patient button. After clicking “Add Patient,” you will be redirected to the Add Patient page.

At this point, you have the option to add a patient by completing the required fields.
Patient Listing:
When reviewing the patient list, once you select the checkbox for any record, you will be presented with four options:
- Manage Care Team.
- Delete.
- Send SMS.
- Send Survey.

Manage Care Team:
From here, we can bulk assign or unassign providers or care coordinators. We have four options:
- Assign Provider.
- Assign Care Coordinator.
- Unassign Provider.
- Unassign Care Coordinator.

Example:I want to change the primary provider for the selected patient. After that, I will select Assign Provider, and we will see the pop-up as shown below.

- Based on the information above, you can see the selected patient names. Next, please select the provider name from the dropdown. If you would like to mark the selected provider as Primary, check the checkbox below. You will then see a table displaying the patient name, the old primary name, and the new primary name.

- After you have validated the data, click Assign. This allows you to assign or unassign provider and care coordinators.

-
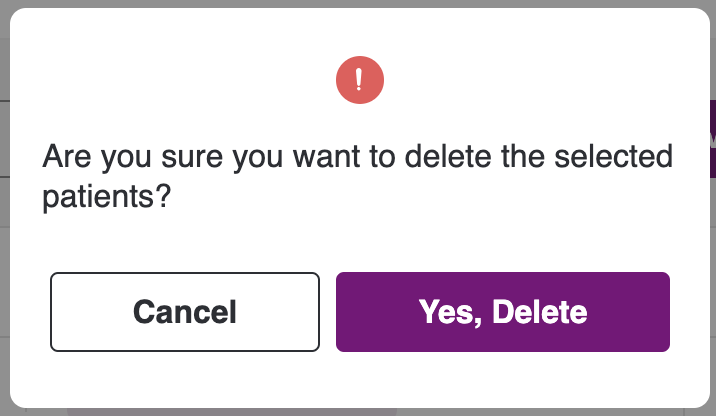
When you click the delete icon next to a specific record, a confirmation pop-up will appear. You will be prompted to confirm your action, with the option to select 'Yes, Delete' or 'Cancel'. If you choose 'Yes, Delete', the patient record will be permanently deleted. If you select 'Cancel', the record will remain displayed in the listing.
-
If you click the Send SMS button, a pop-up will appear. This pop-up allows you to send a message to all selected patients, and all To names will be automatically populated.
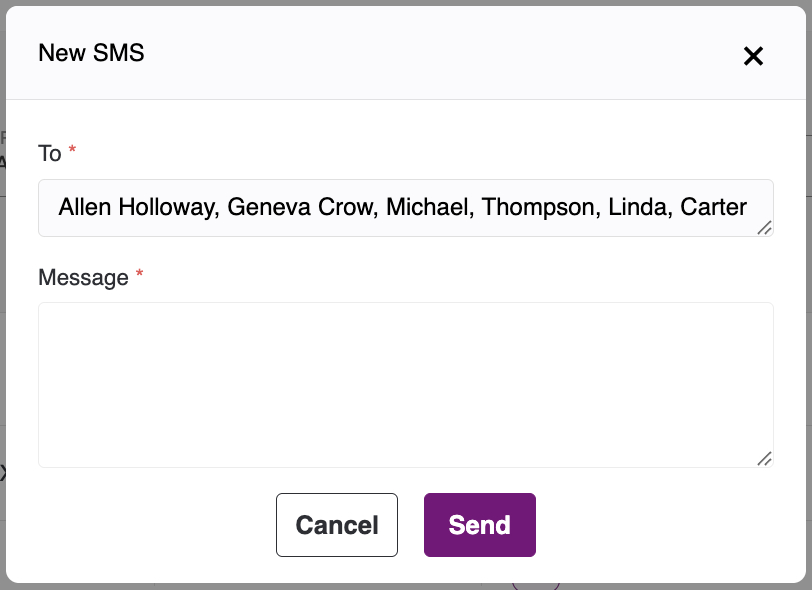
- Please enter your message in the designated field and click the Send button. The message will then be delivered to the intended patient.
- If you sent the SMS to a single recipient, it will appear in the Messages section. If you sent the SMS to multiple recipients at the same time, it will appear in the Broadcast section, where you can review the SMS for all selected users concurrently.


-
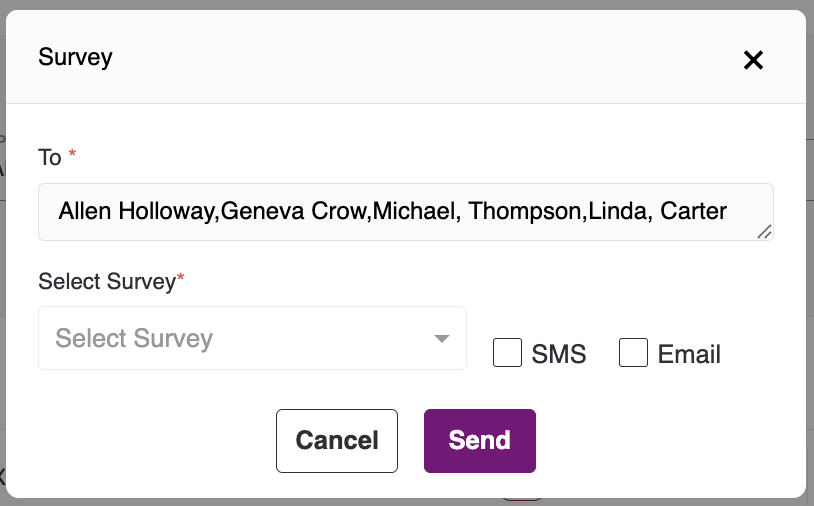
If you click on the Send Survey button, a pop-up will appear. This pop-up allows you to send a message to the all the selected patient and all the To names will be auto-populated.
-
Please select the survey, check the box to send it via SMS or Email, and click Send. The patient will then receive the survey via SMS or Email, based on the option you select when sending.

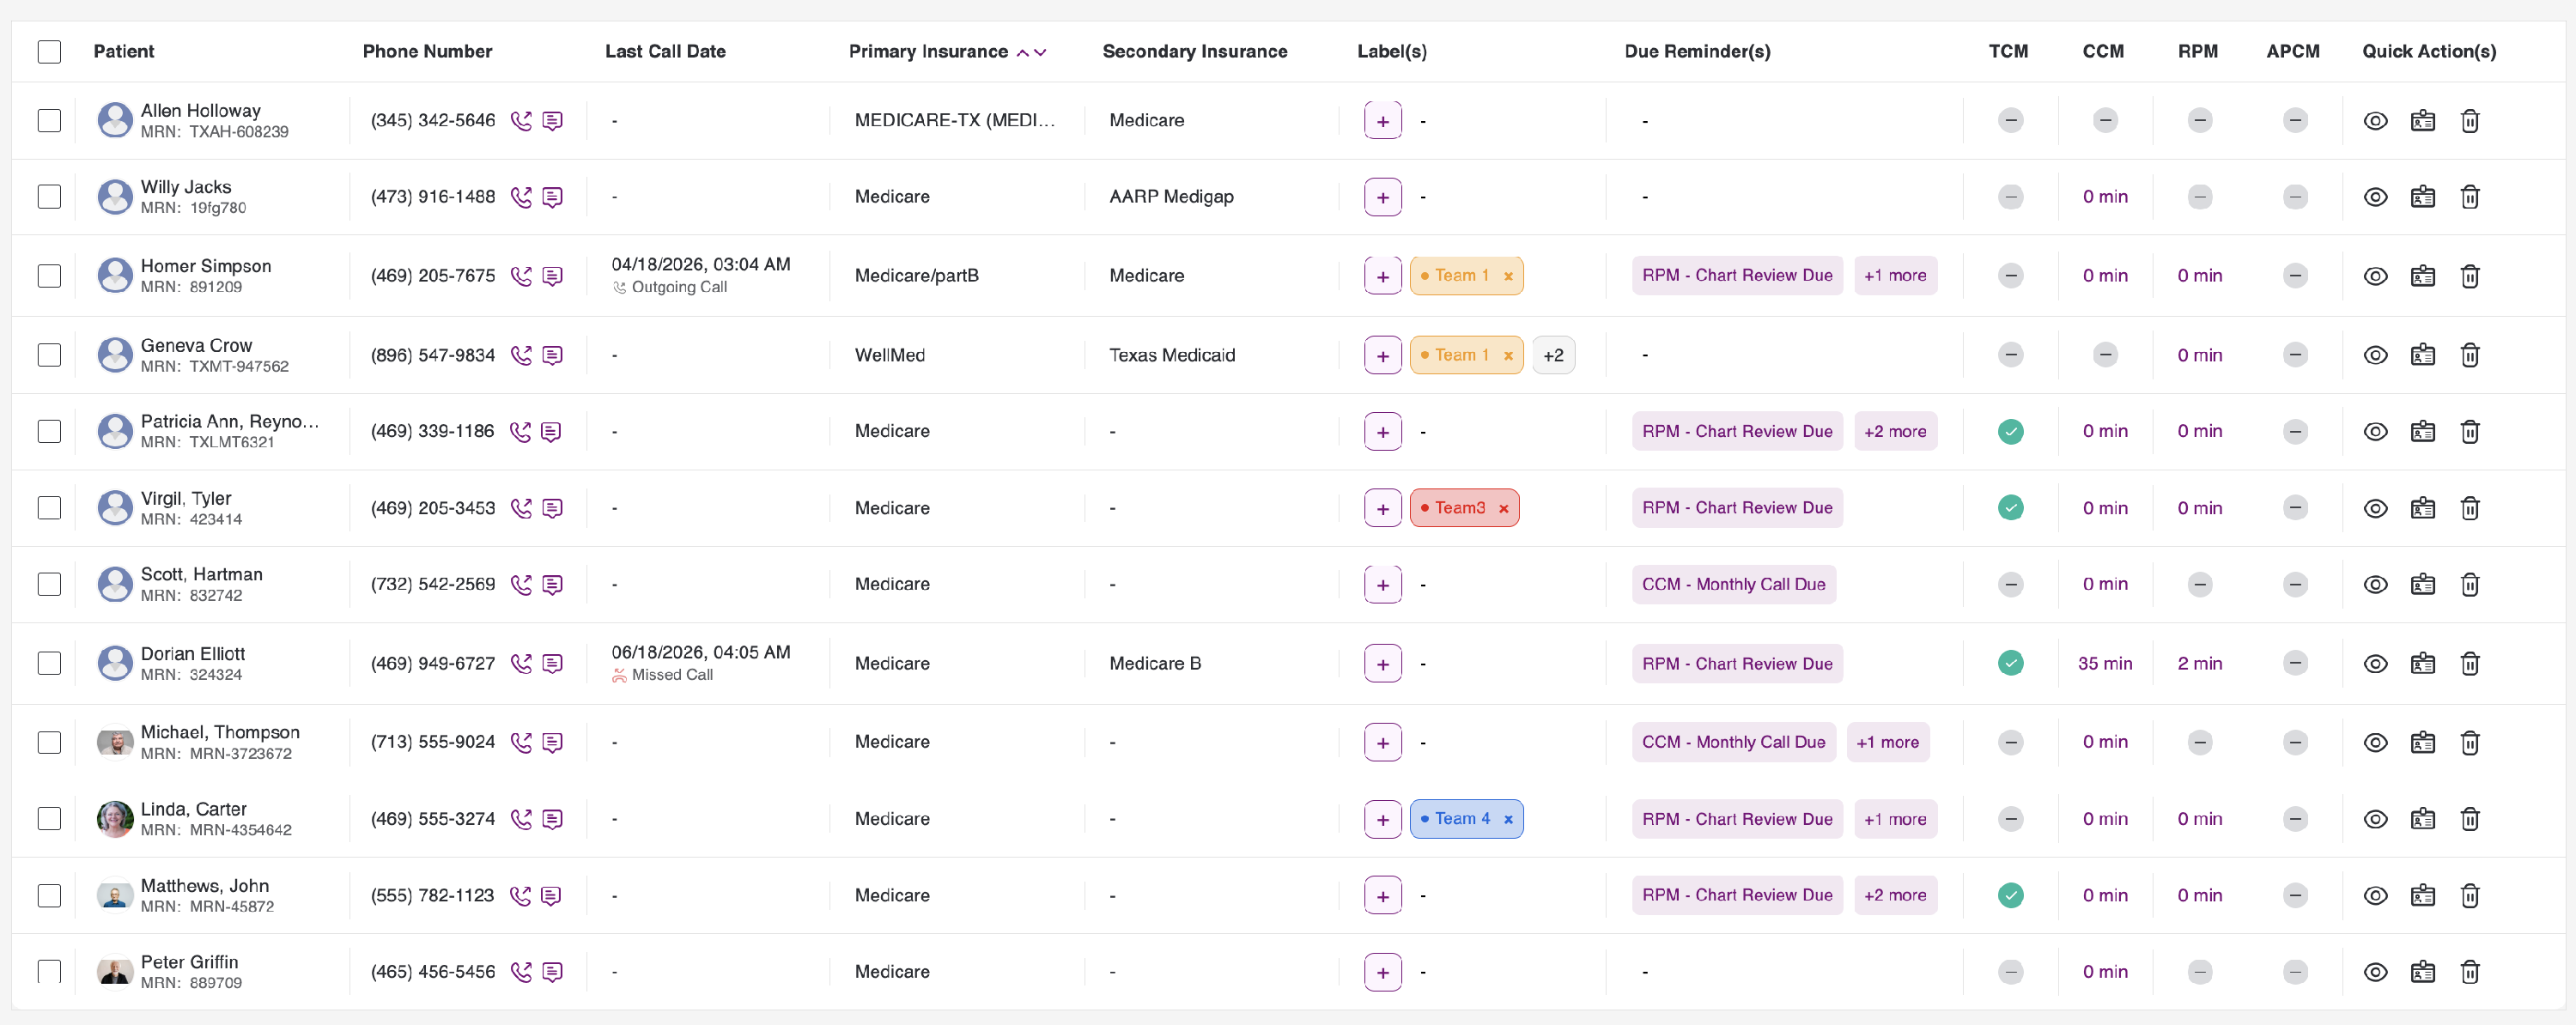
Patient Listing Table:
- Clicking the Patient Column in the patient listing for any record will take you to the dashboard for that specific patient.

Phone Number Column:
In the Patient Listing, when you click the call icon, you can place a call to the patient. You will see a pop-up that prompts you to choose a service name (for Clinical Time).

- Upon selecting the service, the call will be initiated, and it will be recorded.

- You can see the call duration and the recording in the Call & SMS section. There is also an option to download the call records. To download the recording, click on the more icon and from there you can download the recording.

- In the Patient Listing, when you click the message icon in the mobile number column for any record, a pop-up will appear.
-
This pop-up allows you to select the service type under which you would like to add clinical time for this SMS.
-
Once you select the service type, a pop-up will appear to allow you to send a message to the specific patient.
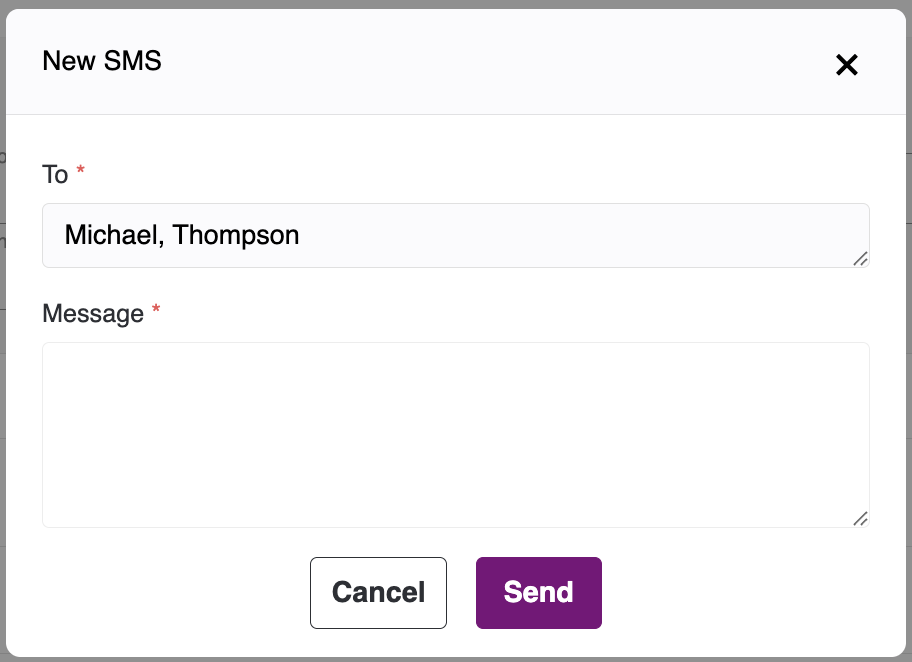
- Within the pop-up, the recipient details will be generated automatically. Please compose your message in the designated field, and then proceed by clicking the send button. The corresponding message will subsequently be delivered to the respective patient.


Last Call Date:
Here, we can review the last call record regardless of whether it is incoming or outgoing. We also provide the ability to sort by date by clicking on the column name.
Primary & Secondary Insurance Columns:
In the primary insurance column, you will find the insurance plans that have been marked as primary. These will be considered the primary insurance. If there is a secondary insurance plan, it will be listed under the secondary insurance section. Both insurance columns can also be sorted by clicking on their respective column names within the table.
Label's Column:
Labels help you categorise, filter, and manage patients efficiently. Once a label is created in the system, it becomes available globally to be assigned to any patient.

1. How to Create & Assign a Label
By default, patients do not have labels assigned. To add one:
- Step 1: Locate the Label column on your patient dashboard.
- Step 2: Click the
+(Plus) icon in that column. A side panel containing the patient's data will slide open. - Step 3: Click on the dropdown menu inside the panel.
- Step 4: Type the desired name for your label.
- Step 5: Select a label colour from the options below the text field.
- Step 6: Click Save. The label is now created globally and assigned to this specific patient.
Note: You only need to create a label once. After it is created, it will appear in the dropdown menu for all other patients; you just need to select and assign it.

2. How to Remove a Label
If a label is no longer relevant to a patient, you can unassign it instantly:
- Look at the assigned label on the patient's profile or row.
- Click the
X(Remove) icon located at the end of the label badge.

3. Filtering Patients by Labels
To quickly find specific groups of patients:
- Navigate to the Labels Filter located above your patient list.
- Select one or multiple labels from the filter to narrow down your dashboard view to only show patients with those specific tags.
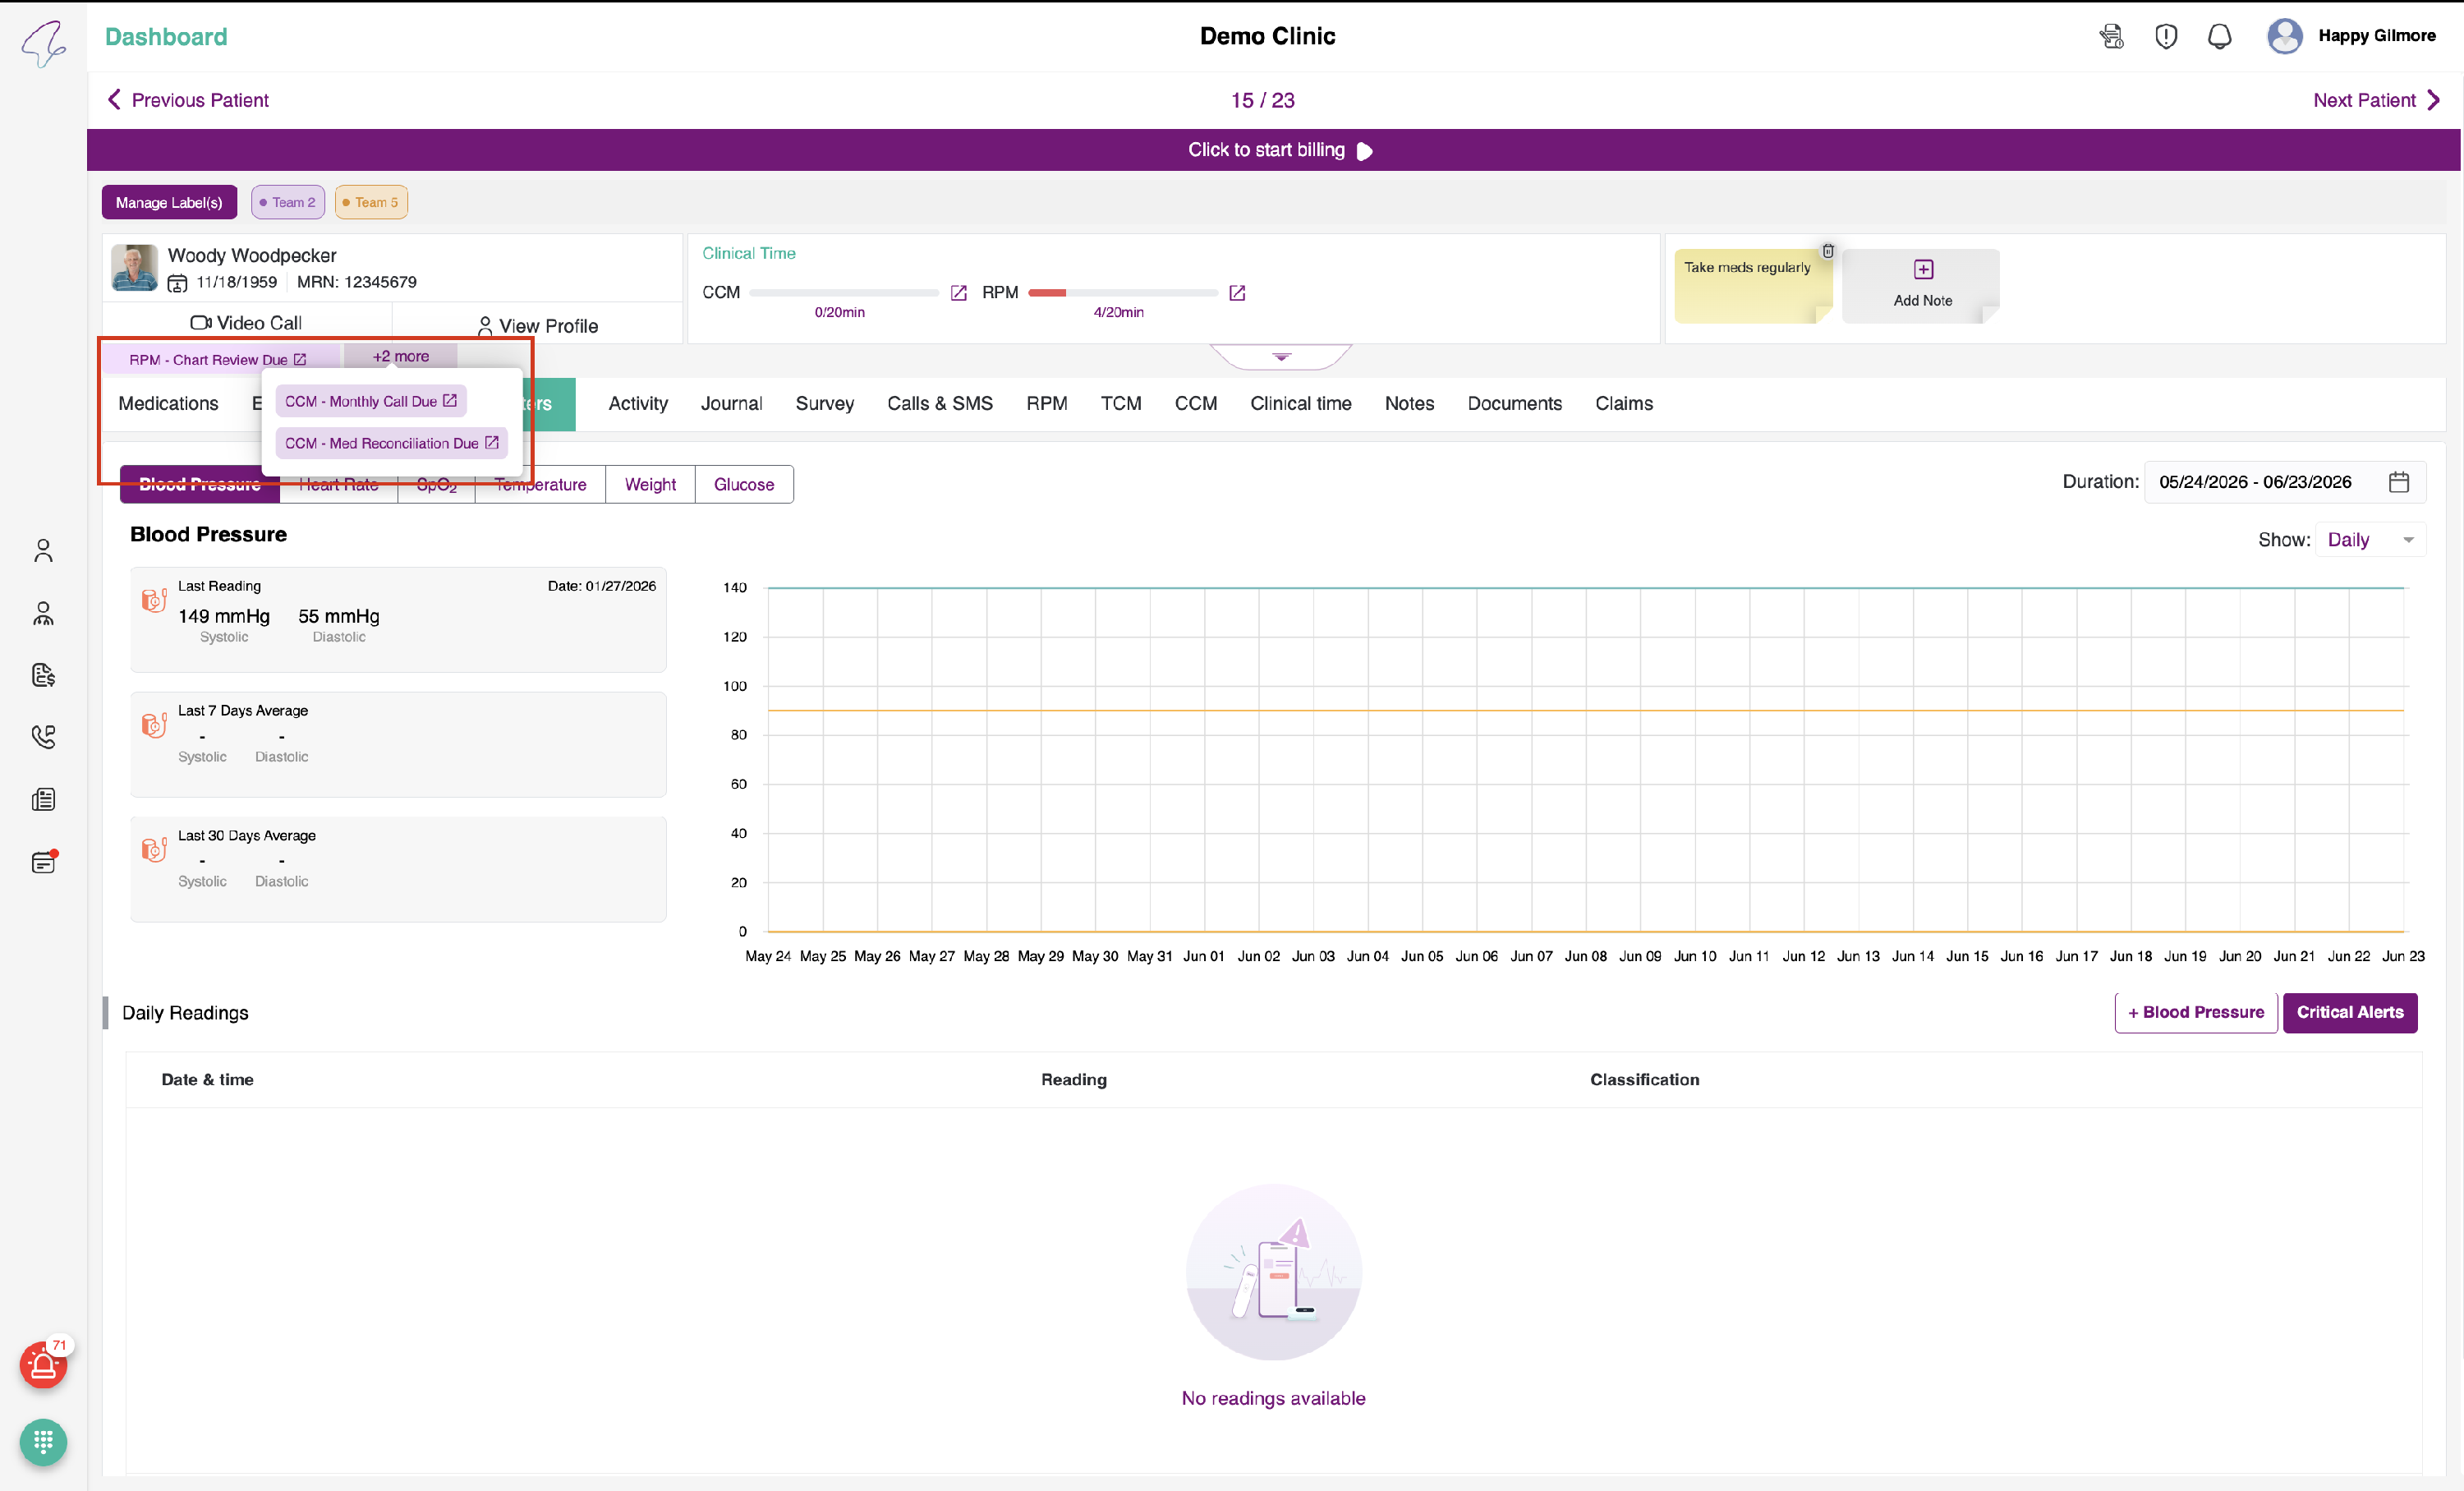
Service Due Reminders:
- On the patient list, the service due reminders are visible in the table.

-
When we click on the Button we will navigate to that particular patient from there we have perform some action to remove the due reminder.
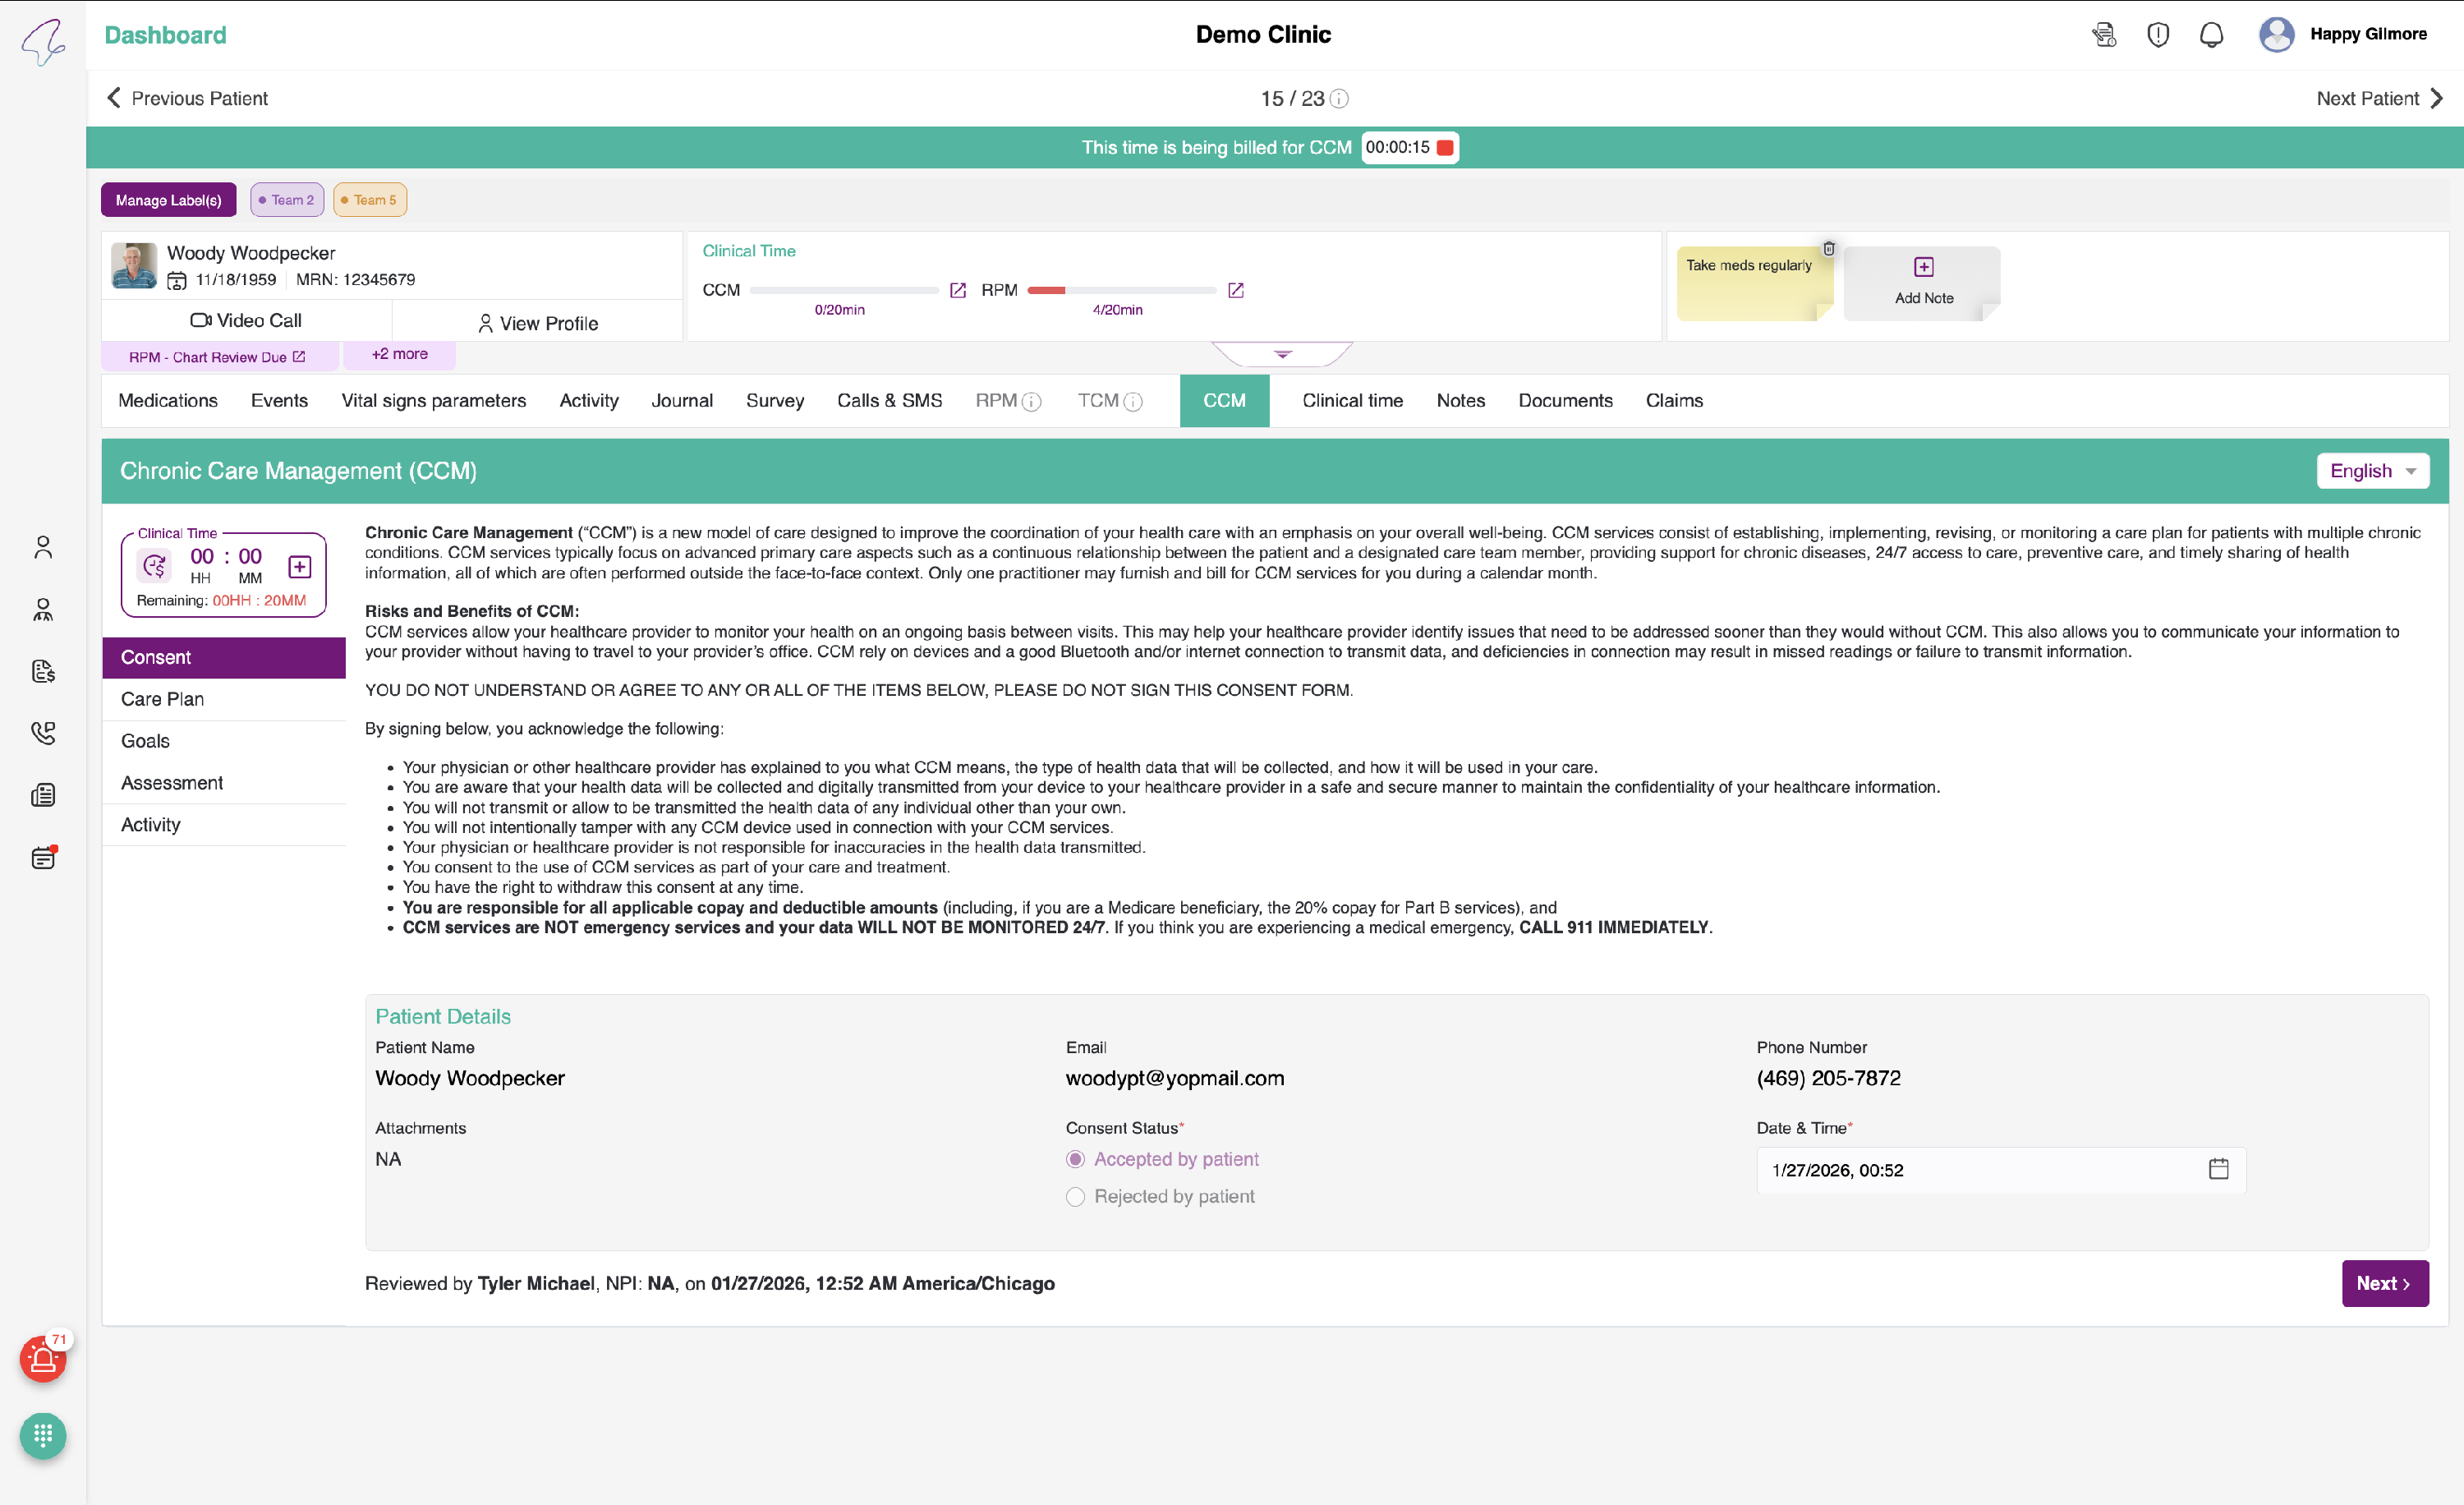
1. CCM Monthly Call Due - This is based on the clinical time. If the last CCM clinical bill was added a month ago and the care plan should be active, then we will show the CCM monthly call due.
- To remove the due reminder, add the clinical time in CCM service by clicking on the + icon.
- Upon clicking on it, you will get the popup model where you can add clinical time.


- Once the clinical time is added for the CCM service, the due reminder will be removed.
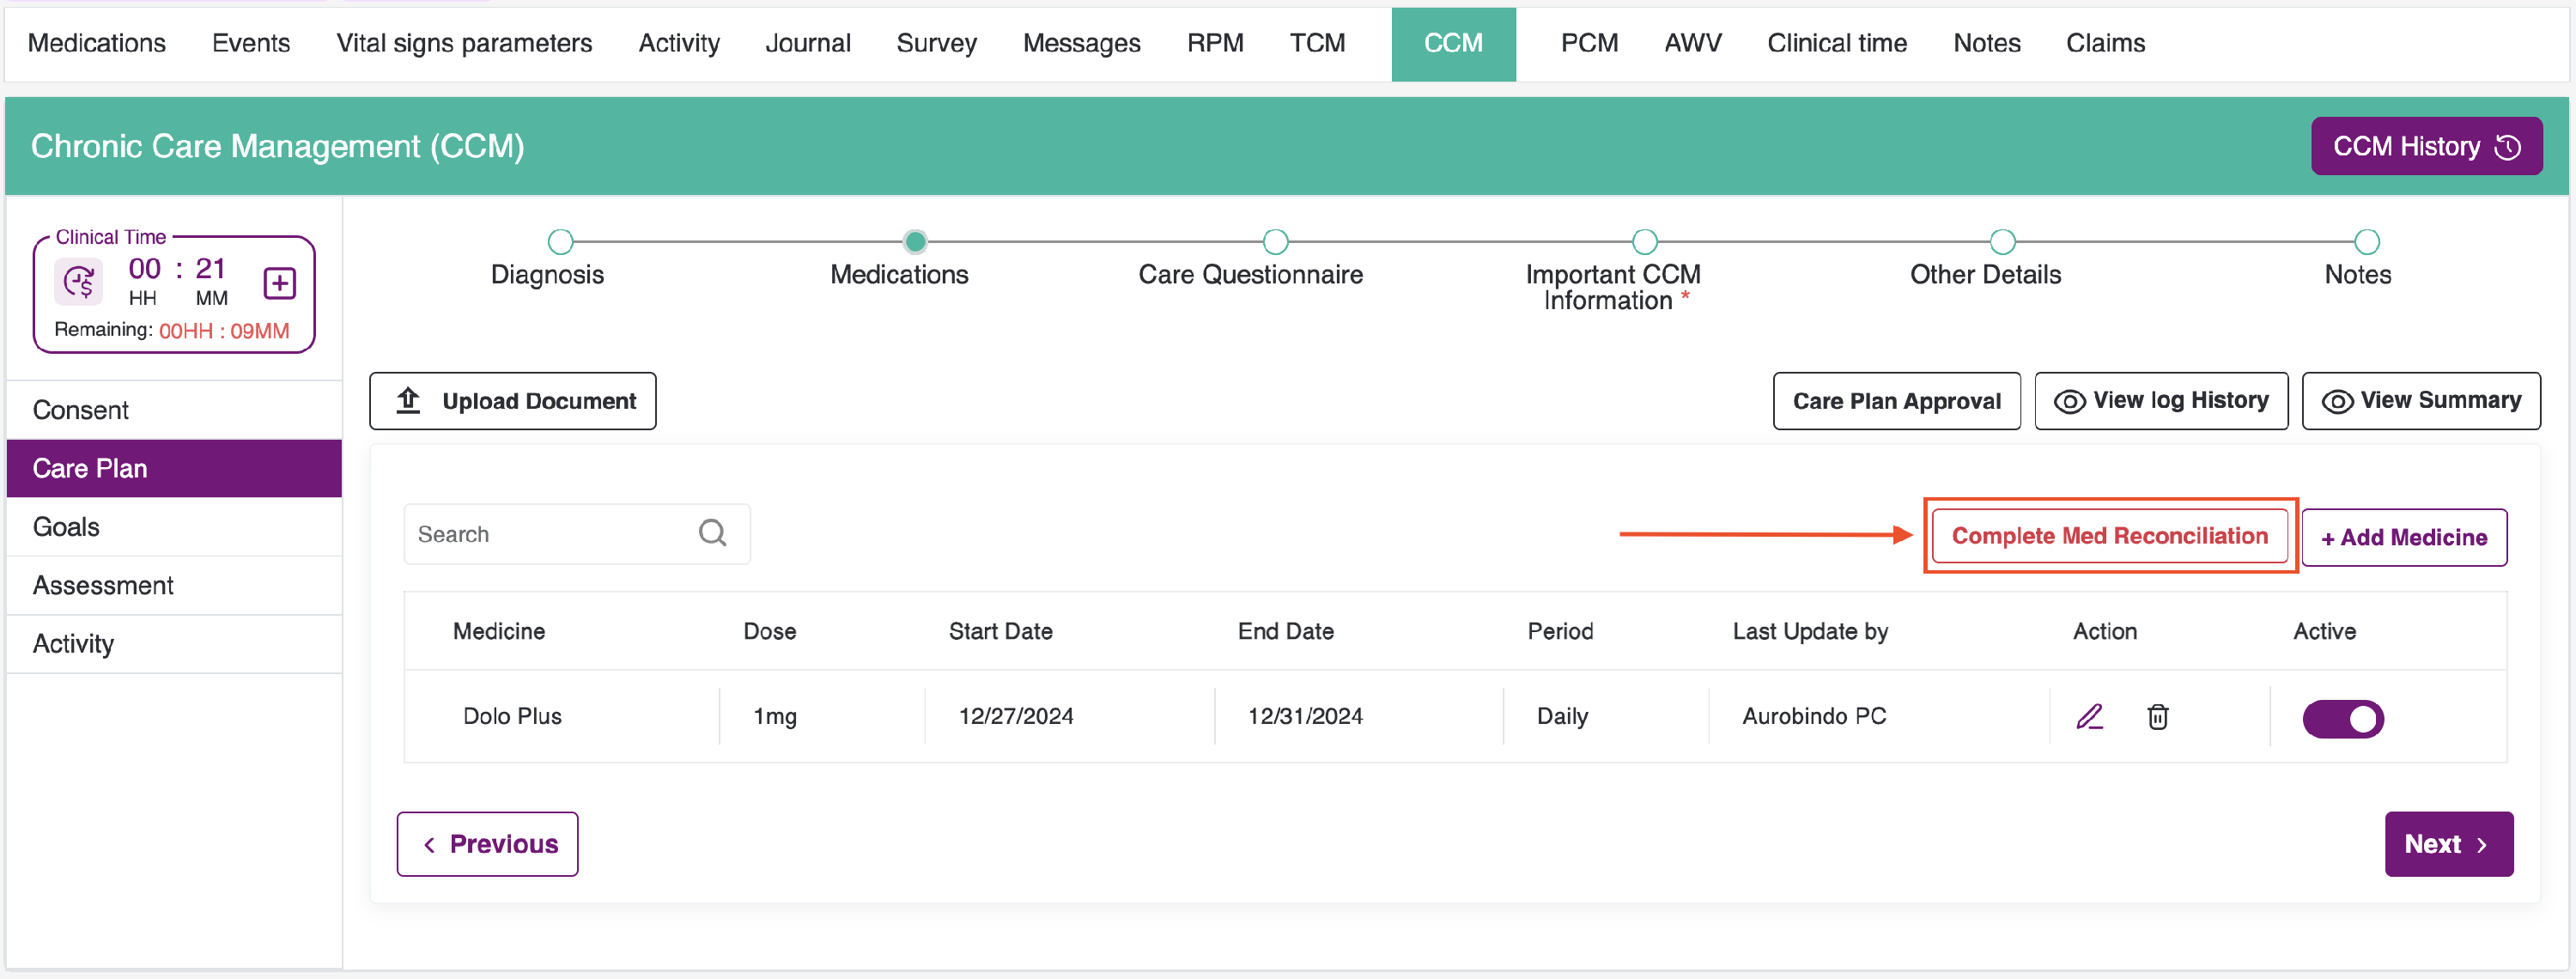
2. CCM Medication Reconciliation Due - This is based on the medication. We show this as due for every quarter, starting from the time the care plan is added and the care plan should be active to show the CCM medication reconciliation due.
- Once we click on the CCM - Med Reconciliation Due button you will be redirected to the patient CCM care plan medication tab.
-
In the medication Tab you will be RED Button Complete Med Reconciliation.
-
Upon clicking on it, a popup modal will be opened, and you have to give a note in that. Once you click submit.
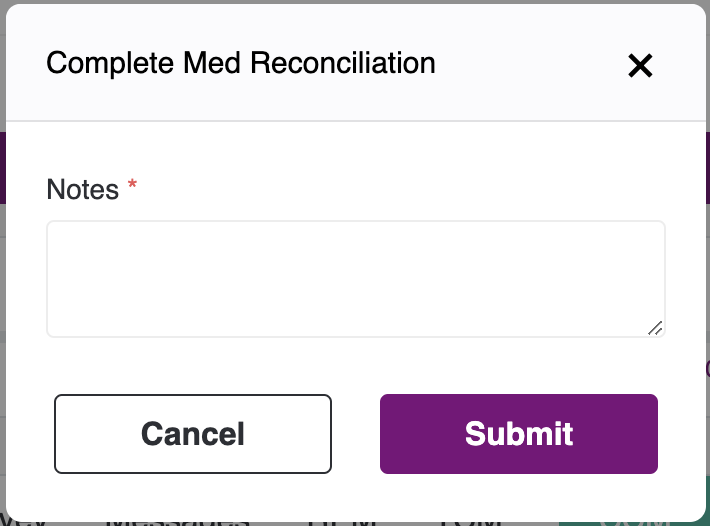
- Once it is submitted, 5 minutes of clinical time will be added as "Medication Reconciliation" for that patient, and that record will be reflected in the Clinical Time tab.
- Once the time is added, the due reminder will be removed on its own.


3. CCM Care Plan Update Due - This is based on the care plan activities. If there has been no action in the care plan for the last one year, or based on the last updated date of the care plan and we should have the care plan active to ensure it is up to date.

- We need to update the care plan in order to remove the Due Reminder.
4. FRA Due - This is based on the latest FRA date after the care plan is taken. If the latest FRA was given more than one year ago and the CCM Care plan is active, then we will show the due.

- We need to add the FRA in order to remove the Due Reminder.
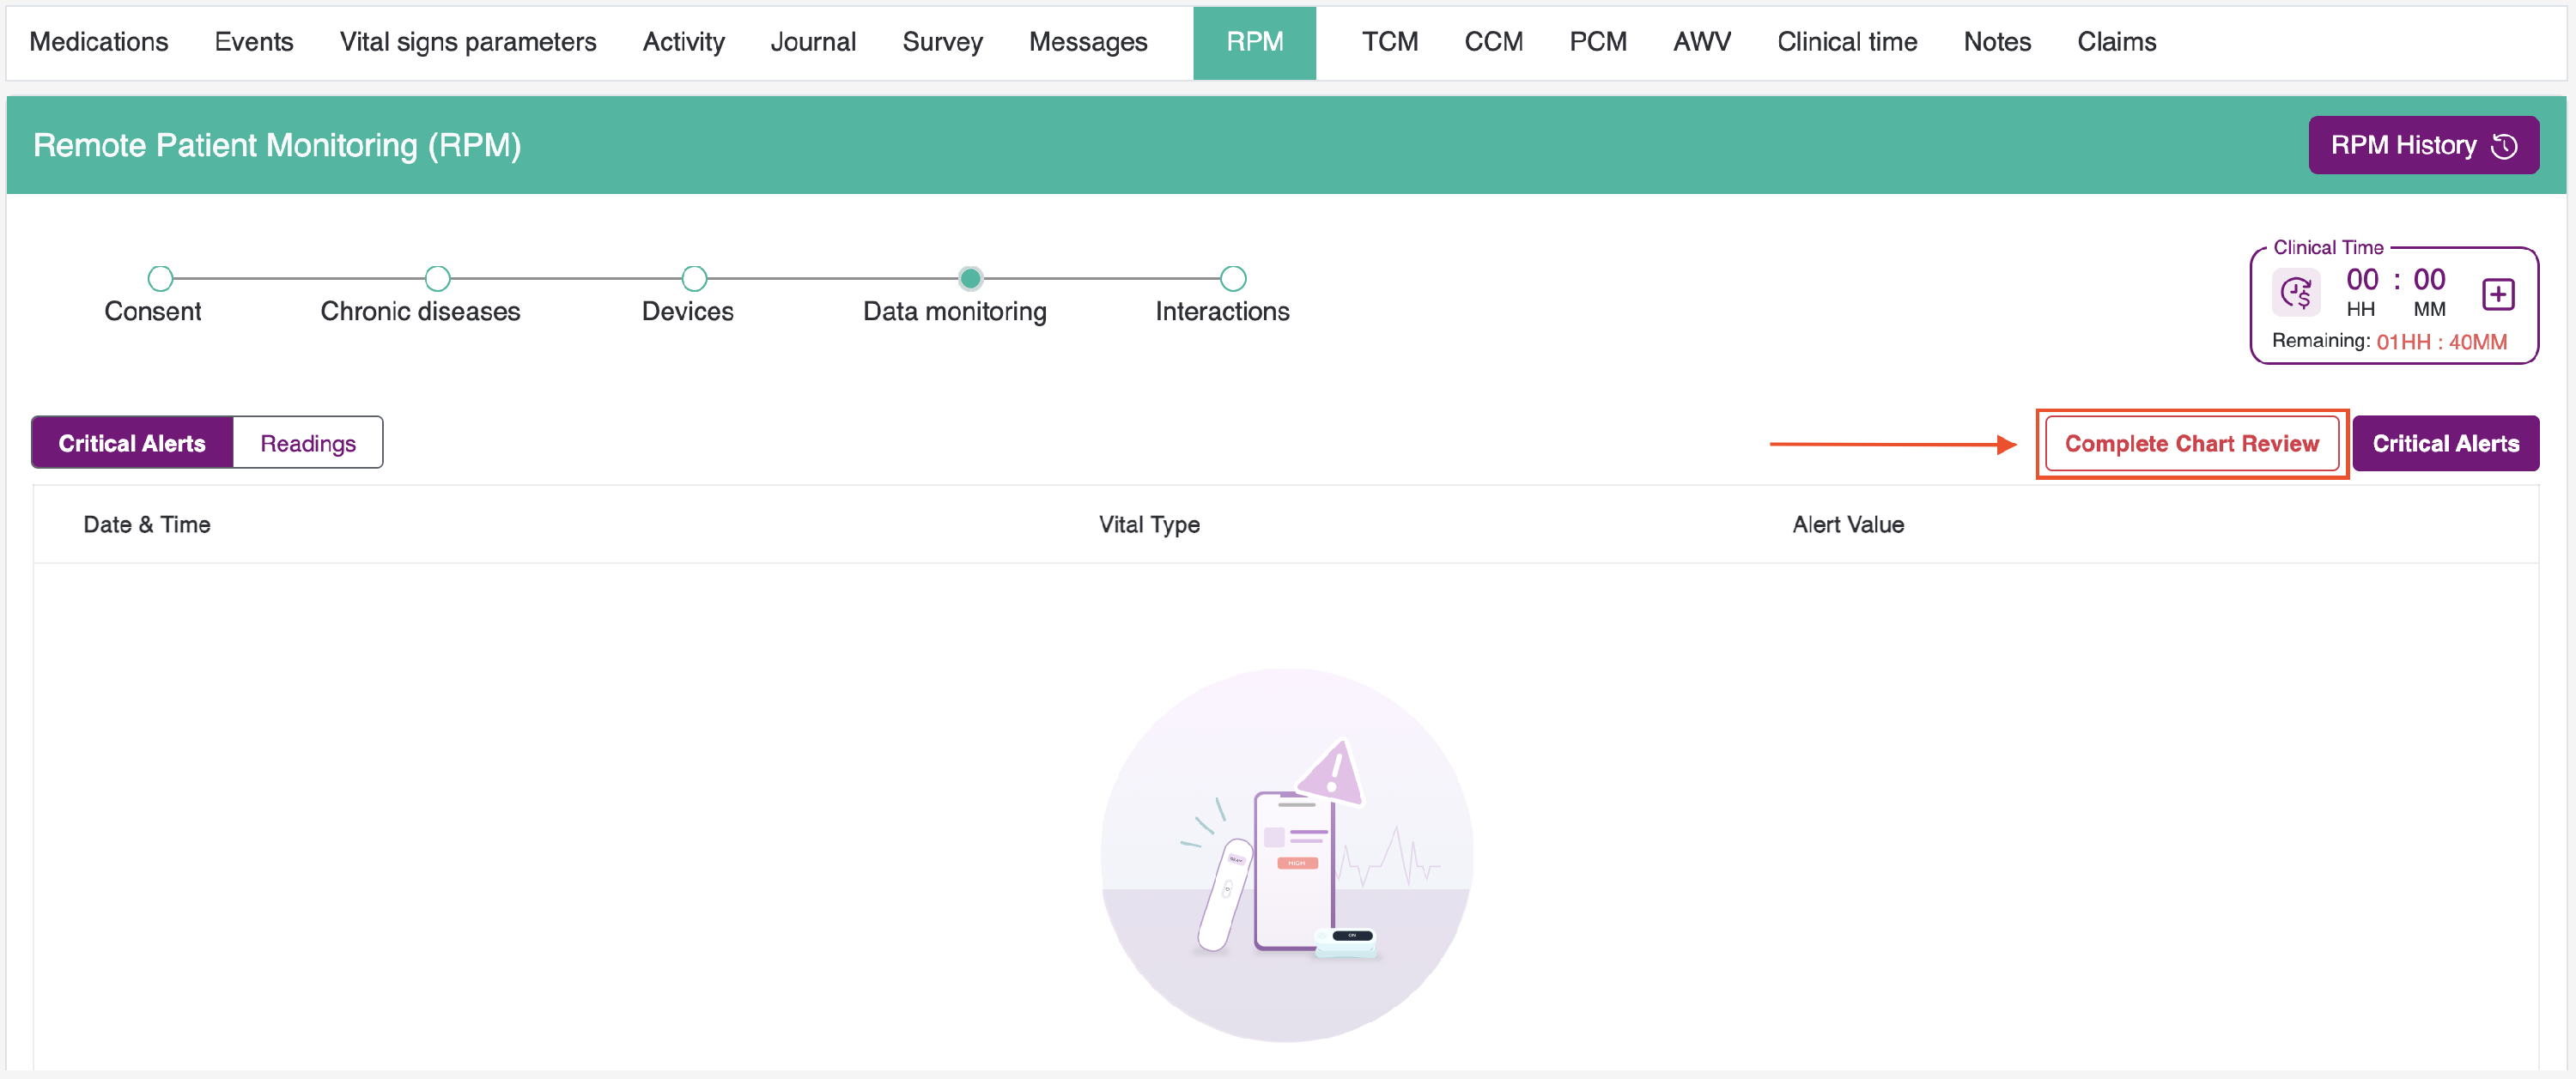
5. RPM Chart Review Due - This is a weekly review for RPM service. We will get this due every week after the RPM care plan is taken, and we will continue to receive the due every week as long as the RPM service is active.
- Once we click on the RPM - Chart Review Due button you will be redirected to the patient RPM Data monitoring tab.
-
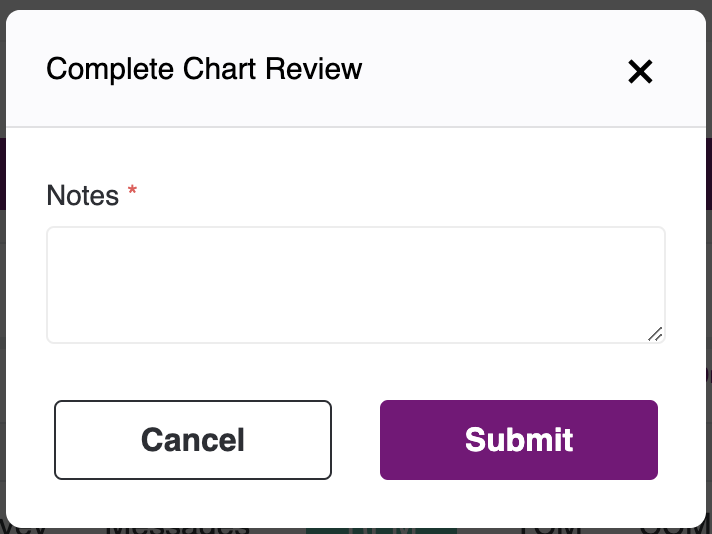
In the Data monitoring Tab you will be RED Button Complete Chart Review.
-
Upon clicking on it, a popup modal will be opened, and you have to give a note in that. Once you click submit.
- Once it is submitted, 5 minutes of clinical time will be added as "Chart Review" for that patient, and that record will be reflected in the Clinical Time tab.
- Once the time is added, the due reminder will be removed on its own.


6. PCM Monthly Call Due - This is based on the clinical time. If the last PCM clinical bill was added a month ago and the care plan should be active, then we will show the PCM monthly call due.

- To remove the due reminder, add the clinical time in PCM service by clicking on the + icon.
- Upon clicking on it, you will get the popup model where you can add clinical time.

- Once the clinical time is added for the PCM service, the due reminder will be removed.
Services:

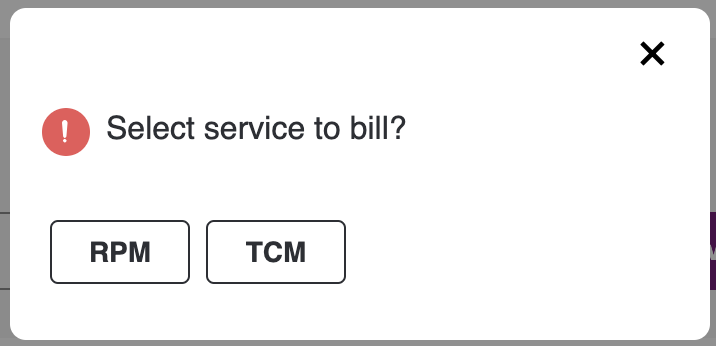
When you click on any service in the patient listing such as CCM, RPM, TCM, PCM, or AWV it will display the following pop-up.

If you select Yes, the timer will begin (billing will start), and you will be redirected to the corresponding service in the patient dashboard. If you select No, you will be directed to that specific service in the dashboard without any billing.
For Example:-
-
If you have selected the CCM service and confirmed that you would like to bill the time, you will be redirected to the service with the billing timer enabled. This step will limit access to other services, because concurrent billing for multiple services such as PCM, TCM, RPM, or AWV is not supported.

-
If you wish to discontinue the billing service, you can select the STOP icon located at the top near the header as outlined below.


- Once you STOP the billing, the other services will be enabled, and the bill will be reflected in the clinical time billing activity section.
Quick Actions:
- By selecting the Eye icon, you will be redirected to the corresponding view of the patient’s details.

- When you click the Card Icon, you will be directed to the corresponding patient dashboard.

- When you click the delete icon next to a specific record, a confirmation pop-up will appear. You will be prompted to confirm your action, with the option to select 'Yes, Delete' or 'Cancel'. If you choose 'Yes, Delete', the patient record will be permanently deleted. If you select 'Cancel', the record will remain displayed in the listing.

Critical Alerts card:
- Within the Critical Alerts card, users may view the total number of critical alerts that have been reported, alongside an arrow icon.

- After clicking on it, you will be redirected to the Event tab. Within the Event tab, please select the critical alerts sub-tab.

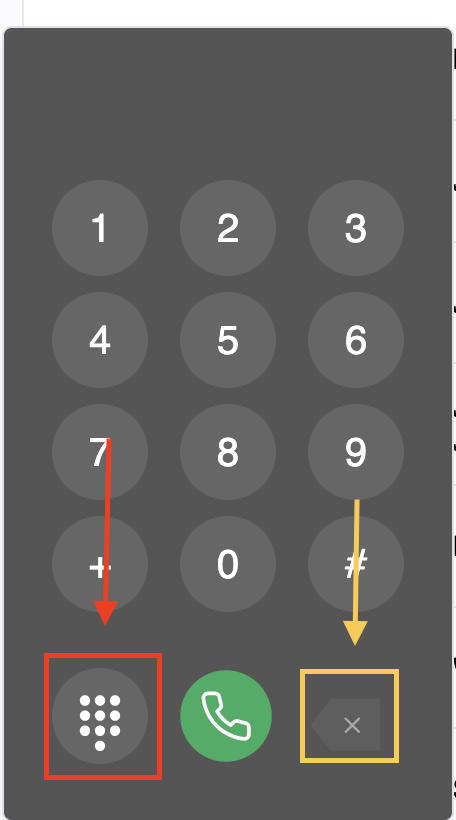
Dial Paid:
The Dial Paid feature enables us to call any user.
-
Click on the "Dial paid" icon shown in the image below. Upon clicking on it, you will be directed to enter your desired number to call.
-
Once you enter the number, the delete number function will be enabled, which is indicated with a yellow highlighter, and the Close Dial Paid Icon is indicated with the red highlighter in the image below.
Delete Patient Listing
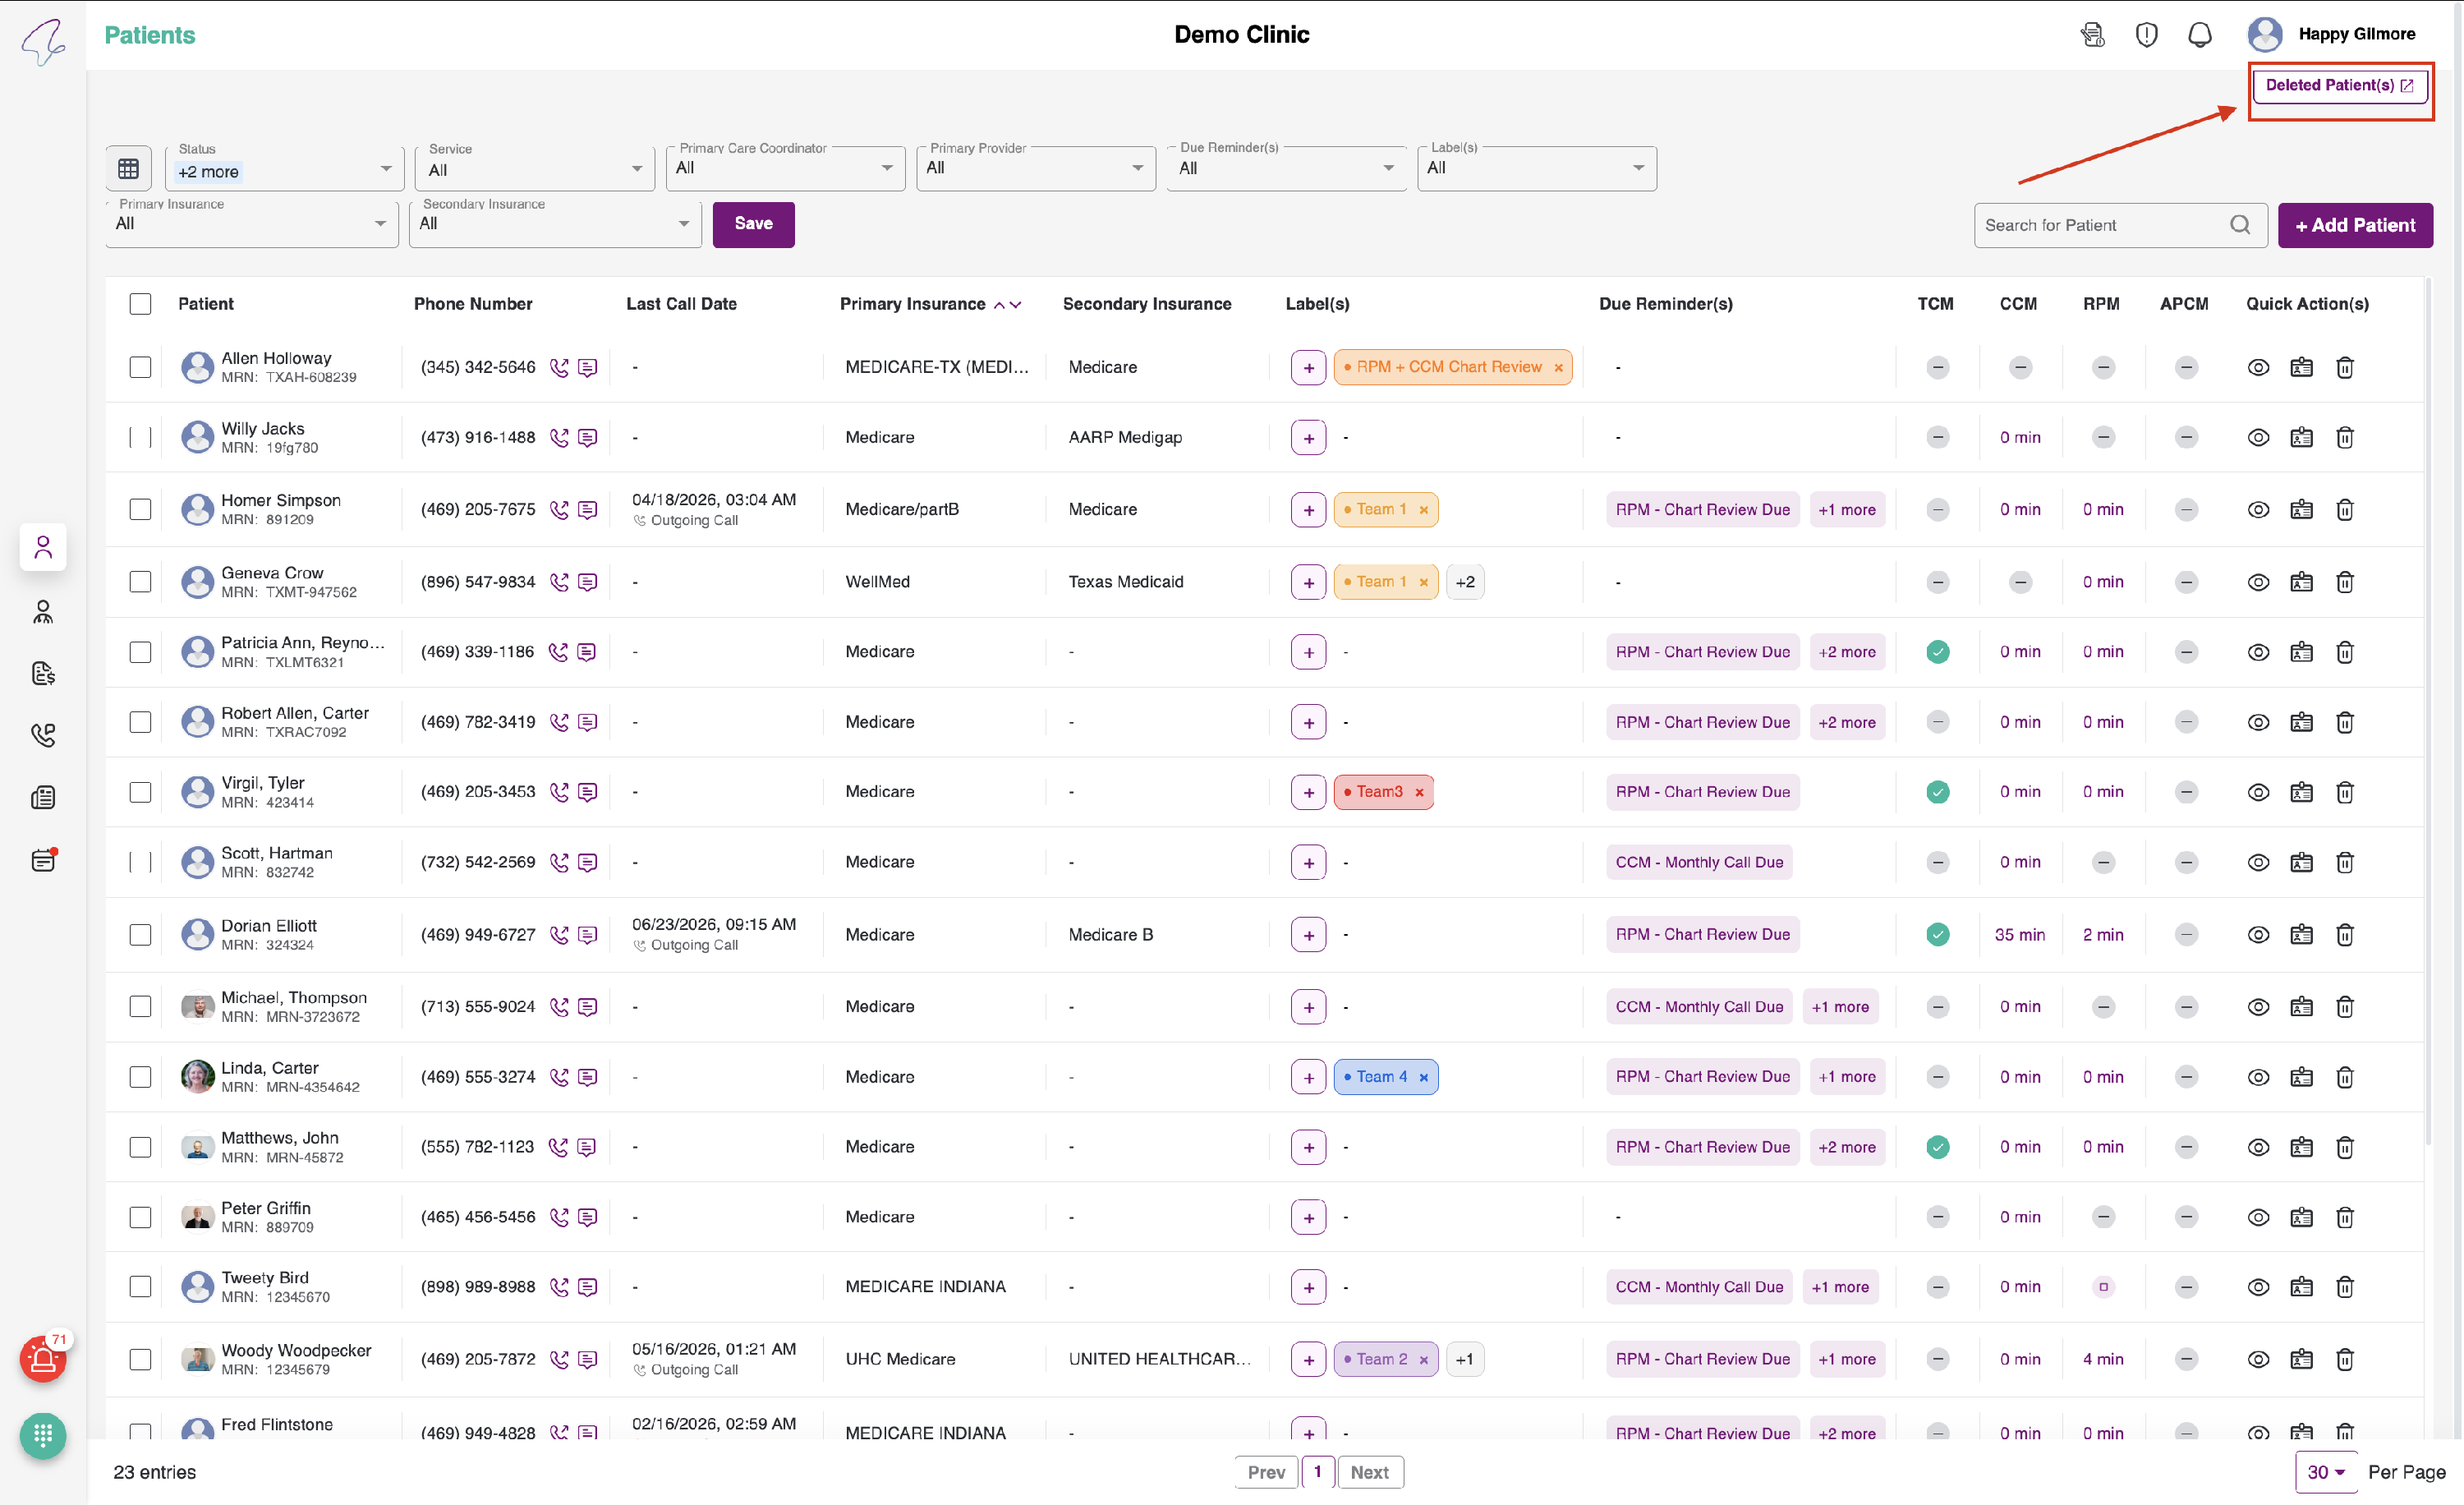
Whenever a patient is deleted, it will be shown in the deleted patient listing. To view the deleted patient listing, click on the "Delete Patient" text. You will find the button on the top right corner in the patient listing table, as shown in the image below.
- When you click on the button, you will see the list of patients to delete, without any filters.
- If you want to reactivate the patient, simply enable the toggle button. Once the toggle is enabled, the patient will appear in the patient listing tab.


- If you want to see the active patient listing, then click on the Active Patient Button which is on the top right corner, as shown in the image below.